FROM NO. 33124461 Rev. A MODEL NO. : UP OPERATOR’'S MODEL NO. UP MANUAL T1800 GENERATOR T2500 GENERATOR COPYRIGHT © ALL RIGHTS RESERVED The Toto Company — 1984 MINNEAPOLIS, MN 55420 — U.S.
[t IMPORTANT NOTICE— Please read this manual and follow its instructions carefully, To emphasize special information the words WARNING, IMPORTANT and NOTE carry special meanings and should be carefully reviewed, WARNING: The personal safety of the operator may be involved. Disregarding this information could result in injury to the operator.
FOREWORD The TOR ® generators, T 1800 and T2500, use a forced air-cooled, 4-cycle engine with side valves. They feature quiet operation, excellent durability and stable performance, The revolving field type self-exciting generator produces an AC voltage which is controlled at a constant level by an AV.R. (automatic voltage regulator). This manual provides the technical information required for the operating, handling and the routine care of the TOR Generators T1800 and T2500.
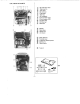
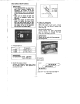
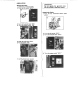
SOP8R0aERRY 2888 258088 & : Ot level alarm lamp + Engine switch : Volt meter : DC terminal : Fuel gauge < Tank cap © AC receptacle « Circuit breaker (AC) : Circuit breaker (DC) + Ol drain plug + it filler cap : Generator : Puffier < Spark fug : Choke lever : Air cleaner : Earth terminal : Fuel cock ever « Frequency adjusting screw : Starter grip : Recoil starter : Tool kit
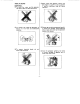
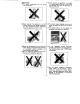
PRECAUTIONS WARNINGS: D To avoid fire, never use the generator near spark, flame or other heat source, @ To prevent fire, keep the generator at jest from any combustible materials, prevent electrical shock, do not touch with wet hands. @ When filling with gasoline, always stop the engine to avoid fire. Do not overfill. if gasoline overflows, wipe off before operation. &) Exhaust gas contains components harmful to people and animals.
IMPORTANT: D To avoid overheating, do not cover during operation. @ Never connect the generator to a wall socket. Doing so may damage the generator and connected electric appliance, injure the operator o result in fire. (@ Never use the generator in rain, snow near water, Doing so will Damage the generator or connected electric appliance and could cause electrical shock, @ Do not wash the generator with water. Doing so will damage the generator. Never operate the generator on unstable or uneven ground.
PER-OPERATION CHECK IMPORTANT: * This GENERATOR has been shipped from factory without oil Therefore, be certain to fill the GENERATOR with oil according o the following instructions before use. * Make sure to check oil level and add oil as necessary therefor use everyday, * When the engine oil level comes down to below the lower level tine, the alarm lamp turns on and the engine stops automatically, Add the engine oil up to the specified line and start the engine again. 1.
(Single grade) FREQUENCY ADJUSTMENT E‘1> This GENERATOR has been shipped out SAE # from factory adjusted for frequency. Also, voltmeter-attached model cannot be adjusted unless using a tachometer, tow Accordingly, when they have to be adjust ed, consult your TOR dealer, Temperature 4. Filling gasoline : Tank capacity : T1800 1.86gal (7L) T2500 201 gal. (11 L) 6. Check the fuel level IMPORTANT: Check the fuel level with the generator on level ground. Be sure to check the fuel level before refusing.
OPERATION Starting the Engine 1. Check the oil and fuel levies. 2. Tum the AC switch “OFF.” 3. Tum the fuel cock lever "ON.” 4. Turn the engine switch “ON.” 6. Push the choke lever down. 8. Phil the starter rope 7. Lift the choke lever upward, IMPORTANT: Do not operate the generator more than 30 minutes at maximum output. Stopping the Engine 1. Turn off sny connected electric appliances, 2. Turn the AC switch “OFF " 3. Turn the fuel cock lever “OFF.” 4. Turn the engine switch “OFF.
RANGE OF APPLICATION Scope of application | wham malfunctions or more Appliance current is required than the T1800 T26500 capacity of the generator. AC circuit breaker wilt automatically be wired off. s 120V 60Hz 150KVA | 2.50KVA AC e mom e e ] Those electric appliance incorporating @ motor require usually a power three times the minimum rated input. Hence, those appliance whose wattage is within the ranges listed on the left can be connected to the generator.
| APPLICATIONS @ Power source for washing machine. The TOR generator has a wide range of applications. The following examples are but & few of them, E}U IMPORTANT: P The power requirement of various ¥ electrical equipment varies. Check the 1 4 rating before use, o (D Power source for chain saws. (B) Power source for mowing machine. = i\ t‘iv T @ Power sours for motor-driven tools. Power source for electric plane. (@ Power source for vacuum cleaner.
@ Illumination for mobile sales. 2 For charging battery. -1Q IMPORTANT: Before starting operation, read the labels and tags attached to the generator carefully and thoroughly. IMPORTANT: Before you start aerating electrical appliance, be sure to check specifications as posted in the label affixed on tha equipment. Make aura that specifications of the electrical appliance match with haste of the generator.
D.C. Applications HOW TO CONNECT POWER CORDS A.C. Applications VOLTAGE | TOTAL W Models &HZ WATTAGE T1800 &i 120V 60Hz | 1.50KVA 120V 60HZ | 250KVA Exclusively for battery charge IMPORTANT: © Never connect the generator to a wall socks. This could cause an overload and seriously damage the generator, NOTE: © Make sure the pilot light sure to plug the cord in completely. i Important: @ Use the D.C. terminals for charging 12V automotive type catteries only.
‘o charge battery 1. 2. Start generator. Connect battery to generator. Astor battery is charged 1. 2 Turn off generator before disconnecting battery. Disconnect battery by removing leads from battery first. WARNING: Charge battery in a well-ventilated ares because gases are produced while battery is being charged. Do not inhale the gases because nausea may result. Alas, the gases are explosive.
@ Ol elev! alarm Jar mp Fuel strainer ® Receptacles @ Fuel leakage @ High tension cord damage D Fuel cock lever @ Abnormal noises and vibrations ~13—
PERIODIC INSPECTION interval Every initial [Every [Every] 300 100 Hes. ov Hrs. | Hrs. | Hes, | One No.| tem yer 1 | Elaine oil © 0 replacement 5 | Clean the spark o plug Clean the spark 3 arrested © Nisan the air . 4 cleaner adamant Q 5 Clef\ the fuel o strainer Check tightness 8 | thousandfold o nuts 1. Engine oil replacement See page 5, 2. Clean the spark plug A dirty, sly or sooty spark plug will adversely affect engine performance. Clean it periodically, @ Remove the spark plug.
@ Adjust the spark pig gap. J 0024 ~0.28n. {06 ~0.7 mm} 3. Clean the spark arrested The exhaust system muffler assembly contains a spark arrested that must be cleaned periodically to remove accumulated carbon particles, WARNING: Be sure that the muffler cover and the muffler assembly are not hot when tout begin to perform the clean out operation.
Squeeze the element dry. {® Oil the element with engine oil. Squeeze excess oil from the element. Instant the element carefully. D IMPORTANT: © When used in dusty area, the air cleaner should ba serviced more frequently, O When installing the lament, make sure that the element seals all of the way around its age. 5, Clean the fuel strainer (D) Remove the fuel strainer. WARNING: Be fora removing the fuel strainer cup, make certain that the fuel cock lever is in the “OFF" position and the engine is not hot.
e LONG-TERM STORAGE @ Remove the spark plug and pour 1 or 2 tablespoons of engine cil into spark plug hole. Reinstall the spark plug. (D Gently pull the recoil starter, until you start feeling a drag. Then, stop pulling of the recoil starter, @ Drain all gasoline from the fuel tank and carburetor. Follow ai! gasoline handling warnings. @ Clean the air cleaner element. See page 15 @ Clean the fuel strainer. Wash the fuel strainer parts in nonflammable cleaning solvent.
Thoroughly wipe off dust or dirt from the top of the generator body. (@ Cover the generator body with a card: board box or a vinyl cover, etc. dD As a storage site, select a place free from dust, with low humidity. SPECIFICATIONS T1800/T2500 AC Rated voltage (V) Frequency {H2}. . . 120 {T1800/2500) 60 (T1800/26001 Rated currant 125 (T1800} 21.0 (72600} Rated output (VAL . . 1.50 {11800} 250 (T2600) Mox. output (KVA) . . 1.80 (T1800} 2.
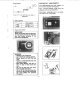
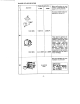
WIRING DIAGRAM (T1800) Part Name: . Terminals . 4P couplet . Field coot Sub coil Main coil Diode . Condenser . Brushes . AV.R. {Automatic voltage regulator} . Voltmeter . Output . AC switch (No fuse breaker} . DC circuit breaker . DO terminal . Engine switch . 6P couplet . Transistor control unit . Oil label alarm light . il level alarm unit .
WIRING DIAGRAM (T2500) k4 Part Name: . Terminals . 4P couplet . Field coil Sub coil . Main coil Diode . Condenser . Brushes A.V.R. {Automatic voltage regulator) . Vito meter . Output . AC switch [No fuse breaker) . DC circuit breaker . DC terminal . Engine switch . 4P couplet . Transistor control unit . Ot level alarm light .