
Addendum

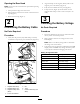


OpeningtheRearHood
Note:Ensurethattheforwardhoodisopenbeforeopening
therearhood.
1.Graspthefrontedgeoftherearhood.
2.Pulluprmlyonthehoodtounseatitfromthehood
clips(Figure1).
3.Rotatethehoodup(Figure1).
2
ConnectingtheBatteryCable
NoPartsRequired
Procedure
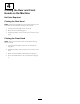
1.Verifythatthepositive(red)cableclampissecurely
connectedtothepositivepostofthebattery(Figure2).
Figure2
1.Negativecableclamp5.Nut
2.Negativebatterypost6.T-bolt
3.Negativebatterycable
(black)
7.Positivecableclamp(red
cable)
4.Frontofthemachine
2.Aligntheclampofthenegative(black)cabletothe
negativepostofthebattery(Figure2).
3.Fullyseattheterminalontothepost(Figure2).
4.Torquethenut(Figure2)andtheT-boltforthe
negativecableclampto678to791N-cm(60to70
in-lb).
3
CheckingtheBatteryVoltage
NoPartsRequired
Procedure
1.Insertthemachinekeyintothekeyswitchandrotate
thekeyswitchtotheRunposition.
2.Wait5minutesandnotethevoltageshownonthe
LEDdisplay.
Note:Refertothebatterychargetabletodetermine
thechargestateofthebattery.
3.Ifthechargestateofthebattery(indicatedintheLED
display)islessthan12.6volts,chargethebattery;refer
totheOperator’sManualforcharginginstructions.
BatteryCharge-stateTable
Volts
BatteryState
12.7andabove
100%charge
12.7to12.6
85to100%charge
12.6to12.4
75to85%charge
12.4to12.2
50to75%charge
12.2to12.0
25to50%charge
Below12.0Fullydischarged
2