
Service Manual


Note: Remember to install the seal with the
lip facing out.
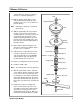
22. With the spindle right side up, install the
small "C" shaped spacer first, then the
long inner spacer. The order of these two
is not critical to the performance of the
spindle, but putting the thin spacer in first
prevents the possibility of the open part of
the spacer dropping down on the long
spacer.
23. Now install the upper bearing and seal.
The upper seal must face inward. Again,
use a seal driver.
24. Lubricate both seal lips with grease and
insert the bearing spacer into the lower
seal.
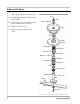
25. Place the bearing shield on the spindle
shaft with the cup up.
26. Slide the spindle shaft up through the
bearing spacer, lower bearing, spacers,
and upper bearing.
27. Install the upper bearing spacer on the
shaft and into the upper seal. By inserting
the upper spacer individually rather than
with the shaft, you will prevent possible
damage to the lower seal.
28. Place the bearing shield, cup down, on the
shaft.
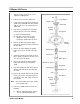
29. Install the pulley hub, square key, heavy
cupped washer, and nut on the top of the
spindle. Torque the nut to 85-110 ft.-lbs.
30. Grease the spindle until grease flows from
the lower seal.
31. Bolt the assembly back into the deck shell.
The screws are self-tapping with a nut
backup on top of the deck. This design
makes it easier for one person alone to
install the spindle assembly and also pro-
vides a method of retention if a hole is
stripped out by overtorquing or repeated
replacement.
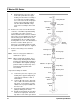
13Spindle Repair Module
Z Master 500 Series
Nut
Square Key
Bearing
Shield
Seal
Bearing
Shield
Spindle
Shaft
Seal
Bearing Cone
Machine “C” Spacer
Bearing Cup
Inner Spacer
Heavy Washer
Pulley Hub
Seal Spacer
Spindle
Housing
Seal Spacer
Outer Spacer
Bearing Cup
Snap Ring
Bearing Cone