
Service Manual


rebuilt, look for proper installation of
the lower seal.
C. Clean the bearings and look for any
pitting or flaking on the rollers.
D. Roll the clean bearings in your hand
and feel for rough spots. If the bear-
ing catches or the rollers get stuck in
the cage, replace the bearing.
Note: With this spindle design, both bearings
and bearing cups must be replaced as
a set. Even if only one of the two bear-
ings is damaged.
13. If replacing the bearings, use a punch and
hammer to drive both of the bearing cups
out of the spindle housing. Also, remove
the large diameter spacer at this time.
Caution: Do not use old bearing cups with
new bearings. This may cause pre-
mature bearing wear and result in
failure.
14. A large snap ring is still inside the spindle
housing. It locates the matched bearing
set in the bore of the spindle housing.
There is no need to remove and replace
this snap ring.
Assembly
15. Thoroughly clean and inspect the parts
prior to assembly:
A. Spindle shaft for bearing surface
damage or signs of impact. Also
check for damage to the threaded
areas for both the blade bolt and the
pulley retention nut.
B. Bottom bearing spacer for wear. If
the spacer is damaged the seal may
not be able to keep dirt out properly.
C. Bearings for wear. If reusing bear-
ings, you must examine them careful-
ly for wear. Also, make sure to put
the same bearing and bearing saddle
together as they were. As noted
above, look for pitting on the rollers
of the bearings and replace the bear-
ing set if any pitting is present.
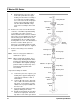
5Spindle Repair Module
Z Master 200 Series
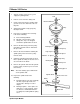
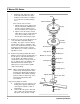
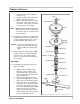
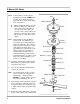
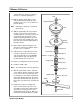
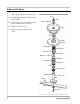
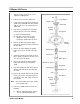
Nut
Zerk
Hardened Washer
Pulley
Seal
Spindle
Housing
Bearing Cone
Large Spacer
Bearing Cup
Small Spacer
Machine “C” Spacer
Snap Ring
Bearing Cup
Bearing Cone
Seal
Bearing Spacer
Spindle Shaft
Blade Bolt
Spring Washer
Grease Axis Hole
Blade