
Service Manual


enough lubrication. Pack the bearing by
hand or use a bearing packing tool.
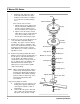
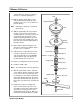
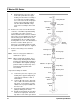
20. With the spindle upside down, set the
lower bearing in the bearing cup. Now
install the lower seal. Use a seal driver to
prevent damage.
Note: Remember to install the seal with the
lip facing out.
21. With the spindle right side up, install the
small "C" shaped spacer first, then the
small thick spacer. The order of these two
is not critical to the performance of the
spindle, but putting the thinner spacer in
first it prevents the possibility of the open
part of the spacer from dropping down on
the thicker spacer.
22. Now install the upper bearing and seal.
The upper seal must face inward. Again,
be sure to use a seal driver.
23. Lubricate both seal lips with grease and
insert the bearing spacer into the lower
seal. By inserting the spacer individually,
and not with the shaft, you will prevent
possible damage to the lower seal.
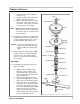
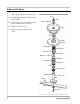
24. Bolt the assembly back into the deck shell.
25. Install the spindle shaft.
Note: The shaft will slide out if not supported.
26. Slide the pulley down onto the shaft and
secure with the washer and nut. Be certain
to only use the washer specified because
it is hardened, a softer washer will deform
and spindle damage will occur. Torque the
nut to 100-120 ft/lbs and rotate the assem-
bly to make sure that it turns smoothly and
freely.
27. Pump grease into the assembly until
grease is relieved pass the lower seal.
The ability to relieve grease without push-
ing out the seal is why to lower seal is
installed with the lip facing out. Make sure
the blade bolt is threaded into the spindle
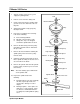
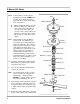
7Spindle Repair Module
Z Master 200 Series
Nut
Zerk
Hardened Washer
Pulley
Seal
Spindle
Housing
Bearing Cone
Large Spacer
Bearing Cup
Small Spacer
Machine “C” Spacer
Snap Ring
Bearing Cup
Bearing Cone
Seal
Bearing Spacer
Spindle Shaft
Blade Bolt
Spring Washer
Grease Axis Hole
Blade