
Setup Instructions


5.Waitvetotenminutesafterllingthebatterycells.
Addelectrolyte,ifnecessary,untiltheelectrolytelevel
isuptotheUpperline(Figure1)onthebatterycase.
6.Installthebatteryventcaps.
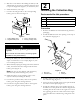
7.Connectthechargerleadstothecorresponding
batterypostsasshowninFigure2.
Figure2
1.PositiveBatteryPost
3.Red(+)ChargerLead
2.NegativeBatteryPost
4.Black(-)ChargerLead
Chargingthebatteryproducesgassesthatcan
explode.
Neversmokenearthebatteryandkeepsparks
andamesawayfrombattery.
8.Chargethebatteryfor10to15minutesat25to30
ampsor30minutesat4to6amps(Figure2).Do
notoverchargethebattery.
9.Whennished,unplugthechargerfromtheelectrical
outlet,thendisconnectthechargerleadsfromthe
batteryposts(Figure2).
Note:Donotrunthemachinewiththebattery
disconnected,electricaldamagemayoccur.
10.Installthebatterytothemachine;refertothe
Operator’sManual,InstallingtheBattery.
11.Connectthepositivebatterycabletothepositive
batterypostusingtheexistingfasteners.
12.Connectthenegativebatterycabletothenegative
batterypostusingtheexistingfasteners.
2
InstallingtheCollectionBag
Partsneededforthisprocedure:
1
Collectionbag
1
DFSlever
1Washer
1
Cotterpin
Procedure
1.RemovetheDFSleverandcollectionbagfromthe
packaging.
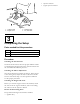
2.InstalltheDFSleverintotheopeningonthetopof
thecollectionbagFigure3.
G005849
1
2
3
4
Figure3
1.DFSlever
3.Washer
2.Collectionbag4.Cotterpin
3.InstallawasherovertheendoftheDFSleverinside
thecollectionbag(Figure3).
4.Securetheleverassemblywithacotterpinandbend
theendstoholditplace(Figure3).
5.Installthecollectionbagtothemachine(Figure4).
Installtheleversidepininthecollectionbagintothe
retainingholeinthenotchoftheenginecover.Seat
theopposingpinintotheothernotchintheengine
coverandallowthecollectionbagswingdowninto
place.
2