
Use and Care Manual


InstallingtheMowerDeck
1.Parkthemachineonalevelsurfaceand
disengagetheblade-controlswitch.
2.Movethemotion-controlleversoutwardtothe
NEUTRAL-LOCKposition,shutofftheengine,
removethekey,engagetheparkingbrake,and
waitforallmovingpartstostopbeforeleaving
theoperatingposition.
3.Slidethemowerunderthemachine.
4.Lowertheheight-of-cutlevertothelowest
position.
5.Placetheheight-of-cutpininthelockposition
forlowestheightofcut.
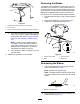
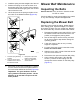
6.Lifttherearofthemowerdeckandattachthe
chainstotherearliftarms(Figure64).
7.Attachthefrontchainstothefrontliftarms
(Figure64).
8.Installthelonglinkbarthroughtheframehanger
anddeck.
9.Securethelinkpinwiththehairpincottersand
washersremovedpreviously(Figure63).
10.Installthemowerbeltontotheenginepulley;
refertoReplacingtheMowerBelt(page47).
ReplacingtheGrass
Deector
ServiceInterval:Beforeeachuseordaily—Inspect
thegrassdeectorfordamage.
WARNING
Anuncovereddischargeopeningcouldallow
thelawnmowertothrowobjectsatyouor
bystandersandresultinseriousinjury.Also,
contactwiththebladecouldoccur.
Neveroperatethelawnmowerunlessyou
installamulchplate,dischargedeector,or
grasscollectionsystem.
Inspectthegrassdeectorfordamagebeforeeach
use.Replaceanydamagedpartsbeforeuse.
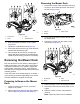
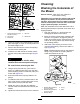
1.Disengagethespringfromthenotchinthe
deectorbracketandslidetherodoutofthe
weldeddeckbrackets,spring,anddischarge
deector(Figure65).
g197127
Figure65
1.Rod4.Deckbrackets
2.Deector5.Springinstalledoverthe
rod
3.Spring
2.Removethedamagedorworndischarge
deector.
3.Positionthenewdischargedeectorwiththe
bracketendsbetweentheweldedbracketson
thedeckasshowninFigure66.
46