
Operator's Manual

5
Description UseQty.
Tensioner pulley and arm with hardware
Spring
Bagger belt
1
1
1
Installing the bagger tensioner pulley and
bagger belt
Weight—left
Weight—right
Weight bracket—left
Weight bracket—right
Support plate
Bolt, 3/8 x 6 in.
Bolt, 5/16 x 1 in.
Nut, 3/8 in.
Lock washer, 3/8 in.
Flat washer, 3/8 in.
Bolt, 3/8 x 4–1/4 in.
Bolt, 3/8 x 3/4 in.
Self tapping bolt, 3/8 x 5/8 in.
1
1
2
2
1
4
2
8
8
16
4
2
1
Installing the weights
Drilling Holes for the Clutch
Use the metal template, included with the bagger, to locate
the clutch holes.
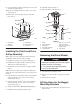
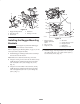
1. Remove the clutch strap for the clutch (Fig. 2).
2. Unplug the clutch connector (Fig. 2).
1
2
3
4
m–4119
Figure 2
1. Clutch strap
2. Bolt
3. Clutch connector
4. Clutch
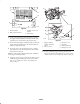
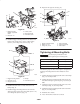
3. Remove the existing deck belt from the clutch.
4. Remove the existing clutch from the machine (Fig. 3).
Discard the bolt that was installed in the clutch.
5. Remove the existing drive spacer from the clutch
(Fig. 3).
1
m–6024
5
3
4
2
Figure 3
1. Engine
2. Clutch
3. Curved washers
4. Clutch bolt—discard
5. Drive spacer
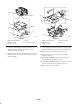
6. Position the template into the clutch pulley so the
outside diameter is flush with the inside of the clutch
flange (Fig. 4).
Note: Before drilling holes, place a piece of metal between
the clutch and pulley. This will prevent drilling into the
clutch.
7. Using the template, drill one 1/8 in. pilot hole into the
pulley (Fig. 4).
8. Install the screw (#6 x 1/2 in.) into the 1/8 in. hole
(Fig. 4). This will hold the template in place while
drilling the other two holes.