
Operator's Manual


3
InstallingtheBagger
MountingBrackets
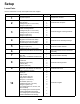
Partsneededforthisprocedure:
1Uppermountingbracket
1Lowermountingbracket
4
Carriagebolt(3/8x1-1/4inches)
2
Carriagebolt(1/2x2–1/2inches)
4
Flangenut(3/8inch)
2
Flangenut(1/2inch)
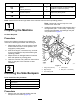
Procedure
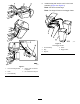
1.Installthelowermountingbrackettothe
machineframewith4carriagebolts(3/8x1-1/4
inches)and4angenuts(3/8inch)asshown
inFigure6.
2.Installtheuppermountingbrackettotheleftand
rightsidebumperswith2carriagebolts(1/2x
2-1/2inches)and2angenuts(1/2inch)as
showninFigure6.
g009215
Figure6
1.Carriagebolt(1/2x2-1/2
inches)
4.Lowermountingbracket
2.Uppermountingbracket
5.Carriagebolt(3/8x1-1/4
inches)
3.Flangenut(1/2inch)6.Flangenut(3/8inch)
4
InstallingtheHood
AssemblyandBags
Partsneededforthisprocedure:
1Hoodassembly
2
Bag(48-inchand52-inchdecks)
3
Bag(60-inchand72-inchdecks)
2Pinandhairpin-cotterassembly
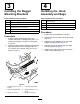
Procedure
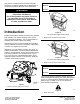
1.Positionthehoodassemblyonitsback.
2.Slidehooksontothelowermountingbracket
(Figure7).
3.Rotatethehoodassemblyuponthelower
baggermountingbracket(Figure7).
4.Aligntheholeinthebaggerwiththeupper
mountingbracket(Figure7).
5.Installthepinandsecureitwiththehairpin
cotteronbothsides(Figure7).
9