
Operator's Manual
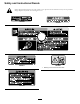
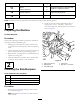
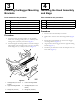


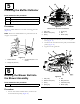

Figure9
Triplebaggershown
1.Hoodassembly4.Notch
2.Bag
5.Baggerframe
3.Bagtab
7.Lowerthebaggerhoodoverthebags(Figure10or
Figure11).
Figure10
Twinbaggershown
1.Hood3.Baggerlatch
2.Bag4.Latchhook
Figure11
Triplebaggershown
1.Hood3.Baggerlatch
2.Bag4.Latchhook
8.Positionthebaggerlatchunderthelatchhook(Figure
12).
9.Pushdownonbaggerlatchuntilitlocksintoplace
(Figure12).
Figure12
1.Baggerlatch2.Latchhook
9