
Use and Care Manual


2
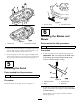
RemovingtheBlades
NoPartsRequired
Procedure
1.Choosethestyleofblade,ofthoseshownin
Figure2andFigure3,thatbestmatchestheblades
onyourmower.Holdthebladeendusingaragor
thickly-paddedgloveandremovethebladeasshown.
Figure2
BladestyleAmountingconguration
1.BladestyleA4.Bladebolt
2.Crosssectionofblade
styleA
5.Curvedwasher
3.Bladestiffenerrequired6.Bladestiffener
Figure3
BladestyleBmountingconguration
1.BladestyleB4.Bladebolt
2.Crosssectionofblade
styleB
5.Curvedwasher
3.Bendsaddextrastiffness6.Bladestiffener
2.Thereplacementbladeswithinthiskitdonotneed
astiffener.Ifyouremovedone,keepitincasefuture
replacementbladesrequireit.
3
InstallingtheBafes
Partsneededforthisprocedure:
1
Leftbafe
1
Rightbafe
4Knob
4
Curvedwasher
Procedure
1.Locatethefourholesinthemowerwherethe
bafemountingstudswillattachtothemowerdeck
(Figure4)andremoveanyfastenersfromthem.
2.Installtheleftbafeintothedecksecuringthestuds
onthebafefromthetopofthemowerusing2
knobsandcurvedwashers(cuppedsidefacingthe
mower)asshownin
Figure4andFigure5.
2