
Use and Care Manual


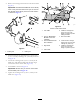


2.Removetheexistingboltandnutfromthemowerdeck
(Figure9).
Important:For48-inchand60-inchmowerdecks,
thereisonlyoneboltandnutthatyoucanremove.
For54-inchmowerdeck,removetheboltandnut
asshowninFigure9.
g206498
Figure9
1.Existingbolt2.Existingnut
3.Installtheleftsideofthebafeusingacarriagebolt
(5/16x3/4inch)andangenut(5/16inch)asshown
inFigure10.
4.Loosenthe2carriagebolts(5/16x3/4inch)inthe
bafeslots,andslidethebafeuntiltheholealigns
withtheholeinthemowerdeck(Figure10).
5.InstallbafeasshowninFigure10.
Important:Ensurethatyouusethecorrecthole
forthebafe;refertoFigure10.
6.Tightenthe2carriagebolts(5/16x3/4inch)inthe
bafeslots(Figure10).
g206496
Figure10
54-inchmowerdeckshown
1.Innerbafe
6.Installthiscarriagebolt
(5/16x3/4inch)and
angenut(5/16inch)after
slidingthebafe.
2.Holefor48-inchand
60-inchmowerdeck
installation.
7.Slotsinthebafe
3.Holefor54-inchmower
deckinstallation.
8.Loosenthese2carriage
bolts(5/16x3/4inch)and
2angenut(5/16inch).
4.Rightblade9.Installthiscarriagebolt
(5/16x3/4inch)and
angenut(5/16inch)rst.
5.Outerbafe
9