
Operator's Manual


8
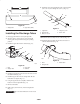
Installing the Collector
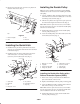
1. Align the hinges on both halves of the collector. The
halves must be positioned in the closed position
(Fig. 9).
2. Push the dumping arm through the hinges and secure
with a cotter pin (3/16 x 1 in.) (Fig. 9).
m-5956
3
2
4
1
Figure 9
1. Dumping arm
2. Collector hopper
3. Collector door
4. Cotter pin
3. Install the oval knob on the draft control and the
collector clutch control (Fig. 10).
1
m–6545
Figure 10
1. Knob
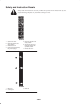
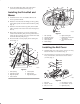
4. Place the quick hitch hooks, on the collector, over the
quick hitch round bar (Fig. 11).
5. Pull the hitch lever up. This will raise the hopper and
engage the collector pin into the hitch extension
(Fig. 11).
6. Pull the locking pin out to allow the collector to be
raised into full upright position (Fig. 11).
7. When the collector is in upright position, release the
locking pin and lock the collector into position
(Fig. 11).
8. Secure left side hitch hook with a clevis pin (3/8 x
1–1/2 in.) and a hairpin cotter pin (Fig. 11).
4
5
8 9
2
7
6
3
1
m–6549
Figure 11
1. Collector
2. Quick hitch hooks
3. Quick hitch round bar
4. Hitch lever
5. Locking pin
6. Clevis pin, 3/8 x 1–1/2 in.
7. Hairpin cotter pin
8. Collector pin
9. Hitch extension
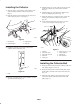
Installing the Collector Belt
1. Route the collector belt around the collector pulley and
idler pulley (Figures 12 and 13).
2. Route the collector belt onto the bottom pulley of the
double pulley mounted on the tractor’s left side axle
(Fig. 12).
3. Pull on the idler pulley to release the tension and at
same time route the collector belt around the idler
pulley (Fig. 13).