
Installation Instructions

FORM NO. 3316-545 Rev A
TPSEThe TORO Company – 1993
INSTALLATION
INSTRUCTIONS
PART NO. 80-9660
WATER VALVE KIT
For Hydroject R 3000
Water valve kit now has a new ceramic sleeve (Item 6).
The old ceramic sleeve was made totally of ceramic.
The new sleeve is stainless steel with a ceramic coating.
The copper washers are no longer required and are
replaced with one stainless steel washer (Item 17).
1. Press a new sleeve bushing (Item 11) into gear case
pilot until bushing is flush with recessed (oil side)
surface.
2. Install oil seal (Item 13) and seal back–up (Item 14)
into gear box pilot. Lip of seal and seal back–up to be
positioned toward gear box pilot. Install retaining ring
(Item 15).
3. Grease O–ring (Item 4) and back–up ring (Item 5),
then install onto valve spool (Item 1). Rubber O–ring is
furthest away from threads.
4. Install black back–up ring (Item 24) into valve cavity,
flat side first.
5. Use Valve Seal Installer (TOR4009) and Seal
Insertion Mandrel (TOR4011) to properly install packing
seal (Item 23) and seal/plunger support (Item 22) into
valve body. Remove installers.
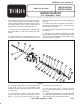
Figure 1
1
2
3
4
5
6
7
8
9
10
11
12
25
13
14
15
16
17
18
19
20
21
22
23
24
26
6. Insert valve guide (Item 21) into valve body. Install
O–ring (Item 18) and U–cup seal (toward small
diameter) (Item 20) to seal retainer (Item 19), then install
into valve cavity.
7. Apply grease to outside of new ceramic sleeve
(Item 6). Use valve spool inserted through ceramic
sleeve to gently drive ceramic sleeve into seals,
inserting it from the ”spring” side.
8. Insert valve spool (Item 1) through valve seat
(Item 2) and install O–ring (Item 3) on inboard side of
valve seat.
9. Hold spool and seat in place so O–ring does not fall
out of place, then carefully slide valve spool, new sleeve
seals, and valve seat, through ceramic sleeve.