Form No. 3415-862 Rev B Power Plex™ 40V MAX Standard 90 WH Battery Pack 88540, 88541, 88542 Batería estándar Power Plex™ 40 V MAX 88540, 88541, 88542 Batterie standard Power Plex™ 40 V MAX 88540, 88541, 88542 www.Toro.com.
Form No. 3415-859 Rev B Power Plex™ 40V MAX Standard Battery Pack/Charger Model No. 88540—Serial No. 317000001 and Up Model No. 88541—Serial No. 317000001 and Up Model No. 88542—Serial No. 317000001 and Up Register at www.Toro.com.
Safety WARNING CALIFORNIA Proposition 65 Warning This product contains a chemical or chemicals known to the State of California to cause cancer, birth defects, or reproductive harm. IMPORTANT SAFETY INSTRUCTIONS—SAVE THESE INSTRUCTIONS. SAVE THESE INSTRUCTIONS—This manual contains important safety and operating instructions for battery pack Models 88540/88541 and battery charger Model 88542.
DANGER – TO REDUCE THE RISK OF FIRE OR ELECTRIC SHOCK, CAREFULLY FOLLOW THESE INSTRUCTIONS. DANGER Plugging the battery charger into an outlet that is not 120 V can cause fire or electric shock. • Do not plug the battery charger into an outlet other than 120 V. • For a foreign connection, use an attachment plug adapter of the proper configuration for the power outlet, if needed. CAUTION The battery pack may present a risk of fire or chemical burn if mistreated. • Do not disassemble the battery pack.
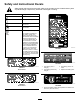
Safety and Instructional Decals Safety decals and instructions are easily visible to the operator and are located near any area of potential danger. Replace any decal that is damaged or missing. Symbol Designation/Explanation Class II For indoor use only Before charging, read the instructions Current fuse Correct disposal of this product This marking indicates that this battery charger and battery pack should not be disposed with other household wastes throughout the EU.
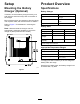
Setup Product Overview Mounting the Battery Charger (Optional) Specifications Battery Charger If desired, mount the battery charger securely on a wall using the wall-mount key holes on the back of the charger. Model 88542 Type 40V MAX Lithium-Ion Battery Charger Mount it indoors (such as a garage or other dry place), near a power outlet, and out of the reach of children. Input 100 to 120V AC 50/60Hz Max 3.0A Output 41.8V MAX DC 2.5A Refer to Figure 1 for assistance in mounting the charger.
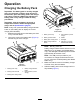
Operation Charging the Battery Pack Important: The battery pack is not fully charged when you purchase it. Before using the tool for the first time, place the battery pack in the charger and charge it until the LED display indicates the battery pack is fully charged. Read all safety precautions. Important: Charge the battery pack only in temperatures that are within the appropriate range; refer to Specifications (page 5).
Installing the Battery Pack Important: Operate the battery pack only in temperatures that are within the appropriate range; refer to Specifications (page 5). 1. Make sure that the vents on the battery are clear of any dust and debris. 2. Line up the cavity in the battery pack with the tongue on the tool. 3. Grasp the trigger handle. 4. Slide the battery pack into the tool until the battery locks into the latch (Figure 5). g194423 Figure 4 1. Charger venting areas 3. Right indicator light 2.
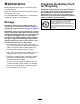
Maintenance Preparing the Battery Pack for Recycling Maintenance and servicing are not required under normal conditions. Important: Upon removal, cover the terminals of the battery pack with heavy-duty adhesive tape. Do not attempt to destroy or disassemble the battery pack or remove any of its components. Recycle or properly dispose of lithium-ion battery packs at a battery recycling facility. When you clean the surface of the equipment, wipe it off only with a dry cloth.
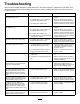
Troubleshooting Perform only the steps described in these instructions. All further inspection, maintenance, and repair work must be performed by an authorized service center or a similarly qualified specialist if you cannot solve the problem yourself. Problem The flashlight does not turn on (battery pack Model 88541 only). Possible Cause 1. The battery pack is on the charger. 1. Remove the battery pack from the charger. 2. The battery pack is over or under the appropriate temperature range. 2.
Problem Possible Cause Corrective Action 1 LED indicator is blinking on the battery pack. 1. The battery pack voltage is low. 1. Place the battery pack on the charger. It is difficult to remove the battery pack from the tool. 1. The battery pack/tool is new or there is corrosion in the battery terminals and/or the terminals on the tool. 1. Clean the terminals on the battery and the tool.
Notes:
The Toro Promise - Electric Products A Three-Year1 Full Warranty for Residential Use for the United States and Canada The Toro Company and its affiliate, Toro Warranty Company, pursuant to an agreement between them, jointly warrant this product for three years against defects in material or workmanship when used for normal residential purposes.* 1 Does not include the battery. 1 Year Battery Warranty for Residential Use.
Form No. 3415-860 Rev B Batería/cargador estándar PowerPlex™ 40 V MAX Nº de modelo 88540—Nº de serie 317000001 y superiores Nº de modelo 88541—Nº de serie 317000001 y superiores Nº de modelo 88542—Nº de serie 317000001 y superiores Registre su producto en www.Toro.com.
Seguridad ADVERTENCIA CALIFORNIA Advertencia de la Propuesta 65 Este producto contiene una o más sustancias químicas que el Estado de California considera causantes de cáncer, defectos congénitos o trastornos del sistema reproductor. INSTRUCCIONES DE SEGURIDAD IMPORTANTES – GUARDE ESTAS INSTRUCCIONES. GUARDE ESTAS INSTRUCCIONES – Este manual contiene importantes instrucciones de seguridad y uso de las baterías modelo 88540/88541 y el cargador de baterías modelo 88542.
PELIGRO – PARA REDUCIR EL RIESGO DE INCENDIO O DESCARGA ELÉCTRICA, SIGA CUIDADOSAMENTE ESTAS INSTRUCCIONES. PELIGRO Si enchufa el cargador en una toma de corriente que no sea de 120 voltios, puede causar un incendio o una descarga eléctrica. • No enchufe el cargador en una toma de corriente que no sea de 120 voltios. • Para enchufar el aparato en un país fuera de los Estados Unidos, utilice un adaptador de enchufe del tipo correcto para la salida de la toma de corriente si es necesario.
Pegatinas de seguridad e instrucciones Las pegatinas de seguridad e instrucciones están a la vista del operador y están ubicadas cerca de cualquier zona de peligro potencial. Sustituya cualquier pegatina que esté dañada o que falte.
Montaje El producto Cómo montar el cargador de la batería (opcional) Especificaciones Cargador de batería Si lo desea, monte el cargador de la batería firmemente en la pared utilizando los orificios de montaje en pared en la parte trasera del cargador. Modelo 88542 Tipo Cargador de batería de iones de litio 40 V MAX Móntelo en un espacio interior (tal como un garaje u otro lugar seco), cerca de una toma de corriente y fuera del alcance de los niños. Entrada 100 a 120 Vca 50/60Hz Máx. 3.
Operación Carga de la batería Importante: En el momento de la compra la batería no está totalmente cargada. Antes de usar la herramienta por primera vez, coloque la batería en el cargador y cárguela hasta que el indicador LED indique que la batería está completamente cargada. Lea todas las precauciones de seguridad. Importante: Cargue la batería solo a temperaturas que estén dentro del intervalo apropiado; consulte Especificaciones (página 5).
Instalación de la batería Importante: Utilice la batería solo a temperaturas que estén dentro del intervalo apropiado; consulte Especificaciones (página 5). 1. Compruebe que los orificios de ventilación de la batería están libres de polvo y residuos. 2. Alinee el hueco de la batería con la lengüeta de la herramienta. 3. Sujete la empuñadura del gatillo. 4. Introduzca la batería en la herramienta hasta que se bloquee el cierre (Figura 5). g194423 Figura 4 1. Zonas de ventilación del cargador 3.
Mantenimiento Preparación de la batería para el reciclado No se requiere mantenimiento ni servicio en condiciones normales. Importante: Al retirarla, cubra los terminales de la batería con cinta adhesiva de servicio pesado. No intente destruir o desmontar la batería ni intente retirar cualquiera de los componentes de la misma. Recicle o elimine adecuadamente las baterías de iones de litio en un centro de reciclaje de baterías. Cuando limpie la superficie del equipo, limpie con un paño seco únicamente.
Solución de problemas Realice solo los pasos descritos en estas instrucciones. Cualquier otro trabajo de inspección, mantenimiento o reparación debe ser realizado por un Servicio Técnico Autorizado o por un especialista autorizado si no puede solucionar el problema usted mismo. Problema Posible causa Acción correctora 1. La batería está en el cargador. 1. Retire la batería del cargador. 2. La temperatura de la batería está por encima o por debajo del intervalo de temperatura adecuado. 3.
Problema Posible causa Acción correctora 1 indicador LED de la batería parpadea. 1. El voltaje de la batería es bajo. 1. Coloque la batería en el cargador. Es difícil retirar la batería de la herramienta. 1. La batería/herramienta es nueva o hay corrosión en los terminales de la batería o los terminales de la herramienta. 1. Limpie los terminales de la batería y de la herramienta.
Notas:
La Promesa Toro – Productos eléctricos Garantía completa de tres años1 para el uso residencial en Estados Unidos y Canadá The Toro Company y su afiliado, Toro Warranty Company, bajo un acuerdo entre sí, garantizan conjuntamente este producto durante tres años contra defectos de materiales o mano de obra cuando se utiliza con propósitos residenciales normales.* 1 No incluye la batería. 1 año de garantía de la batería para el uso residencial.
Form No. 3415-861 Rev B Batterie/Chargeur standard PowerPlex™ 40 V MAX N° de modèle 88540—N° de série 317000001 et suivants N° de modèle 88541—N° de série 317000001 et suivants N° de modèle 88542—N° de série 317000001 et suivants Enregistrez votre produit à www.Toro.com.
Sécurité ATTENTION CALIFORNIE Proposition 65 - Avertissement Ce produit contient une ou des substances chimiques considérées par l'état de Californie comme capables de provoquer des cancers, des anomalies congénitales ou d'autres troubles de la reproduction. CONSIGNES DE SÉCURITÉ IMPORTANTES – CONSER VEZ CES INSTRUCTIONS. CONSERVEZ CES INSTRUCTIONS – Ce manuel contient d'importantes consignes de sécurité et d'utilisation pour les batteries modèles 88540/88541 et le chargeur modèle 88542.
• Les enfants ne doivent pas jouer avec l'appareil. PRUDENCE • Les enfants ne doivent pas nettoyer ou entretenir Mettez rapidement au rebut les batteries usagées. l'appareil sans supervision. Débarrassez-vous des batteries au lithium-ion dans un centre de recyclage spécialisé dans le recyclage des batteries. DANGER Vous pouvez causer un incendie ou un choc électrique si vous branchez le chargeur de batterie à une prise qui n'est pas de 120 volts.
Autocollants de sécurité et d'instruction Des autocollants de sécurité et des instructions bien visibles par l'opérateur sont placés près de tous les endroits potentiellement dangereux. Remplacez tout autocollant endommagé ou manquant.
Mise en service Vue d'ensemble du produit Montage du chargeur de batterie (option) Caractéristiques techniques Si vous le souhaitez, fixez le chargeur de batterie solidement à un mur à l'aide des fentes de fixation murale situées au dos. Chargeur de batterie Montez-le à l'intérieur (par exemple dans un garage ou tout autre endroit à l'abri de l'humidité), à proximité d'une prise de courant et hors de la portée des enfants. Pour vous aider à monter le chargeur, reportez-vous à la Figure 1.
Utilisation Charge de la batterie Important: Quand vous l'achetez, la batterie n'est pas complètement chargée. Avant d'utiliser l'outil pour la première fois, placez la batterie dans le chargeur et chargez-la jusqu'à ce que les diodes indiquent que la batterie est complètement chargée. Lisez toutes les consignes de sécurité. Important: Chargez la batterie uniquement à des températures comprises dans la plage adéquate; voir Caractéristiques techniques (page 5).
Mise en place de la batterie Important: Utilisez la batterie uniquement à des températures comprises dans la plage adéquate; voir Caractéristiques techniques (page 5). 1. Assurez-vous que les évents sur la batterie sont exempts de toute poussière et tout débris. 2. Alignez le creux de la batterie sur la languette de l'outil. 3. Saisissez la poignée d'actionnement. 4. Insérez la batterie dans l'outil jusqu'à ce qu'elle s'enclenche dans le verrou (Figure 5). g194423 Figure 4 1. Évents du chargeur 3.
Entretien Préparation de la batterie pour le recyclage Aucun entretien et aucune révision ne sont nécessaire dans des conditions normales de fonctionnement. Important: Après avoir retiré la batterie, recouvrez les bornes de ruban adhésif épais. N'essayez pas de détruire ou de démonter la batterie ni de déposer aucun de ses composants. Recyclez ou débarrassez-vous correctement des batteries au lithium-ion dans un centre de recyclage.
Dépistage des défauts Effectuez uniquement les opérations décrites dans cette notice. Tout autre travail d'inspection, d'entretien ou de réparation doit être réalisé par un centre d'entretien agréé ou autre spécialiste qualifié si vous n'arrivez pas à résoudre le problème vous-même. Problème La lampe de poche ne s'allume pas (batterie modèle 88541 uniquement). Cause possible Mesure corrective 1. La batterie est sur le chargeur. 1. Retirez la batterie du chargeur. 2.
Problème Cause possible Mesure corrective Une diode clignote sur la batterie. 1. La tension de la batterie est faible. 1. Placez la batterie sur le chargeur. Il est difficile de retirer la batterie de l'outil. 1. La batterie/l'outil sont neufs, ou les bornes de la batterie et/ou les bornes de l'outil sont corrodées. 1. Nettoyez les bornes de la batterie et de l'outil.
La promesse de Toro – Produits électriques Une garantie intégrale de trois ans1 pour usage domestique valable aux États-Unis et au Canada. The Toro Company et sa filiale, Toro Warranty Company, en vertu d'un accord mutuel, s'engagent conjointement à réparer le produit utilisé à des fins résidentielles normales s'il présente un défaut de fabrication, pendant une période de trois ans à dater de l'achat.* 1 Ne comprend pas la batterie. 1 an de garantie sur la batterie pour usage résidentiel.