
Installation Instructions

FORM NO. 3318-165
The TORO Company - 1995
INSTALLATION
INSTRUCTIONS
For Workman Vehicle
REAR VIEW MIRROR KIT
PART NO. 92-2670
Mirror is convex. Objects in mirror are
closer than they appear.
CAUTION
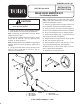
1. Remove and discard L-shaped bracket secured
to mirror. Bracket not required for this application.
Note: If mounting rear view mirror on a Cab, Model
07246, proceed to step 7.
2. Secure mirror bracket and mirror brace to mirror
mount with (2) 5/16-24 x 3/4" lg. capscrews and
locknuts, as shown in figure 1.
Note: Assembly shown is for installation on right side of
machine, but mirror can be mounted on either side of
machine.
3. Using one of three holes in mirror mount, secure
mirror to mirror mount with a 5/16-24 x 5/8" lg.
capscrew and lockwasher.
Note: Mounting mirror in outer holes allow greater
viability with wider attachments, but also creates a
greater risk of damage to mirror.
4. Remove (2) upper shroud mounting screws from
side of machine on which mirror will be mounted.
5. Using (2) screws removed or screws supplied in
kit, secure mirror bracket and mirror brace to machine.
6. Sit on seat and adjust mirror to desired position.
7. Position mirror bracket (Fig. 1, inset) onto front of
cab on right or left side of windshield.
8. Using bracket as a template locate, mark and drill
(2) .281" dia. holes thru front of cab.
9. Secure bracket to front of cab with (2) 1/4-20 x
7/8" lg. flange head capscrew and flangenuts.
10. Secure mirror to mirror mount with a 5/16-24 x
5/8" lg. capscrew and lockwasher.
11. Adjust mirror to desired position.
Figure 1
3
2
4
1
1. Mirror mount
2. Mirror bracket
3. Mirror bracket
4. Mirror brace
5. Mirror bracket (cab)
5