
Installation Instructions

1
All Rights Reserved
Printed in the USA
2002 by The Toro Company
8111 Lyndale Avenue South
Bloomington, MN 55420-1196
Roller Brush Kit
Greensmaster
3000 SPA Cutting Units
Part No. 92-9160
Form No. 3327-998
Installation Instructions
Note: For traction units with serial numbers 49999 and
lower, the Extended Pull Frame Kit, Toro Part No. 93-0120,
must be mounted on the traction unit before the Roller
Brush Kit can be installed.
1. Remove all of the cutting units from the pull frames;
refer to the traction unit Operator’s Manual for removal
instructions.
2. Remove and discard the rear roller and left and right
height-of-cut brackets from each cutting unit. Retain the
side plate mounting fasteners.
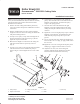
3. Loosely secure a pulley scraper to the left height-of-cut
bracket with a flange head capscrew (Fig. 1). Do not
tighten the capscrew at this time.
4. Mount the left height-of-cut bracket to the cutting unit
side plate with the fasteners previously removed
(Fig. 1).
5. Loosely secure a pulley to the left end of the brush shaft
with socket head set screws. Position the pulley as
shown in Figure 1. Do not tighten the set screws at this
time.
6. nsert the drive o-ring around the roller and brush
pulleys. Then insert the end of each shaft into the left
height-of-cut bracket (Fig. 1). Position the pulley
scraper in the pulley grooves.
7. Insert the other ends of the shafts into the right
height-of-cut bracket and mount the bracket to the
cutting unit side plate with the fasteners previously
removed.
8. Tighten the screw securing the pulley scraper to the left
height-of-cut bracket (Fig. 1). Reposition the roller
shaft and brush pulley to keep the scraper in the
grooves.
9. Secure each end of the roller shaft to the height-of-cut
brackets with a set screw (Fig. 1). Apply Loctite 242 to
the set screws.
10. Tighten the set screws securing the brush pulley to the
shaft (Fig. 1). Apply Loctite 242 to the set screws.
11. Adjust the rear roller; refer to the cutting unit
Operator’s Manual for the adjustment procedure.
Ensure that the brush and roller rotate freely.
1
7
45
6
3
2
Figure 1
1. Pulley scraper
2. Height-of-cut bracket
3. Cutting unit side plate
4. Pulley
5. Brush
6. Roller
7. Drive o-ring