
Installation Instructions


FORM NO. 3317-227
The Toro Company1994 TPS
INSTALLATION
INSTRUCTIONS
PART NO. 93-3741
MID MOUNT KIT
WORKMAN 3000 SERIES
Helping you put quality into play.
This kit is required to mount 1/3 Platform Lift, Model
07344 in mid position on vehicle frame.
1. Remove any accessories mounted to top of frame
such as full beds, 2/3 beds, top dressers, etc.
Note: Lift may be installed on top of H.D. Hitch Frame
Tubes. If lift is to be mounted on top of H.D. Hitch Frame
Tubes proceed to step 14.
2. Remove the flange screw and locknut, shown in
figure 1, securing engine frame to left side of vehicle
frame.
3. Install a new 1/2-13 x 3-1/2" lg. capscrew thru
engine frame and vehicle frame. Insert a lift mounting
bracket onto capscrew and loosely secure with locknut
removed. Bracket to be positioned as shown in
figure 2.
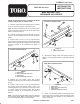
Figure 1
1. Engine frame
2. Remove this flange screw & nut
3. Spring mount
4. Remove this flange screw & nut
1
3
Left Side of Vehicle Shown
2
4
4. Remove the rear flange screw and locknut
securing leaf spring mount to left side of vehicle frame
(Fig. 1).
5. Install a new 1/2-13 x 3-1/2" lg. capscrew thru
leaf spring mount and vehicle frame. Insert a lift
mounting bracket onto capscrew and loosely secure
to engine frame and vehicle frame with locknut
removed. Bracket to be positioned as shown in
figure 2.
Note: Lift mounting bracket tubes have two different
size mounting holes. Make sure brackets with larger
holes are used with larger mounting screws.
Figure 2
1. Lift
2. Lift mounting brackets
1
2
2
Left Side of Vehicle Shown
6. Remove the flange screw and locknut, shown in
figure 3, securing engine frame to right side of vehicle
frame.
Figure 3
1. Engine frame
2. Remove this flange screw & nut
3. Spring mount
4. Remove this flange screw & nut
1
3
Right Side of Vehicle Shown
2
4
7. Insert a lift mounting bracket onto flange screw
and loosely secure to engine frame and vehicle frame
with locknut removed. Bracket to be positioned as
shown in figure 4.