
Installation Instructions

FORM NO. 3317-782
The TORO Company - 1996
TPS
INSTALLATION
INSTRUCTIONS
PART NO. 94-3333
FUEL TANK KIT
For Groundsmaster 580D
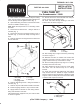
1. Park machine on a level surface, lower the cutting
units, stop the engine, engage the parking brakes and
remove the key from the ignition switch (Fig. 1).
2. Open drain fitting on bottom of fuel tank and drain
fuel into a suitable container (Fig. 1).
Note: Retain all components for re-assembly, unless
specified.
3. Disconnect fuel line from 90 fitting on bottom of
fuel tank (Fig. 1).
4. Disconnect wire from fuel gauge sender on top of
fuel tank (Fig. 1). Remove R-clamp securing wire to
tank.
5. Remove fasteners securing fuel tank to frame and
remove fuel tank.
Figure 1
1. Drain fitting
2. 90 fitting
3. Fuel gauge sender
1
2
4
3
5
4. R-clamp
5. Sealing strip
6. Remove drain fitting and 90 fitting from bottom of
fuel tank (Fig. 1).
7. Remove cap from fuel tank and install on new tank.
8. Install fuel gauge sender to top of new fuel tank.
9. Apply sealant to threads on drain fitting and 90
fitting and reinstall in new tank.
10. Install bushing (supplied in kit) into new fuel tank
as shown in figure 2.
11. Secure vent hose to vent tube with hose clamp as
shown in figure 2. All supplied in kit.
12. Insert vent tube through bushing in fuel tank.
Position tube as shown in figure 2.
Figure 2
1. Bushing
2. Vent tube
1
2
3
3
3. Hose
4. R-clamp
13. Affix sealing strip to edge of fuel tank, positioning
as shown in figure 1.
14. Reinstall fuel tank on machine and secure with
fasteners previously removed. Connect wire to fuel
gauge sender and to top of tank with R-clamp.
15. Remove sealing strip from top edge of L.H. sealing
bracket (below new vent hose).
16. Using dimension shown in figure 3, locate, mark
and drill a .750" dia. hole thru top of L.H. sealing
bracket.
17. Insert vent hose through drilled hole. Trim sealing
strip around hole and reinstall on edge of bracket.
Remove capscrew securing bottom of bracket to grille
support. Insert R-clamp onto hose and secure clamp
to bracket with capscrew removed.
Figure 3
1. Sealing bracket
2. Sealing strip
1
2
.750" Dia.
Hole
4.75"