
Installation Instructions


ASSEMBLY PROCEDURE
1. Turn the topdresser on until the conveyor belt
seam is on top and near the center of the unit.
2. Remove side guards to expose bearings and
bolts attaching hopper to frame.
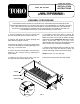
3. Remove the hopper, front guard, rubber skirts
and front lift brackets by removing bolts(A)(11 per
side), Fig. 1, from each side.
4. Loosen the front bearing bolts and release the
tension on the conveyor belt by adjusting the
tension bolts.
5. Remove the lacing (seam wire) from the
conveyor belt and remove belt from unit.
6. Thoroughly clean drive roller to remove old
paint, sand, rust, and any other foreign material.
Make sure roller is clean and dry before painting.
Apply texture paint (Glidden AS-150) to drive roller
with a clean paint roller to an even coat,
approximately 1/32 inch thick. Allow 48 hours cure
time in a warm dry area before reassembly.
7. Remove front bearing bolts and cotter pin from
one side of idler roller and discard. Loosen set
screws on bearing collar and remove bearing.
NOTE: Do step 7 on one side only.
8. Remove bearing tension bolt and discard.
1800 TOPDRESSER
SPRING KIT ASSEMBLY
FOR PROPER INSTALLATION OF THIS SPRING KIT, APPROVED TEXTURE PAINT MUST BE
PURCHASED AND APPLIED TO THE DRIVE ROLLER OF THE TOPDRESSER. TO OBTAIN THIS PAINT,
CALL 1-800-468-0115 AND ASK FOR YOUR NEAREST GLIDDEN DISTRIBUTOR. THE APPROVED
PRODUCT IS PACKAGED AS GLIDDEN (AS-150) AND CAN BE PURCHASED IN ONE GALLON
CONTAINERS, ENOUGH TO COAT APPROXIMATELY 10 ROLLERS.
INSTALLATION
INSTRUCTIONS
PART NO. 95-0108
FORM NO. 92-4665
ATension
Bolt
Front
Bearing
A
FIG. 1
Hopper
Lift Bracket
Front Guard
A