
Operator's Manual

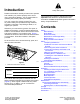


Introduction
Readthisinformationcarefullytolearnhowtooperate
andmaintainyourproductproperlyandtoavoid
injuryandproductdamage.Youareresponsiblefor
operatingtheproductproperlyandsafely.
YoumaycontactT orodirectlyatwww.T oro.com
forproductsafetyandoperationtrainingmaterials,
accessoryinformation,helpndingadealer,orto
registeryourproduct.
Wheneveryouneedservice,genuineT oroparts,or
additionalinformation,contactanAuthorizedService
DealerorT oroCustomerServiceandhavethemodel
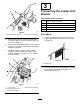
andserialnumbersofyourproductready.Figure1
identiesthelocationofthemodelandserialnumbers
ontheproduct.Writethenumbersinthespace
provided.
Gotowww.T oro.comtoaccesswarranty,parts,and
otherproductinformation.
g243011
Figure1
1.Modelandserialnumberlocation
ModelNo.
SerialNo.
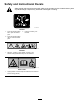
Thismanualidentiespotentialhazardsandhas
safetymessagesidentiedbythesafety-alertsymbol
(Figure2),whichsignalsahazardthatmaycause
seriousinjuryordeathifyoudonotfollowthe
recommendedprecautions.
g000502
Figure2
Safety-alertsymbol
Thismanualuses2wordstohighlightinformation.
Importantcallsattentiontospecialmechanical
informationandNoteemphasizesgeneralinformation
worthyofspecialattention.
Contents
Safety.......................................................................3
GeneralSafety...................................................3
SlopeSafety.......................................................3
AttachmentSafety..............................................4
MaintenanceandStorageSafety........................4
BeforeDigging....................................................4
SafetyandInstructionalDecals..........................5
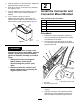
Setup........................................................................6
1PreparingtheMachine.....................................6
2InstalltheConnectorandConnectorMount
Bracket............................................................7
3ConnectingtheLoaderArmBranch.................8
4ConnectingtheRelayandPowerLead
Connectors....................................................11
5RemovingtheExistingLever..........................13
6Installingthe4-in-1BucketLever...................14
7InstallingtheValveManifoldSolenoid
Harness........................................................15
8T estingtheInstallation...................................16
9CompletingtheInstallation.............................17
ProductOverview...................................................17
Controls...........................................................17
Specications..................................................18
MaximumMaterialDensityatCapacity.............19
Operation................................................................20
InstallingandRemovingtheAttachment...........20
4-in-1OperationandControl............................20
TransportPosition............................................20
BucketOperation..............................................21
BladeOperation...............................................21
LevellerOperation............................................21
GrappleBucketOperation................................21
Maintenance...........................................................22
RecommendedMaintenanceSchedule(s)...........22
LubricatingtheBucket......................................22
Adjustingthe4-in-1BucketOperation...............22
Storage...................................................................23
Troubleshooting......................................................24
Schematics.............................................................25
©2018—TheToro®Company
8111LyndaleAvenueSouth
Bloomington,MN55420
2
Contactusatwww.Toro.com.
PrintedinAustralia
AllRightsReserved