
Service Manual


Cover/Body-Reassembly
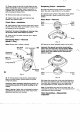
Fig.
36
Important: Be sure to realign previous scribed line
for correct ouput rotation.
If
body assembly
is
installed 180° as previous assembled output
rotation
will
be reversed.
59
Hold the motor rotor assembly in position and install
body on pintle.
Note:
Do
not force motor rotor assembly on pintle as it
is
a slip fit and must turn freely by hand.
60
Install the
(2)
5/16
x
1
1/4
socket heat cap screws and
torque to
15
foot pounds.
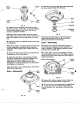
Reservoir/Adapter-Reassembly
I
61
Lightly grease sealing ring and install into recess
in cover.
62
Install the adapter or reservoir in cover by rotating
counterclockwise.
Torque to Approximately 8-12 ft. Ibs.
Important: The adapters and reservoir are threaded
left hand. To install, turn counterclockwise.
Start-up Procedure
i
Fig.
38
63
Remove the
3/8
hex head plug to vent the
transmission. See Page
16
for fluid recommendations.
Attached Reservoir
Fill the transmission with the proper fluid through
reservoir until fluid overflows from opening in body.
Rotate both the input and output shafts to purge any
trapped air from transmission. Refill reservoir until fluid
13
reappears and install hex head plug,
Torque to 2-5
Foot Pounds.
Fill reservoir to oil level cold mark.
Separate Reservoir
Fill the transmission with the proper fluid through
customer supplied separate reservoir until fluid
overflows from opening in body.
Rotate both the input and output shafts to purge any
trapped air from transmission. Refill reservoir until fluid
reappears and install hex head plug.
Torque to 2-5
Foot Pounds.
Fill reservoir to proper fluid level shown.
Fig.
37