
Service Manual
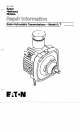


Disassembly/Reassembly
Fig.
1
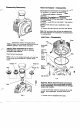
Clean the transmission exterior thoroughly before
repairs are begun. Use a cleaning solution that
will
not
affect paint, gaskets, rubber seals, and plastic.
Important: When compressed air is used in
cleaning, do not expose lip seals or bearing
surfaces to high pressure.
Drain fluid from transmission.
Note:
A
2
x
6
x
10
wooden block with a
3/4
inch hole
in the center is recommended for a suitable bench
fixture.
Adapter
#1
Reservoir
Plug
I
I
i
JLl
8
Seal
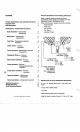
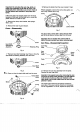
Reservoir/Adapter-Disassembly
Eaton light duty transmissions are equipped with one
of
two
adapters or a reservoir as shown in Fig.
2.
1
Remove the adapter or reservoir by rotating
clockwise.
Important: The adapters and reservoir have left
hand threads.
To
remove turn clockwise.
To
remove adapter
#1
use a six point
1½”
1/2”
hex wrench
or socket.
To
remove adapter #2 use a six point
1”
hex wrench or
socket.
To
remove the reservoir use a small filter or web
wrench.
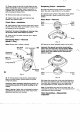
2
Remove the seal ring from the cover and discard.
Note: We recommend that all seals be replaced with
new ones whenever the transmission is disassembled
and reassembled.
Body/Cover-Disassembly
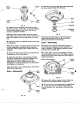
5
Fig.
3
Important: Before disassembling the transmission,
scribe a line across the cover and body to ensure
correct reassembly. Incorrect assembly
will
change
output shaft rotation.
3
Use
1/4
inch allen wrench to remove the
(2)
5/16
cap
screws. Where applicable, remove the dump valve
shaft.
Fig.
2
4
Lift the cover to separate from the body.