
Installation and Programming Guide


Selecting the proper installation site for the controller is essential to safe and reliable
operation. The controller should be installed on a vertical wall or other sturdy structure
near a grounded power source. For easy operation and better view of the display, install
the controller so that the display is at, or slightly below, eye level.
CAUTION: Do not connect to power until after the valves are connected. Indoor
model controllers are not weather resistant and must be installed indoors or in a
protected area.
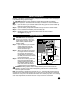
Installing the Indoor Model Controller
Step 1 - Using the mounting template, mark the location of your Rain Dial in an area
protected from weather, such as the garage, and within 5' (1.52M) of a 120 V
a.c. outlet (230 or 240 V a.c., 50 Hz for international models). Do not install on
the same circuit with a high power user such as a refrigerator or air conditioner.
Step 2 - Drive a #10 screw into the wall stud, leaving about 1/4" (6.35mm) exposed to
slip into the keyhole slot on the back of the controller.
Step 3 - Open the door to your controller cabinet and swing open the control module by
flexing the release tab to the right.
Step 4 - Use the two provided screw holes to secure the controller with two additional
screws. Use wall anchors or toggle bolts if wall is hollow. See Figure 1.
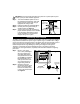
Installing the Outdoor Model Controller
Step 1 - Use the mounting template to locate the two mounting holes. Although you can
locate your outdoor controller anywhere, it is best to avoid direct exposure to
sprinkler spray. Since this device is “hard wired,” keep in mind that you must run
electrical cable to it.
Step 2 - Locate the controller over the area marked with the template, then drive a #10
screw into the wall stud, leaving about 1/4" (6.35mm) exposed to slip into the
keyhole slot on the back of the controller.
Step 3 - Open the door to your controller cabinet and swing open the control module by
flexing the release tab to the right.
Step 4 - Use the two provided screw holes to secure the controller with two additional
screws. Use wall anchors, toggle bolts or other appropriate fastener when
attaching to other than wall studs. See Figure 1.
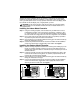
Controller Installation
Figure 1
Indoor Controller
Outdoor Controller
4