
User's Manual

Add Scene/s
Add Hardware
3
4
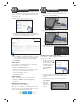
After adding a location, a default Scene is
added to the Light Logic. e default scene
turns on every day of the week from Dusk to 10pm.
To edit the Scene:
1. Click the blue pen by “Scene 1” text.
2. Change the Scene name, description, which days
of the week the scene will execute, and the times of
operation for the specied days as desired.
As you can see in Figure 3, it is possible to have
two dierent Schedules (A and B) for each scene.
For example, one might want security lights to
stay on longer on Friday and Saturday nights.
3. Click Submit.
Add a Scene
It is possible to add additional scenes to the Light
Logic PLUS (see cover diagram).
1. Click the + Add a Scene button.
2. Enter a name, description, specify the days of the
week to run and the time for those days.
Add a Schedule B if desired.
3. Click Create Scene.
1. Press the blue pen next to the Scene name.
2. Click the red Delete scene link (Figure 3).
Conrm.
To manually turn on or o a scene:
Click the On or O button to the right of the scene.
To run a scene for a specic length of time, enter the
desired time (in minutes) then press On.
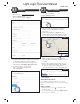
Connecting the Light Logic PLUS
1. Connect Ethernet cable from internet router to
RJ45 port on back of PLUS.
2. Plug in the AC adapter.
3. PLUS lights ash. Left LED should eventually
settle on solid green.
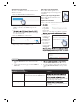
Now we have to add the Light Logic PLUS to your
Light Logic account.
1. At the computer, click
the blue gear icon
by the location to add
the PLUS. From the
contextual menu,
select Congure
Devices.
2. Type in the Light Logic PLUS ID. is is the
“SUID” number on the sticker on the bottom of
the unit.
3. Enter the Security key also found on bottom.
Click Submit.
4. e PLUS
should be
added to the
system.
Figure 3
Position Antenna and
Unit as Shown.
Use Supplied
A
ntenna Only