
Operation Manual


Important:Alwayskeepthebatteryfullycharged
(1.260specicgravity).Thisisespeciallyimportant
topreventbatterydamagewhenthetemperatureis
below32°F(0°C).
1.Removethebatteryfromthechassis;referto
RemovingtheBattery.
2.Checktheelectrolytelevel;refertoCheckingthe
ElectrolyteLevel.
3.Makesurethattheventcapsareinstalledinthe
battery.Chargethebatteryfor1hourat25to
30ampsor6hoursat4-6amps.Donotovercharge
thebattery.
4.Whenthebatteryisfullycharged,unplugthecharger
fromtheelectricaloutlet,thendisconnectthe
chargerleadsfromthebatteryposts(Figure44).
Figure44
1.Positivebatterypost
3.Red(+)chargerlead
2.Negativebatterypost
4.Black(-)chargerlead
5.Installthebatteryinthemachineandconnectthe
batterycables;refertoInstallingtheBattery.
Note:Donotrunthemachinewiththebattery
disconnected,electricaldamagemayoccur.
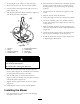
InstallingtheBattery
1.Positionthebatteryinthetraywiththeterminal
postsawayfromthecontrolpanel(Figure42).
2.Installthepositive(red)batterycabletothepositive
(+)batteryterminal.
3.Installthenegativebatterycabletothenegative(-)
batteryterminal.
4.Securethecableswith2bolts(1/4x3/4inch),
washers(1/4inch),andnuts(1/4inch)(Figure42).
5.Slidetheredterminalbootontothepositive(red)
batterypost.
6.Securethebatterywiththehold-down(Figure42).
ServicingtheFuses
Theelectricalsystemisprotectedbyfuses.Itrequires
nomaintenance;however,ifafuseblows,checkthe
component/circuitforamalfunctionorshort.
Fuse:
•MainF1-30amp,blade-type
•ChargeCircuitF2-25amp,blade-type
1.Raisetheseattogainaccesstothefuseholder
(Figure45).
2.Toreplaceafuse,pulloutonthefusetoremoveit
(Figure45).
G005893
1
Figure45
1.Relays5.Fuseblock
2.Alarm6.Main-30amp
3.Positivebatterycable
7.Chargecircuit-25amp
4.Battery
8.Openslots
34