
Operation Manual


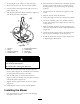

Figure56
1.Locknutandadjustingnut3.Adjustmentnut
2.Fronttire4.Locknut
14.Whenthefront-to-rearbladeslopeiscorrect,
tightenthelocknutsandchecktheside-to-sidelevel
ofthemower;refertoLevelingtheMowerfrom
Side-to-Side.
RemovingtheMower
Note:Beforeremovingthemower,makeanotefor
whichholesareusedinthelevelingbrackets(Figure58).
1.Parkthemachineonalevelsurfaceanddisengage
thebladecontrolswitch.
2.Movethemotioncontrolleverstothebrakeposition,
stoptheengine,removethekey,andwaitforall
movingpartstostopbeforeleavingtheoperating
position.
3.Lowertheheight-of-cutlevertothelowestposition.
4.Removethehairpincotterandclevispinfrom
thefrontsupportrodoneachsideofthemower
(Figure57).
Figure57
1.Hairpincotterandclevis
pin
2.Supportrod
5.Removethehairpincotterandwasherfromthe
adjustingrod(Figure58)oneachsideofthemower.
6.Removethehairpincotterandwasheratthemower
levelingbrackets(Figure58)oneachsideofthe
mower.Notewhichholethelevelingbracketis
mountedinforfutureinstallation.Slidethebrackets
offofthemountingpin.
Figure58
1.Levelingbracket3.Adjustingrod
2.Hairpincotterandwasher
7.Liftupthefrontpartofthemachineandsupport
themachineusingjackstands.
8.Slidethemowerforwardandoutfromunderneath
themachine.
Note:Retainallpartsforfutureinstallation.
MowerBeltMaintenance
InspectingtheBelts
ServiceInterval:Every25hours
Inspectallbeltsevery100hours.
Checkthebeltsforcracks,frayededges,burnmarks,or
anyotherdamage.Replacedamagedbelts.
ReplacingtheMowerBelt
Squealingwhenthebeltisrotating,bladesslippingwhen
cuttinggrass,frayedbeltedges,burnmarks,andcracks
aresignsofawornmowerbelt.Replacethemowerbelt
ifanyoftheseconditionsareevident.
1.Parkthemachineonalevelsurfaceanddisengage
thebladecontrolswitch.
2.Movethemotioncontrolleverstothebrakeposition,
stoptheengine,removethekey,andwaitforall
movingpartstostopbeforeleavingtheoperating
position.
39