
Design Guide


4
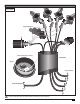
Wiring Inside the Hub
1. Feed all wires into the slanted end of the hub giving 12 of slack to allow for future servicing (Figure 16).
2. Strip 1/2” o each transformer wire and feed into an aluminum terminal lug.
Tighten with supplied Allen wrench (Figure 10).
3. Strip one end of each of the 5-amp fuse wires 1½˝. Twist the exposed ends together (up to four) (Figure 11).
4. Into the same side as the transformer wire of the terminal lug, feed the bundled wires into the other hole. Tighten with an
Allen wrench (Figure 11). Trim excess.
5. Push the wired terminal lug deep into the supplied grease cap (Figure 12).
6. Pull to tighten the zip-tie on the grease cap to secure the terminal lug. (Figure 13).
7. Twist the other end of the 5-amp fuse wire with one of the brown wires from the light runs (Figure 14).
8. Feed the two wires into a provided wire nut (Figure 14).
9. Push the wire nut deep into the provided grease cap and close the latch (Figure 14).
10. Repeat steps 7-9 for the remaining light run wires.
11. Now, twist the remaining brown TWGP lines together (Figure 15).
12. Insert the wired bundle into the other terminal lug, same direction as the transformer line.
Tighten with an Allen wrench (Figure 12).
13. Push the wired terminal lug deep into the supplied grease cap (Figure 12).
14. Tighten the zip-tie on the grease cap to secure the terminal lug (Figure 13).
15. Secure wire bundle to bottom of the hub lid using the pre-attached zip-tie (Figure 16).
16. Install lid on hub.
Figure 12
to TWGP light
Figure 14
5-amp
fuse
wires
Figure 11
to
TWGP
lights
Figure 15
Adjusting the Twilight Golf Post Light (TWGP-STAR36-12-L5)
Figure 8
adjust head angle
Head Angle
1. Loosen the brass nut
(Figure 8) turning it
counter-clockwise.
2. Adjust the head to
the desired angle.
3. Retighten the brass
nut to hold desired
angle.
Figure 9
loosen Oribtal lock nut
to adjust direction
Direction
1. Loosen the Orbital lock
nut (Figure 9) around the
light post.
2. Rotate the head only
of the TWGP-STAR to
desired direction. Do
not rotate the lightpost as
damage may occur.
3. Tighten Orbital lock nut
by hand.
Figure 10
Figure 13