For more information about HP products and services, see the HP Web site at http://www.hp.com. © Copyright 2010 Hewlett-Packard Development Company, L.P. Microsoft and Windows are U.S. registered trademarks of Microsoft Corporation. SD Logo is a trademark of its proprietor. The information contained herein is subject to change without notice. The only warranties for HP products and services are set forth in the express warranty statements accompanying such products and services.
Contents 1 Getting started Charging the battery . . . . . . . . . . . . . . . . . . . . . . . . . . . . . . . . . . . . . . . . . . . . . . . . . . . . . . Verifying the box contents . . . . . . . . . . . . . . . . . . . . . . . . . . . . . . . . . . . . . . . . . . . . . . . . . Getting information. . . . . . . . . . . . . . . . . . . . . . . . . . . . . . . . . . . . . . . . . . . . . . . . . . . . . . . User Manual on a Secure Digital (SD) Memory Card . . . . . . . . . . . . . . . . . . . . . . . .
Contents 5 Multimedia features Using multimedia software. . . . . . . . . . . . . . . . . . . . . . . . . . . . . . . . . . . . . . . . . . . . . . . . 29 Installing multimedia software from a disc . . . . . . . . . . . . . . . . . . . . . . . . . . . . . . . 29 Using HP MediaSmart . . . . . . . . . . . . . . . . . . . . . . . . . . . . . . . . . . . . . . . . . . . . . . . . . . . 30 Using the webcam. . . . . . . . . . . . . . . . . . . . . . . . . . . . . . . . . . . . . . . . . . . . . . . . . . . . .
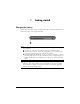
1 Getting started Charging the battery To fully charge the battery, leave the computer plugged into external power until the battery light on the left side of the computer turns white. WARNING: To reduce the risk of electric shock or damage to your equipment, observe ï these guidelines: ■ Plug the power cord into an AC outlet that is easily accessible at all times. ■ Disconnect power from the computer by unplugging the power cord from the AC outlet (not by unplugging the power cord from the computer).
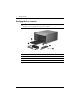
1 Getting started Verifying the box contents color, features, and options may vary by computer model. The illustrations in ✎ Computer this guide may look slightly different from your computer. Component Component 1 Computer 3 Power cord* 2 AC adapter 4 SD Memory Card *Power cords vary in appearance by country or region.
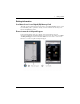
1 Getting started Getting information User Manual on a Secure Digital (SD) Memory Card This guide provides information about new features, such as HP QuickWeb software, action keys, TouchPad gestures, optical drive sharing, as well as details about connecting to the Internet and multimedia features.
1 Getting started Help and Support In Help and Support, you can find information about technical support, and about the operating system, drivers, and troubleshooting tools. To access Help and Support, click Start, and then click Help and Support. For country- or region-specific support, go to http://www.hp.com/support, select your country or region, and follow the on-screen instructions. WARNING: To reduce the risk of serious injury, read the Safety & Comfort Guide.
2 What’s new? Windows 7 Your computer includes the new Windows® 7 operating system. Windows 7 has several new program and feature enhancements, such as: ■ Faster startup ■ Updated Wi-Fi network controls ■ Customizable taskbar ■ Fewer pop-ups and notifications ■ Support for more multimedia formats Customizable desktop The Stardock MyColors program (select models only) offers a customizable desktop theme that transforms the look and feel of your basic Windows desktop.
2 What’s new? Action keys Action keys are customized actions that are assigned to specific keys at the top of the keyboard. To use an action key, press and hold the key to activate the assigned action. ✎ Some action keys are not available in QuickWeb. additional information about action keys, refer to the HP ENVY 15 User Guide. To ✎ For access this guide, click Start, click Help and Support, and then click User Guides.
2 Icon What’s new? Description Plays the previous track of an audio CD, or the previous section of a DVD or a Blu-ray Disc (BD). Plays, pauses, or resumes an audio CD, a DVD, or a BD. Stops audio or video playback of a CD, a DVD, or a BD. Plays the next track of an audio CD or the next section of a DVD or a BD. Decreases speaker sound incrementally when held down. Increases speaker sound incrementally when held down. Mutes or restores speaker sound. Initiates the QuickLock security feature.
2 What’s new? One-touch launch keys One-touch launch keys are customized actions that are assigned to specific keys on the left side of the keyboard. To use a one-touch launch key, press the key to activate the assigned action. Item 1 Icon Description Opens your default e-mail program. first time you press the mail key, you may be prompted to set up ✎ The your e-mail account. After you have set up your e-mail account, you can press the mail key to quickly access your e-mail. 2 Opens HP MediaSmart.
2 What’s new? TouchPad Navigating To move the pointer, slide one finger across the TouchPad in the direction you want the pointer to go. Selecting Use the left and right TouchPad buttons like the corresponding buttons on an external mouse.
2 What’s new? Turning the TouchPad on and off To turn the TouchPad on and off, quickly double-tap the TouchPad off indicator. When the TouchPad is on, the light is off. Using TouchPad gestures The TouchPad supports gestures that make it easy and fun to work with images or pages of text. To activate the TouchPad gestures, place 2 fingers on the TouchPad at the same time as described in the following sections. Scrolling Scrolling is useful for moving up or down on a page or image.
2 What’s new? Pinching/Zooming Pinching allows you to zoom in or out on items such as PDFs, images, and photos. ■ Zoom in by placing two fingers together on the TouchPad, and then moving them apart. ■ Zoom out by placing two fingers apart on the TouchPad, and then moving them together. Setting preferences Scrolling and pinching are enabled at the factory. You computer also supports additional TouchPad gestures that are disabled at the factory.
2 What’s new? Beats Audio Beats Audio is an enhanced audio profile that provides a deep, controlled bass while maintaining a clear sound. Beats Audio is enabled by default. » To increase or decrease the Beats Audio bass settings, press fn+b. You can also view and control the bass settings through the Windows operating system. Click Start, click Control Panel, click Sound, and then click Speakers and Headphone Properties to view and control the bass properties.
2 What’s new? Sharing optical drives Although your computer does not have an integrated optical drive, you can easily access software, install programs, and access information by sharing an optical drive connected to another computer in your network. Drive sharing is a feature of the Windows operating system that allows a drive on one computer to be accessible to other computers on the same network. must have a network set up in order to share an optical drive.
Is QuickWeb for Nikita 1.2 the same as Nikita 1.1? 3 Using HP QuickWeb (select models only) HP QuickWeb is an optional, instant-on environment that is separate from your Windows operating system. QuickWeb allows you to rapidly access a Web browser, and other communication and multimedia programs, without the need to start Windows. QuickWeb is ready to go within seconds of pressing the power button after system setup.
3 Using HP QuickWeb (select models only) Setting up HP QuickWeb for the first time The first time you turn on your computer after completing the Windows setup process, the QuickWeb setup screens appear. Follow the on-screen instructions to activate QuickWeb. At the end of the setup process, you are given the choice to start Windows or to continue to QuickWeb for the current session. If you select the option to start QuickWeb, the QuickWeb Home screen appears.
3 Using HP QuickWeb (select models only) Starting Microsoft® Windows® has been activated, it will start every time you power up your computer. ✎ IfToQuickWeb start Microsoft Windows, you must click the Windows Start icon in the QuickWeb Home screen. To start Microsoft Windows: 1. Turn on your computer. The HP QuickWeb Home screen appears. 2. Click the Windows Start icon on the far left of the QuickWeb Home screen. 3. A dialog box appears, asking if you are sure you want to start Windows. Click Yes.
3 Using HP QuickWeb (select models only) Identifying the LaunchBar icons The following table shows and describes HP QuickWeb icons. Icon Description Launches the Web browser. You can bookmark your favorite Web sites and view Web pages. Launches the Chat application. This is compatible with Google Talk, Windows Live Messenger, Yahoo! Messenger, and other providers. Launches Skype (select models only).
3 Using HP QuickWeb (select models only) Identifying the notification icons The following table shows and describes the notification icons: Icon Description Indicates that a USB drive is present. If a USB drive is inserted, the File Manager window containing a USB icon appears. Click the USB icon to open the File Manager window. Right-click the USB icon to open a menu to safely eject the device. ENVY 15 comes equipped with USB 3.0, please note that ✎ IfonlyyourtheHPeSATA/USB 2.
3 Using HP QuickWeb (select models only) Using the Settings panel 1. After turning on the computer, click the Settings icon. The Settings panel selection box is displayed. 2. Click the icon that corresponds to the system setting you want to modify.
3 Using HP QuickWeb (select models only) Browsing photos To view photos: 1. Click the Photos icon on the LaunchBar. Photo Viewer is displayed. 2. On the left side of the Photo Viewer window, navigate to the directory that contains your photos. The directory can be on either your hard drive or an external drive. The right side of the Photo Viewer window displays thumbnail views of all the photos in the selected directory. 3. Double-click the thumbnail of the photo you want to view.
3 Using HP QuickWeb (select models only) Disabling and enabling HP QuickWeb You can disable or reenable QuickWeb in two ways. To disable or reenable QuickWeb from within the Windows operating system: 1. Click Start, click All Programs, and then click HP QuickWeb. The HP QuickWeb Installer folder displays. Click HP QuickWeb Configuration Tool. 2. Select the Enable QuickWeb check box. 3. Click OK.
4 Connecting to the Internet hardware and software features vary depending on the computer model and ✎ Internet your location. Choosing the type of Internet access The computer supports 2 types of Internet access: ■ Wired—You can access the Internet by connecting to a broadband network using the RJ-45 (network) jack. To learn how to connect to a wired network, refer to the “Connecting to a wired network” section. ■ Wireless—For mobile Internet access, you can use a wireless connection.
4 Connecting to the Internet ■ ■ ISP-provided icons (available in some locations): These icons may be displayed either individually on the Windows desktop or grouped in a desktop folder named Online Services. To set up a new Internet account or configure the computer to use an existing account, double-click an icon, and then follow the on-screen instructions.
4 Connecting to the Internet To connect the cable: WARNING: To reduce the risk of electric shock, fire, or damage to the equipment, ï do not plug a modem or telephone cable into the RJ-45 (network) jack. 1. Connect the network cable to the RJ-45 (network) jack 1 on the computer. 2. Connect the other end of the network cable to a network wall jack 2. Connecting to an existing wireless network To connect the computer to an existing wireless network, follow these steps: 1.
4 Connecting to the Internet Setting up a new wireless network This section describes how to use a wireless computer to set up a typical home or small office wireless network, which is also called a wireless local area network (WLAN).
4 Connecting to the Internet Step 1: Purchase and install a wireless router Read this section carefully before you install the wireless router using the router manufacturer's instructions and your wireless computer. If you need technical assistance during the router installation, contact the router manufacturer. connect your new wireless computer to the router by using the network ✎ Temporarily cable provided with the router. This will ensure that the computer can access the Internet. 1.
5 Multimedia features The following section highlights the entertainment features of the computer. Using multimedia software The computer includes preinstalled multimedia software. » To see a list of the software that is preinstalled on the computer, click Start, and then click All Programs. details about using software included with the computer, refer to the software ✎ For manufacturer’s instructions, which may be provided with the software, on disc, or on the manufacturer’s Web site.
5 Multimedia features Using HP MediaSmart MediaSmart turns your computer into a mobile entertainment center. With MediaSmart, you can enjoy music and movies, and also manage and edit photo collections. » To start MediaSmart, click Start, click All Programs, click HP, and then click HP MediaSmart. MediaSmart includes the following features: ■ Internet TV—View a range of TV shows and channels, as well as the HP-TV channel streamed in full-screen mode to computers with an Internet connection.
5 Multimedia features Using audio features Your computer enables you to use a variety of audio features: ■ Playing music using your computer speakers and/or connected external speakers. ■ Controlling the bass with the Beats Audio feature (fn+b). ■ Recording sound using the internal microphone, or connect an external microphone. ■ Downloading music from the Internet. ■ Creating multimedia presentations using audio and images. ■ Transmitting sound and images with instant messaging programs.
6 Updating software Updating the software installed on the computer Most software, including the operating system, is updated frequently by the manufacturer or provider. Important updates to the software included with the computer may have been released since the computer left the factory. Some updates may affect the way the computer responds to optional software or external devices. Many updates provide security enhancements.
6 Updating software 6. Click Install now to install the updated driver without downloading the file. – or – Click Download only to save the file to your computer. When prompted, click Save, and then select a storage location on your hard drive. After the file is downloaded, navigate to the folder where the file was stored, and double-click the file to install the driver. 7. If you are prompted to do so, restart your computer after the installation is complete, and then verify the operation of the device.
7 Backup and recovery Tools provided by the operating system and by HP Recovery Manager software are designed to help you with the following tasks for safeguarding your information and restoring it in case of a system failure: ■ Backing up your information ■ Creating a set of recovery discs ■ Creating system restore points ■ Recovering a program or driver ■ Performing a full system recovery Creating recovery discs HP recommends that you create recovery discs to be sure that you can restore your system to
7 Backup and recovery Backing up your information As you add new software and data files, you should back up your system on a regular basis to maintain a reasonably current backup. Back up your system at the following times: ■ At regularly scheduled times Set reminders to back up your information periodically.
7 Backup and recovery Using Windows Backup and Restore To create a backup using Windows Backup and Restore, follow these steps: sure that the computer is connected to AC power before you start the backup ✎ Be process. backup process may take over an hour, depending on file size and the speed of the ✎ The computer. 1. Click Start, click All Programs, click Maintenance, and then click Backup and Restore. 2. Follow the on-screen instructions to set up and create a backup.
7 Backup and recovery Creating a system restore point 1. 2. 3. 4. 5. 6. Click Start, click Control Panel, click System and Security, and then click System. In the left pane, click System protection. Click the System Protection tab. Under Protection Settings, select the disk for which you want to create a restore point. Click Create. Follow the on-screen instructions.
7 Backup and recovery Recovering using the recovery discs To restore the system from the recovery discs: 1. Back up all personal files. 2. Insert the first recovery disc into an optional external optical drive, and restart the computer. 3. Follow the on-screen instructions. Recovering using the partition on the hard drive (select models only) On some models, you can perform a recovery from the partition on the hard drive, which is accessed by pressing either the Start button or f11.
A Product information and troubleshooting Input power The power information in this section may be helpful if you plan to travel internationally with the computer. The computer operates on DC power, which can be supplied by an AC or a DC power source. Although the computer can be powered from a standalone DC power source, it should be powered only with an AC adapter or a DC power source supplied and approved by HP for use with this computer.
A Product information and troubleshooting Traveling with the computer For best results, follow these traveling and shipping tips: Prepare the computer for traveling or shipping: 1. Back up your information. 2. Remove all discs and all external media cards, such as digital cards. ■ To reduce the risk of damage to the computer, damage to a drive, or loss of ï information, remove the media from a drive before removing the drive from a drive bay, and before shipping, storing, or traveling with a drive.
A Product information and troubleshooting Routine care Cleaning the display CAUTION: To prevent permanent damage to the computer, never spray water, ï cleaning fluids, or chemicals on the display. To remove smudges and lint, frequently clean the display with a soft, damp, lint-free cloth. If the screen requires additional cleaning, use premoistened antistatic wipes or an antistatic screen cleaner.
A Product information and troubleshooting Quick troubleshooting The computer is unable to start up If the computer does not turn on when you press the power button, the following suggestions may help you resolve the problem: ■ If the computer is plugged into an AC outlet, unplug the computer, and then plug another electrical device into the outlet to be sure that the outlet is providing adequate power. Use only the AC adapter provided with the computer or one approved by HP for this computer.
A Product information and troubleshooting The computer is on but is not responding If the computer is on but is not responding to software or keyboard commands, try the following emergency shutdown procedures, in the sequence provided, until shutdown occurs: CAUTION: Emergency shutdown procedures will result in the loss of unsaved ï information. ■ ■ Press and hold the power button on the computer for at least 5 seconds. Disconnect the computer from external power and remove the battery.
A Product information and troubleshooting The wireless network connection is not working If a wireless network connection is not working as expected, follow these suggestions: ■ Click Start, click Control Panel, click Network and Internet, and then click Network and Sharing. ■ Be sure that the wireless device is turned on (wireless light is off). If the light is amber, press the wireless key to turn on the wireless device. ■ Be sure that the computer wireless antennas are free from obstructions.
Index A M action keys, identifying 6 altitude specifications 41 audio features 31 mail key 8 media keys 7 Media Launch key 8 Microsoft Windows default power on 17 starting 17 monitor, external 45 multimedia software 29 Music Player 15 B backing up 36 Beats Audio 12, 31 C cable, modem 23 cables and cords, power 44 calculator key 8 Chat 21 connecting to a wired network 24 connecting to an existing wireless network 25 D devices, external, troubleshooting 45 drivers, updating 33 E environmental specifica
Index R recovery discs, creating 35 Recovery Manager 38, 39 recovery, performing 38 recovery, system 35 regulatory information notices 4 Regulatory, Safety and Environmental Notices 4 S Web browser key 8 Web calendar 15 Web e-mail 15 webcam 30 Windows Backup and Restore 37 wireless Internet access 23 wireless network connection 25 Z zooming gesture 11 screen brightness keys 6 scrolling gesture 10 Skype 21 software multimedia 29 safeguarding information 35 updating 33 specifications altitude 41 humidity