User’s Manual dynadock™ WiAC www.toshiba.
dynadockTM WiAC Content User? Manual Introduction................................................................................................12 Features ..............................................................................................12 Package Contents ...............................................................................13 Computer Requirements .....................................................................13 Quick Tour.....................................................
dynadockTM WiAC Conventions This manual uses the following formats to describe, identify, and highlight terms and operating procedures. Abbreviations On first appearance, and whenever necessary for clarity, abbreviations are enclosed in parentheses following their definition. For example: Read Only Memory (ROM). Icons Icons identify ports, dials, and other parts of your dynadockTM. The indicator panel also uses icons to identify components.
dynadockTM WiAC Safety Instructions Always read the safety instructions carefully: Do not disassemble, modify, tamper with or repair your product ■ Do not attempt to disassemble, modify, tamper with or repair product (including AC adaptor). Disassembly, modification, tampering or repairing the product could cause fire or electric shock, possibly resulting in serious injury. Please contact an authorized Toshiba service provider for any repair service.
dynadockTM WiAC Dust on the power plug connectors or connector base ■ If dust gets on the power plug connectors or connector base, turn the power off and disconnect the power plug. Then clean the connector and/or connector base with a dry cloth. Continuing to use the product without cleaning the power plug may result in a fire or an electric shock, possibly resulting in serious injury.
dynadockTM WiAC Never place your product or AC adaptor on a heat sensitive surface ■ Never place your product or AC adaptor on a wooden surface, furniture, or any other surface that could be marred by exposure to heat since the product base and AC adaptor’s surface increase in temperature during normal use. ■ Always place your product or AC adaptor on a flat and hard surface that is resistant to heat damage.
dynadockTM WiAC This equipment generates, uses and can radiate radio frequency energy and, if not installed and used in accordance with the instructions, may cause harmful interference to radio communications. However, there is no guarantee that interference will not occur in a particular installation.
dynadockTM WiAC CE Compliance This product is CE marked in accordance with the requirements of the applicable EU Directives. Responsible for CE marking is TOSHIBA EUROPE GMBH, Hammfelddamm 8, 41460 Neuss, Germany. A copy of the official Declaration of Conformity can be obtained from following website: http://epps.toshiba-teg.com.
dynadockTM WiAC Toshiba will meet all REACH requirements and is committed to provide our customers with information about the presence in our articles of substances included on the candidate list according to REACH regulation. Please consult the website www.toshiba.eu/reach for information about the presence in our articles of substances included on the candidate list according to REACH in a concentration above 0.1% weight by weight.
dynadockTM WiAC Copyright Statement No part of this publication may be reproduced in any form by any means without prior written permission. Other trademarks or brand names mentioned herein are trademarks or registered trademarks of their respective companies. Disclaimer Information in this document is subject to change without notice.
dynadockTM WiAC Precautions for Microsoft® Windows® 7 and Windows 8.1 Due to the many configurations of computers and Windows® operation systems available, functionality may differ slightly than stated in the user manual. This might be due to the computer manufactures BIOS and other custom configurations of the hardware, pre-installed software or operating system installed at time of production.
dynadockTM WiAC Introduction Thank you for purchasing the Toshiba dynadockTM WiAC, the universal docking station that enables you to connect your computer peripherals wirelessly or through one USB cable to just about any Windows-based computer. It can also be used as a wireless AP (Access Point) for other users to go to the Internet simultaneously. Increased mobility and the absence of cabling is beneficial for your network.
dynadockTM WiAC Package Contents Check to make sure you have all of the following items: ■ ■ ■ ■ ■ ■ dynadockTM WiAC AC adaptor and power cord USB 3.0 cable Wall mount parts Quick Start Guide Warranty leaflet Computer Requirements Component Requirement CPU 2 GHz or higher processor (Intel® Core i5/i7 family, or AMD Liano family, or compatible processor recommended. Intel® Core™ i7 2 GHz or higher processor recommended for optimal video performance) Wireless module a computer integrated with 802.
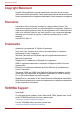
dynadockTM WiAC Quick Tour This section identifies the various components of the dynadock. Front The following illustration shows the front of the dynadock. For a description of each component, refer to the accompanying table. 7 6 3 1 4 5 2 (Sample Illustration) The front of the dynadock 1. Universal Serial Bus (USB 3.0) port 5. Power indicator 2. Headphone/Microphone combo jack 6. Security lock slot 3. USB upstream indicator 7. WPS/Undock button 4.
dynadockTM WiAC ■ Note that it is not possible to confirm the operation of all functions of all USB devices that are available. Some functions associated with a specific device might not operate properly. ■ Only the USB 3.0 port on the front panel supports wake-up on USB. ■ If your USB device, such as a printer or optical drive, and so on, came with its own AC adaptor, make sure that it is plugged into the device and a live electrical outlet. Component Description Headphone/ Microphone combo jack A 3.
dynadockTM WiAC Back The following illustration shows the back of the dynadock. For a description of each component, refer to the accompanying table. 1 2 3 4 5 6 7 8 (Sample Illustration) The back of the dynadock 1. Power switch 5. Universal Serial Bus (USB 3.0) port 2. DC IN 19V jack 6. Universal Serial Bus (USB 3.0) port 3. LAN jack 7. HDMI out port 4. USB upstream connector 8. DisplayPort Component Description Power switch Switch to turn on/off the dynadock.
dynadockTM WiAC Component Description LAN jack This jack lets you connect to a LAN via a network (10/100/1000 BASE- cable (not provided). Connect one end of a network cable to the Ethernet port (RJ-45) on the dynadock TX Ethernet) and the other end to your network for high performance network access. To configure the network properties of the Ethernet adaptor: In Windows 8.
dynadockTM WiAC Component Description HDMI out port HDMI out port can connect with Type A connector HDMI cable (supports video and up to 5.1 surround sound). An HDMI cable sends video and audio signals. In addition, it can send and receive control signals. DisplayPort This port is for a connection to a DisplayPort device. HDMI out port and DisplayPort can be used simultaneously for a dual display. Underside The following illustration shows the underside of the dynadock.
dynadockTM WiAC Using your dynadock for the first time This section provides basic information to start using your dynadock. Installing the Drivers 1. The drivers are provided at www.toshiba.eu/download-drivers. Please select OPTIONS -< CONNECTIVITY -< DOCKS & PORT REPLICATORS -< DYNADOCK WiAC from the drop-down menu, then click SEARCH.You can save it to a storage device and then install to your computer.
dynadockTM WiAC 2. Connect the DC output plug of the AC adaptor to the DC IN 19V jack on the dynadock. (Sample Illustration) Connecting the AC adaptor cord to the dynadock 3. Plug the power cord into a live wall outlet. 4. Switch to turn on the dynadock. The power indicator on the front panel glows green.
dynadockTM WiAC ■ The name of the dynadock is displayed as “dynadockWiAC_xxxxxx”, which differs from models. ■ Some computers might not immediately recognize that the dynadock is connected upon start-up. This is related to the computers BIOS start up sequence but not a malfunction of the dynadock. If this occurs, do the following: 1. Turn off the computer 2. Disconnect the dynadock from the computer. 3. Turn the computer back on. 4.
dynadockTM WiAC To change the default settings, you might need to adjust the audio settings in Windows® manually, as described in this section. ■ If there is no audio device connected to the dynadock, the audio ports on the computer are enabled automatically. ■ If your media player is running when you undock or dock, you must close the application and wait approximately 10-15 seconds for the new settings to take effect before restarting the application. ■ Audio devices connected to the dynadock via the 3.
dynadockTM WiAC Configuring audio recording ports (Microphone) 1. Right-click the speaker icon in the Notification Area of your Windows® desktop. 2. Select Recording Devices from the menu. 3. On the Recording tab of the dialog box, select one of the following: ■ A Realtek High Definition Audio device—to use the Microphone jack or headphone/microphone combo jack of the docked computer ■ A dynadock Audio device—to use the headphone/microphone combo jack of the dynadock 4. Click Set Default. 5. Click OK. 6.
dynadockTM WiAC Video Modes The dynadock video output works in two modes: ■ Mirror Mode ■ Extend Mode Mirror Mode Mirror mode creates an identical display from your computer screen to the external monitor. This is useful, for example, if you want to use a larger desktop monitor rather than the computer screen.
dynadockTM WiAC ■ If the icon is not visible in your system tray/notification area, make sure that the dynadock is connected and docked, and then click the Show Hidden Icons button ( ), if necessary, to display hidden icons.
dynadockTM WiAC When the HDMI/DisplayPort component first starts, it will extend the primary monitor. Changes to the screen mode and HDMI/DisplayPort component operation mode can be made under the Windows display properties. If no output is seen on the monitor connected to the HDMI/ DisplayPort component, it might be in a mode which cannot be displayed by the monitor. This can happen if the monitor does not report its supported modes to the HDMI/DisplayPort component.
dynadockTM WiAC ■ To change the screen resolution, select those options on the screen. Be sure to select one of the supported resolutions numbers in the table above. For an external monitor, you can also select any resolution supported by that monitor. ■ To change the refresh rate, do the following: 1. Select Video Setup from the menu. This opens the Windows® Display Settings screen. 2. On the Display Settings screen, click Advanced settings and then click Monitor. 3.
dynadockTM WiAC How Standby/Sleep/Hibernation Mode Affects Devices Attached to the dynadock External Monitors The external monitor connected to the dynadock goes blank if the computer enters standby/sleep/hibernation mode. When in Mirror mode, the external monitor retains the settings it had previoulsly when the computer resumes from standby/sleep/hibernation mode.
dynadockTM WiAC How to go to the Web Graphical User Interface Follow these instructions to enter the web Graphical User Interface. 1. Click the UDS icon in the Notification Area of your Windows® desktop and select “dynadock WiAC Configure Setting”. Or, open your web browser, type in IP address http://192.168.1.1 in the address field and press Enter. 2. Enter Username and Password. Both of them are “admin” by default. 3. Click OK to continue.
dynadockTM WiAC WPS function While being used as an AP, the WPS button allows you to connect to the Internet without a password. 1. Click the Internet icon in the Notification Area of your Windows® desktop and connect to “dynadockWiAC_xxxxxx”. 2. Press the WPS button for about 5 seconds and the connection is completed. WPS function can be used for only one user at a time. Troubleshooting Problem Procedure AC adaptor does not Check the connections to make sure that the power power the dynadock.
dynadockTM WiAC Problem Procedure The USB ports are Remove the USB device from the dynadock and not functioning on the then reconnect it to a free port in order to ensure dynadock. that it is firmly attached. Ensure that any required USB device drivers are properly installed. To achieve this, refer to both the device documentation and the operating system documentation. The LAN port is not functioning. Check for a firm cable connection between the LAN jack and the LAN hub.
dynadockTM WiAC General Specifications Computer Interface USB 3.0 or 2.0 or wirelessly Ports and Connectors 2 x USB 3.0 ports on the back 1 x USB 3.