
User's Manual


The printer can handle paper with different thicknesses, including multipart forms with up to
four parts (original plus three copies). For details on paper thickness specifications, see
Appendix B “Printer and Paper Specifications.”
The Print Gap lever, located on the left under the cover, allows you to adjust for different
paper thicknesses. Be sure to adjust the Print Gap lever whenever you change the number
of copies being printed.
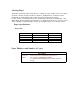
The print gap lever has twelve settings.
Moving the Print Gap lever to front of printer reduces the Print Gap.
Adjusting the Print Gap Lever
Using Continuous Forms
Continuous forms paper, fanfolded at the horizontal perforations, is ideal for printing rough
drafts, long files, forms and invoices. The paper is fed into the printer using the forms tractor
unit. The Push tractor is at the front/bottom of the printer. The paper is loaded and adjusted
via pushbuttons. The forms may be advanced to tear off position by operator or automatically
through a timeout.
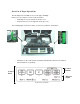
Rear of Printer
Left Side View
Front of Printer
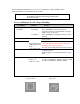
Important:
Open Print Gap
lever to maximum
to replace ribbon.
Caution: If printing smears, the ribbon misfeeds, or the paper jams, move the lever one position wider.
Small Print Gap
Large Print Gap