
Operation Manual


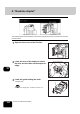


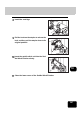

Table Of Contents
- CONTENTS
- NOTICE TO USERS
- TOSHIBA QUALITY IS SECOND TO NONE
- PREFACE
- FEATURES OF THE e-STUDIO520/600/720/850
- GENERAL PRECAUTIONS
- DISCLAIMER NOTICE
- 1. BEFORE USING EQUIPMENT
- 1. Description of Each Component
- 2. Turning Power On / Shutdown
- 3. Energy Saving Mode
- 4. Setting Copy Paper
- 2. HOW TO MAKE COPIES
- 3. SETTING OF BASIC COPY MODES
- 1. Paper Selection
- 2. Enlargement and Reduction Copying
- 3. Selecting Finishing Modes
- 4. Duplex Copying
- 5. Original Mode
- 6. Copy Density Adjustment
- 4. IMAGE ADJUSTMENT
- 5. USING THE EDITING FUNCTIONS
- 6. e-FILING
- 7. TEMPLATE
- 8. JOB STATUS
- 9. BLINKING GRAPHIC SYMBOLS
- 10. WHEN THIS MESSAGE APPEARS
- 1. “Toner low”
- 2. “Check staple cartridge”
- 3. “Check staple cartridge in the saddle stitch unit”
- 4. “Examine stapler”
- 5. “READY (CHECK STAPLER)”
- 6. “Examine stapler in the saddle stitch unit”
- 7. “READY (CHECK SADDLE STITCH STAPLER)”
- 8. “READY (HOLE PUNCH DUST BIN IS FULL)”
- 9. “POWER FAILURE”
- 10. “Time for periodic maintenance”
- 11. “Check paper size setting on control panel for drawer N”
- 12. “Reboot the machine”
- 11. MAINTENANCE
- 12. SPECIFICATIONS & OPTIONS
- INDEX

305
10
6. “Examine stapler in the saddle stitch unit”
This message appears when the staples in the saddle stitch unit (optional) are jammed. To remove them,
follow the procedure below.
1
Open the lower cover of the Saddle Stitch
Finisher.
2
Pull out the saddle stitch unit slowly.
3
Pull the handle of the stapler of the sad-
dle stitch unit to release the lock. And
then rotate the stapler approx. 60º clock-
wise.
• The stapler is locked and fixed when it comes to a near-horizon-
tal position.
1
2