9W330DB COLOUR TELEVISION OWNER’S MANUAL 呏午䥂䄭⠱㥖㌳い䈩ⴱ㤷㤵ⵃ佖䕒⁐䅇䔭呆吭〵〵㔶ⴵ〱へ硸 〵⁈慺楲慮′〰㜠卡泽‱〺㈷㨰
Contents SETTING UP Safety Precautions – Some do's and don'ts for you to be aware of Installation and important information The remote control – an at-a-glance guide Connecting external equipment – a guide to connecting equipment to the back of the television Side Connections and controls – switching on the television, standby, using the side controls Tuning the television – digital tuning Tuning the television – digital programme sorting, auto tuning, manual tuning Tuning the television – analogue tuning,
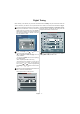
Safety Precautions This equipment has been designed and manufactured to meet international safety standards but, like any electrical equipment, care must be taken to obtain the best results and for safety to be assured. Please read the points below for your own safety. They are of a general nature, intended to help with all electronic consumer products and some points may not apply to the goods you have just purchased.
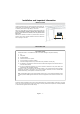
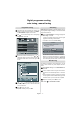
Installation and important information Where to install Locate the television away from direct sunlight and strong lights; soft, indirect lighting is recommended for comfortable viewing. Use curtains or blinds to prevent direct sunlight falling on the screen. Place on a sturdy platform, the mounting surface should be flat and steady. It must then be secured to the wall with a sturdy tie using the clip on the back of the television, this will prevent it from falling over.
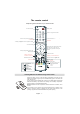
The remote control Simple at-a-glance reference of your remote control. Standby mode To mute the sound To select TV programme number To select between analogue and digital TV, or an external source To return to the previous programme in TV mode. No function To display the digital on-screen Programme Guide BACK GUIDE MENU EXIT On-screen menus To exit Menus When using menus the direction buttons move the cursor on the screen up, down, left or right.
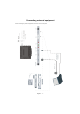
Connecting external equipment Before connecting any external equipment, disconnect from the main power.
Connecting external equipment continued, Aerial cables: Connecting the PC via PC input Connect the aerial to the socket on the rear of the television. If you use a decoder and/or a media recorder it is essential that the aerial cable is connected through the decoder and/or through the media recorder to the television. • Power off both computer and TV before making any connections. SCART leads: Connect the media recorder IN/OUT socket to the television. Connect the decoder TV socket to the television.
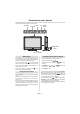
Connections and controls Whilst all the necessary adjustments and controls for the television are made using the remote control, the buttons on the top of the television may be used for some functions. VOLUME PROGRAMME UP / DOWN UP / DOWN MENU VOLUME P/CH MENU TV/AV POWER ON/OFF TV/AV HEADPHONE JACK LED Blue = Standby Switching on Using the controls and connections If the standby LED is unlit, connect the mains plug to the mains outlet. Press the Power button to switch the television into standby.
Digital Tuning Before switching on the television put your decoder and media recorder to Standby if they are connected and ensure the aerial is connected to your television. To set up the television use the buttons on the remote control as detailed on page 4. Connect the mains plug and switch the TV into standby using the top Power button. Press any numbered or standby button on the remote control, the Local Options screen will appear.
Digital programme sorting, auto tuning, manual tuning Programme sorting Auto tuning The station order may be changed, for instance if the picture is unclear or the signal is weak. Press MENU, the SETUP MENU will appear on the screen. Auto tuning will completely re-tune the television. All current programme sorting and settings, i.e. favourites and locked programmes, will be lost. Select the SETUP MENU and use Auto tuning. Press OK. Use to move down through the list and highlight Programmes. Press OK.
Analogue Tuning and programme sorting Before switching on the television put your decoder and media recorder to Standby if they are connected and ensure the aerial is connected to your television. To set up the television use the buttons on the remote control as detailed on page 4. When TV (Analogue TV) is selected for the first time; the A.P.S. screen will appear. You must allow the television to complete the search.
Analogue manual tuning The television can be tuned-in manually using INSTALL. For example: if the television cannot be connected to a media recorder/decoder with a SCART lead or to tune-in a station on another System. Manual tuning To allocate a programme position on the television for a decoder and media recorder: turn the decoder on, insert a pre-recorded film into the media recorder and press PLAY, then manually tune. Press MENU and using the Up or Down button select INSTALL menu.
Analogue APS, choosing a language APS (AUTOMATIC PROGRAMMING SYSTEM) When the APS (AUTOMATIC PROGRAMMING SYSTEM) feature is selected all channels and settings will be lost, the television will return to factory settings and then re-tune. Press MENU and using the Up or Down button select INSTALL menu. By using Up or Down buttons, select PROGRAM TABLE and press Right button. Program Table P01 BBC 1 P02 C 04 P03 P04 P05 P06 P07 P08 P09 P10 Delete Name Auto.
Analogue general controls, time display, stereo/ bilingual transmissions, child lock Selecting programme positions To select a programme position use the numbered buttons on the remote control.Programme positions can also be selected using and buttons on the remote control Analogue TV menus will appear on the screen. Press Up or Down button select the FEATURES menu. Press the Down button to choose Child Lock and press the Left or Right button to turn it on or off. and the top of the TV.
Picture format Depending on the type of broadcast being transmitted, programmes can be viewed in different formats.Press the button repeatedly to select between Auto, Wide and 4:3. When Auto is selected the format being displayed is determined by the picture being broadcast. WIDE 4:3 Use this setting when watching a 16:9 broadcast. Use this setting to view a true 4:3 broadcast. Using the special functions to change the size of the displayed image (i.e.
Analogue Picture controls — picture mode, hue, colour temperature, room lighting Picture mode This television offers the choice of personalising the picture style.Press to view the different styles available: MANUAL, BRIGHT, STANDARD and SOFT. Select the PICTURE option from the main menu.
Timers On-screen information When viewing in digital mode the on-screen information and guide give access to programme details for all available channels. Sleep timer - analogue Information The television can be set to turn itself OFF after a certain time. Press MENU and press or to select Features. Then Select information by pressing , the information screen will appear giving details of the channel and programme currently being viewed. or OK to enter the menu. 13.45 Sat, 21 Aug.
Digital programme guide and setting digital programme timer Guide Programme timer - digital only Select the on-screen guide by pressing GUIDE, the guide screen will appear highlighting details of the channel and programme currently being viewed. This may take a few moments to appear. Press MENU and 10.03 Mon, 30 Sep. ALL PROGS 10:00 10:30 City Hospital BBC TWO Teletubbies Wildlife on ITV 1 Trisha This Morning Five BBC THREE to select the TIMER MENU.
Digital parental controls - setting the pin, mode There are a number of parental controls which can block specific channels being viewed, and which can only be accessed with a security PIN code when in digital mode. Once you’ve entered the PIN code, you do not need to enter it again until next time you power-on TV. To restore PIN code entry again (e.g. for parental controls on locked programmes) press STANDBY twice.
Digital settings - favourite programmes, locked programmes, encrypted programmes Selecting Favourite Programmes Locking Programmes Favourite Programmes creates a list of the digital channels that are watched most. Four lists can be created, this can be a mixture of television, text and radio channels. Locked programmes stops the viewing of selected digital channels,which can only be accessed by entering the PIN. From the FEATURE MENU press to select Favourite and Locked Programmes and press OK.
Digital settings continued - country, language and audio languages Country Language This feature allows you to select a country option for the APS installation process. From the SETUP MENU press OPTIONS. to select LOCAL This feature will define the Menu language selection. From the LOCAL OPTIONS menu press Language item. to select LOCAL OPTIONS SETUP MENU TV Setup OK Local Options OK Auto tuning OK Manual tuning OK Programmes OK Back 13.39 Back Watch TV Press OK, then use try.
Digital settings continued - audio languages, subtitles, audio output, reset tv, common interface, local time settings Reset TV LOCAL OPTIONS Selecting Reset TV will delete all stored digital and analogue channels and settings. The television will return to factory settings and then auto tune. Press MENU and then press highlighted. Press OK to select. A screen will appear warning that all previous settings will be deleting, press OK to continue. 13.
Digital settings continued - version, auto upgrade and searching for new software Version Searching for new software This feature can be used to check the version of software currently installed. If prefered, software upgrades can be searched for manually using Search For New Software. From the FEATURE MENU press ware Upgrade. to select Softt- In the SOFTWARE UPGRADE menu press to select Search For New Software.
Analogue sound controls — volume, sound mute, equalizer, balance, AVL, effect, line out, headphone volume Sound Controls Sound Balance Volume Press or on the remote control or using the top buttons on the TV to adjust the volume. Sound Mute Press on the remote control once to turn the sound off and again to cancel. Press the Right button to select the SOUND option from the main menu. Press the Down button to highlight Balance and Left or Right button to adjust the settings.
Input selection, AV connections Settings for the INPUT and OUTPUT sockets so that the television recognises connected equipment. See page 5 and 6 for a clear view of the back connection recommendations and page 7 for the side connections. Input selection Use the Input Selection if the television does not switch over automatically. Press the external source selection button lect an input from the menu displayed.
PC Mode PC Picture Position and PC Picture menus are described below. The other menu items are identical to TV mode menus. Please see the previous sections. For connections please refer to page 5. Autoposition Clock If you shift the picture horizontally or vertically to an unwanted position, use this item to put the picture into correct place automatically.
PC input typical display modes Mode Res olution Frequency (Hz) Horizontal Vertical 1 2 640 800 480 600 60 56 IBM, VGA VESA 3 4 5 6 7 800 600 640 640 800 800 480 480 600 600 60 72 75 72 75 VESA VESA VESA VESA VESA 8 9 10 11 12 1024 1024 1024 1280 1280 768 768 768 720 768 60 70 75 60 60 VESA VESA VESA VESA VESA English - 26 -
Digital and Analogue text services Digital text and interactive services The digital text and interactive services are the up-to-date way of viewing service information, using computer-style formats, incorporating pictures and interactive views. They offer high quality on-screen images with multi-colour photographic still images, advanced text and graphics and are user-friendly.
Text services To hold a wanted page: At times it is convenient to hold a page of text. Press and will appear in the top left of the screen. The page will be held on screen until the button is pressed again. To enlarge the text display size: Press once to enlarge the top half of the page, press again to enlarge the bottom half of the page. Press again to revert to normal size. To select a page whilst viewing a normal page: Enter the page number then press , a normal picture will be displayed.
Q u e stio n s and A n sw e rs B e lo w a re th e a n s w e rs to s o m e o f th e m o s t c o m m o n q u e rie s .F o r m o re in fo rm a tio n , g o to w w w .to s h ib a .c o .u k Q A Q A Q A Q A Q A Q A Q A W h y is the re n o so u nd o r p i c t ure ? C h e c k th e m a in s s w itc h is o n a n d ch e ck a ll c o n n e c tio n s . C h e c k th e te le vis io n i s n o t in s ta n d b y m o d e .
Questions and Answers Below are the answers to some of the most common queries.For more information go to www.toshiba.co.uk Q A Q A Q A Why is the DTV main menu unavailable? Analogue mode (TV) is selected. Press select DTV. to Why is the digital channel locked? The channel has been selected in the locked programmes list, see page 19 . Q A Q A Why can only certain digital channels be viewed? Favourite Mode has been set to On. See page 19 .
Notes For your own records English - 31 -
Notes For your own records English - 32 -
Specifications and accessories 19W330DB Broadcast Systems / Channels UHF UK21-UK69 PAL I VHF E2-E12, S1-S41 UHF E21-E69 PAL-B/G VHF E2-E12, S1-S41 SECAM-L UHF F21-F69 VHF F1-F10, B-Q SECAM-D/K UHF R21-R69 VHF R1-R12 DVB-T Broadcast Systems country VHF UK France 05-12 Germany 05-12 05-12 Italy excluded Spain Switzerland 05-12 Sweden 05-12 Finland 05-12 Greece 05-12 Austria 05-12 Video Input UHF 21-69 21-69 21-69 21-69 21-69 21-69 21-69 21-69 21-69 21-69 Programme Positions 100 Stereo Nicam, German 2 c
"Printed on Recycled Paper" "100% Chlorine free" 呏午䥂䄭⠱㥖㌳い䈩ⴱ㤷㤵ⵃ佖䕒⁐䅇䔭呆吭〵〵㔶ⴵ〱へ硸 〵⁈慺楲慮′〰㜠卡泽‱〺㈷㨰 50074235 European Service centre: Toshiba Information Systems (U.K.