22BL712G DIGITAL Series OWNER’S MANUAL
Contents 01_MB62_[GB]_DVB_TC_(IB_INTERNET)_(22145LED_3910UK)_BRONZE19_10081092_10079982.indd 1 English Viewing Info Banner, Electronic Programme Guide .................................................................... 19 Viewing Info Banner.......................................... 19 Electronic Programme Guide............................ 19 Language Selection .............................................. 20 Language Settings ............................................ 20 Preferred ..................
English Other Settings ................................................... 27 Using a Conditional Access Module ................. 27 Setting Timers, Setting Date/Time ........................ 28 Timers ............................................................... 28 Setting Sleep Timer .......................................... 28 Setting Programme Timers ............................... 28 Configuring Date/Time Settings ........................ 28 Source Settings, Other Controls .........................
Safety Precautions Air Circulation Do not Leave more than 10cm clearance around the television to allow adequate ventilation. This will prevent overheating and possible damage to the television. Dusty places should also be avoided. DON’T remove any fixed cover as this may expose dangerous voltages. Heat Damage Damage may occur if the television is left in direct sunlight or near a heater.
Installation and Important Information Where to install English Sturdy tie (as short as possible) P Clip * Button and stand style is dependent on model. P Clip “P” Clip position on TV is dependent on model. Locate the television away from direct sunlight and strong lights. Soft, indirect lighting is recommended for comfortable viewing. Use curtains or blinds to prevent direct sunlight falling on the screen. Place the TV on a stable, level surface that can support the weight of the TV.
Important safety information Headphone Warning Loud music can damage your hearing irreversibly. Do not set the volume to a high level when listening through headphones, particularly for extended listening periods. English DO NOT OPEN COVERS AND DO NOT REPAIR YOURSELF. REFER SERVICING TO QUALIFIED PERSONNEL. Information for the DVB-T function • Any function relative to the digital television (with the DVB logo) is available only within the country or area where such signals are transmitted.
Important safety information (continued) English • Keep away from rodents. Rodents (and also cockatiels) enjoy biting electric flexes. They can cause a short circuit (fire hazard!) and receive a fatal electric shock. • Always hold the plug when disconnecting the unit from the socket outlet. Do not pull on flex. The flex can become overloaded and cause a short circuit. • Use a soft, dry cloth to clean the unit. • Set up unit so that no one will trip over the flex.
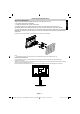
Removing the pedestal stand English When using a Wall Bracket Please use a wall bracket appropriate for the size and weight of the LCD TV. • Two people are required for installation. • To install a wall-mount from another manufacturer. (1) Unplug and remove any cables and/or other component connectors from the rear of the TV. (2) Carefully lay the front of the unit face down on a flat, cushioned surface such as a quilt or blanket. (3) Follow the instructions provided with your wall bracket.
The Remote Control English Simple at-a-glance reference of your remote control. Standby / On mode To switch your TV to standby mode. Subtitle On/Off Mono-Stereo / Dual I-II To enable the displaying of subtitles. Stereo/Bilingual Transmissions Image size Expand (in TXT mode) Red button SCREEN LANG SUBTTL No function Blue button Green button 1 2 3 4 5 6 7 8 9 0 Teletext / Mix To call up text services in analogue broadcasts and interactive services in digital mode.
Connecting External Equipment Side View English Before connecting any external equipment, remove the mains plug from the wall socket. COMMON INTERFACE The Common Interface is for a Conditional Access Module (CAM). USB Input HDMI 1 HDMI Input Socket DIGITAL AUDIO Socket RGB/PC Input Aerial Input SPDIF Coax.OUT SIDE AV MODE o Headphone Menu Wheel SCART Socket * a decoder could be Digital Satellite, Free to Air or any other compatible decoder. decoder* TV Aerial cable:.........................
Connecting an HDMI® or DVI Device to the HDMI Input English The HDMI input on your TV receives digital audio and uncompressed digital video from an HDMI source device or uncompressed digital video from a DVI (Digital Visual Interface) source device. This input is designed to accept HDCP (High-Bandwidth Digital-Content Protection) programme material in digital form from EIA/CEA-861-D–compliant [1] consumer electronic devices (such as a set-top box or DVD player with HDMI or DVI output).
Connecting a Computer Connecting a USB Memory English To Connect a Computer Connect a USB Memory With either an RGB/PC or an HDMI connection, you can watch your computer’s display on the TV and hear the sound from the TV’s speakers. • You can connect a USB memory to your TV by using the USB input of the TV. This feature allows you to display/play music, photo or video files stored in a USB memory.
Power Save Mode English Environmental Information • This television is designed to consume less energy to save environment. You not only help to save the environment but also can save money by reducing electricity bills, thanks to the energy efficiency feature of this TV. To reduce energy consumption, you should take the following steps: You can use Power Save Mode setting, located on page 22.
Controlling the TV English A wide variety of external equipment can be connected via the sockets located on the side and back of the TV. Whilst all the necessary adjustments and controls for the TV are made using the remote control, the menu wheel on the left side of the TV may be used for some functions.
Initial Installation English Before switching on the TV, put your decoder and media recorder to Standby if they are connected and ensure the aerial is connected to your TV. To set up the TV, use the buttons on the remote control as detailed on page 8. IMPORTANT: Ensure that the aerial is connected and a Common Interface module is not inserted before switching on the TV for the first time installation. 1. Connect the mains plug and switch the TV to on using the side control switch.
Initial Installation - continued Auto Tuning English Auto Tuning As new services are broadcast, it will be necessary to retune the television in order to view them. • Auto Tuning will completely retune the television and can be used to update the channel list. It is recommended that Auto Tuning is run periodically to ensure that all new services are added. All current channels and settings, i.e. locked channels, will be lost. Note: You can press MENU button to cancel.
Manual Tuning, Analogue Fine Tuning The television can be tuned-in manually using Manual Search feature. English Digital Aerial Manual Search Analogue Manual Search The feature is available for service engineers or can be used for direct channel entry if the multiplex channel is known. The television can be tuned-in manually. For example: if the television cannot be connected to a media recorder/decoder with a SCART lead or to tune-in a station on another System.
General Operation English Stereo and Bilingual Transmissions Standby Notifications If stereo or dual language broadcasts are transmitted, the word Stereo or Dual will appear on the screen each time positions are changed, disappearing after a few seconds. If the broadcast is not in stereo, the word Mono will appear. If the TV switches off while in No Signal mode, the following on-screen message will be displayed on the next switch-on: Stereo… Press LANG. to select Stereo or Mono.
Channel List, Sorting Programmes, Programme Locking English You can view stored channels and sort them by using the Channel List feature. Viewing Channel List • Selected channel is now moved. The channel order may be changed to suit your personal preference. • Select Channel List from the main menu and press OK button. The following menu will be displayed: Deleting a Channel You can press GREEN button to tag/untag all channels; YELLOW button to tag/untag channel.
Viewing Info Banner, Electronic Programme Guide English Viewing Info Banner • Press INFO button. The information screen will appear giving details of the channel and programme currently being viewed. • To set the timer for a selected programme, press OK button to select Timers menu. • Press YELLOW button to switch to timeline view. • Press GREEN button to list the schedule. • Press BLUE button to display filtering options.
Language Selection English Language Settings Using this menu you can adjust the preferred language settings. • Press MENU button and select Settings by using Left or Right button. • Select Language from setup menu and press OK to view this menu. Press the RETURN button on the remote control to exit. Preferred These settings will be used if available. Otherwise the current settings will be used. Audio: by pressing Left or Right button change the audio language.
Digital Settings - Parental Control, Menu Lock, Set PIN English You can view or set parental preferences of your TV. Viewing Parental Control Menu Child Lock Press MENU button and select the Settings by using Left or Right button. Press OK button to view Settings menu. Use Up or Down button to highlight Parental and press OK to continue: Press MENU button and select settings by using Left or Right button. Press OK to continue. Use Up or Down to select parental and then press OK to continue.
Configuring Picture Settings You can configure picture settings of your TV by using Picture Settings menu. English Configuring Picture Settings Brightness You can use different picture settings in detail. You can customize current picture mode settings as desired. For example, you can change items such as, Brightness, Contrast, Colour, Sharpness and Hue. Sets the brightness value for the screen. Press MENU button and select Picture by using Left or Right button.
Configuring Picture Settings - continued English Colour Temp: Colour Temperature increases the ‘warmth’ or ‘coolness’ of the picture by increasing the red or blue tint. Picture Zoom: Sets the picture size to Auto,16:9, Subtitle,14:9, 14:9 Zoom, 4:3 or Cinema. Press MENU button and select Picture by using Left or Right button. Press Up or Down button to select Picture Zoom.
Changing Picture Format English Press SCREEN button repeatedly to open Settings menu, press “ ” button to select Picture Zoom menu then press “ ” / “ ” buttons to select between Auto(*), 16:9, Subtitle, 14:9, 14:9 Zoom, 4:3 or Cinema. Note: Using the special functions to change the size of the displayed image (i.e. changing the height/width ratio) for the purposes of public display or commercial gain may infringe on copyright laws.
Configuring PC Picture Settings English PC Picture Settings (*) V Position (*) While in VGA/PC mode, some items in Picture menu will be unavailable. Instead, VGA mode settings will be added to the Picture Settings while in VGA/ PC mode. V (Vertical) Position shifts the image vertically towards the top or bottom of the screen. PC Picture controls In the PC Position menu press the Down button until V Position is highlighted. Press the Left or Right button to adjust the value.
Configuring Sound Settings English You can configure sound settings of your TV by using Sound Settings menu. Configuring Sound Settings Sound settings can be configured according to your personal preferences. Press MENU button and select Sound by using Left or Right button. Press OK button to view Sound Settings menu. In equalizer menu, the preset can be changed to Music, Movie, Speech, Flat, Classic and User. Press the MENU button to return to the previous menu.
Settings Menu Operation, Conditional Access English Configuring Your TV’s Settings Other Settings Detailed settings can be configured to suit your personal preferences. Viewing Settings Menu Press MENU button and select Settings by using Left or Right button. Press OK button to view Settings menu. Displays other setting options of the TV set.
Setting Timers, Setting Date/Time English Timers Editing a Timer To view Timers menu, press MENU button and select Settings by using Left or Right button. Press OK button to view Settings menu. Use Up or Down button to highlight Timers and press OK to continue: • Select the timer you want to edit by pressing Up or Down button. • When finished with editing, press GREEN button to save. You can press MENU button to cancel.
Source Settings, Other Controls English Configuring Source Settings Configuring Other Settings - General You can enables or disable selected source options. The TV will not switch to the disabled source options when SOURCE button is pressed. You can configure the settings of your TV. Select Settings from main menu and press OK to view the Settings menu. Press the MENU button on the remote control to exit.
Other Controls - continued English Blue Background If the signal is weak or absent, the TV will automatically change to a blue screen. To enable this, set Blue Background to On. • In the Other Settings menu, select Blue Background and choose On or Off using Left or Right button. Software Upgrade This feature helps to keep your TV updated. It works automatically and searches for new information when available. Note that this setting is inactive to be modified.
USB Media Browser Manual Start • To display Media Browser window, you can press MENU button on the remote control and then select Media Browser by pressing Left or Right button. • You can also select Media Browser from the Quick button menu. English This TV allows you to enjoy photo, music or video files stored on a USB memory • Only limited types of USB device are supported. Therefore, it is suggested not to use USB for playing Media Player.
USB Media Browser - continued This TV allows you to enjoy photo, music or video files stored on a USB memory English Playing MP3 Files Viewing JPEG Files To play mp3 files from a USB memory, you can use this menu screen. To view photo files from a USB Memory, you can use this menu screen. When you select Photos from the main options, available image files will be filtered and listed on this screen. • Use Up or Down button to highlight a file. • Use RED button to stop playback.
USB Media Browser - continued This TV allows you to enjoy photo, music or video files stored on a USB memory English Slideshow Feature You can use this feature to display photos on your TV. • Press BLUE button to stop the video playback. • Press OK button to pause the video playback. • Press RED button to zoom. • Press GREEN button to continue with the slideshow. • Press LEFT button to go backward. • Press RIGHT button to go forward. • Press YELLOW button to pause a playing file.
USB Media Browser - continued This TV allows you to enjoy photo, music or video files stored on a USB memory English Media Browser Settings You can set your Media Browser preferences by using the Settings dialogue. Press Up or Down button to highlight an item and use Left or Right button to set. View Style: Sets default browsing mode. Slideshow Interval: Sets slide show interval time. Show Subtitle: Sets subtitle enabling preference. Subtitle Language: Sets supported subtitle language.
Analogue Text Services This television has a multi-page text memory, which takes a few moments to load. English Analogue Text Services Revealing Concealed Text Before using the text services, the required language region must be chosen. To discover the solutions on quiz and joke pages press the INFO button. • Select Language from the Settings menu. Holding a Page • Press the Left or Right button to choose the required language region.
Appendix A: PC Input Typical Display Modes English The following table is an illustration of some of the typical video display modes. Some, due to the display native resolution, are scaled automatically to enable correct image to be displayed. Your TV may not support different resolutions. Supported resolution modes are listed below. If you switch your PC to an unsupported mode, a warning OSD will appear on the screen.
Appendix B: AV and HDMI Signal Compatibility (Input Signal Types) English Source Supported Signals PAL 50/60 EXT NTSC 60 (SCART) RGB 50 RGB 60 Side AV YPbPr HDMI PAL 50/60 NTSC 60 480i 60Hz 480p 60Hz 576i 50Hz 576p 50Hz 720p 50Hz 720p 60Hz 1080i 50Hz 1080i 60Hz 1080p 50Hz 1080p 60Hz 480i 60Hz 480p 60Hz 576i 50Hz 576p 50Hz 720p 50Hz 720p 60Hz 1080i 50Hz 1080i 60Hz 1080p 24Hz 1080p 25Hz 1080p 30Hz 1080p 50Hz 1080p 60Hz Note: In some cases a signal on the
Appendix C: Supported File Formats for USB Mode English Media Format File Extension Video Audio .mpg, .mpeg MPEG1, 2 MPEG Layer 1/2/3 Movie .dat MPEG1, 2 .vob MPEG2 .mkv H.264, MPEG1,2,4 EAC3 / AC3 .mp4 MPEG4, H.264 PCM/MP3 MPEG2, MPEG4 PCM/MP3 H.264 PCM - MPEG 1 Layer 1 / 2 (MP3) .avi Music .mp3 .bmp .sub Subtitle MPEG2 max 1920x1080 @ 30p 20Mbit/sec max 1920x1080 @ 30p 20Mbit/sec Baseline JPEG .jpg .jpeg Photo Remarks (Maximum resolution/Bit rate etc.
Specifications and Accessories English Broadcast Systems/Channels DVB-T, MPEG2, DVB-T, MPEG4 HD DVB-C, MPEG2, DVB-C, MPEG4 Video Input Stereo Nicam External Connections 1-SCART 1 Input 2-YPbPr (via VGA) Input 3-SIDE AV Input 4-HDMI Input 5-PC Input 6-Digital Audio Output PAL, SECAM, NTSC 4.43 21-pin SCART Mini D-Sub 15-Pin Analogue Side AV Cable input Type A Mini D-Sub 15-Pin Analogue S/PDIF RGB, A/V Video + Audio L + R RGB Signal (Coaxial) USB Port Media Browser Interface Version: USB 2.
License Information English • HDMI, the HDMI logo, and High-Definition Multimedia Interface are trademarks or registered trademarks of HDMI Licensing LLC in the United States and other countries. • DVB is a registered trademark of the DVB Project. • [1] EIA/CEA-861-D compliance covers the transmission of uncompressed digital video with high-bandwidth digital content protection, which is being standardized for reception of high-definition video signals.
Questions and Answers Questions Q A Q A Q A Q A Q Why is there no sound or picture? Check the TV is not in standby mode. Check the mains plug and all mains connections. Why is there a picture but no sound? Check the volume has not been turned down or that sound mute has not been selected. What can cause a poor picture? Interference or a weak signal. Try a different TV station.
Questions English Q A Q A Why doesn't the Media Browser feature operate? Make sure that USB memory is connected correctly. Incorrect behaviour may occur with a USB Hub connection. Why is the digital channel locked? Parental control is activated. Check parental settings.
If you wish to view the advanced functions but do not have access to a computer or the internet then please contact your nearest owner's manual Helpline number from the numbers shown below.