9DL833B 22DL833B DIGITAL Series OWNER’S MANUAL
User Manual DIGITAL Series English - 1 - 19&22DL833_DVD_MB60_[GB]_(01-TV)_(IB_QSG)_DVB-TC_(1911UK)_10071225_10071818_50180448.indd 1 25.03.
Digital Switchover 8IFO EPFT TXJUDIPWFS IBQQFO $PQFMBOE TXJUDIFT PO 0DUPCFS ,FFQ UIJT JNQPSUBOU JOGPSNBUJPO BCPVU IPX UP SF UVOF ZPVS 57 EVSJOH UIF EJHJUBM 57 TXJUDIPWFS 5IF FYBDU EBUF ZPV TXJUDI EFQFOET PO UIF USBOTNJUUFS ZPV BSF TFSWFE CZ 5P DIFDL XIFO ZPV TXJUDI HP UP %JHJUBM 6,µT QPTUDPEF DIFDLFS PO XXX EJHJUBMVL DP VL IFDL ZPVS *57 OFXT $ TFSWJDF PS MPPL BU 5FMFUFYU QBHF UP TFF XIBU 57 SFHJPO ZPVµSF JO Television in the UK is going digital, bringing us all more choice
Re-tuning: TOSHIBA Freeview Products Toshiba Digital TV This guide can be used to help you re-tune the following product with the remote control below. Make sure your TV is on and press 80 for the BBC News channel 1 ) Press MENU and press ◄ or ► to select Install and Retune and press OK. Press ▲ or ▼ to select Automatic channel scan (Retune) to start the process. MENU 2 ) Select the desired search mode using ► and press OK button.
Manual Re-tuning If your Freeview TV or box picks up a different regional service to your preferred service (e.g. BBC England instead of BBC Scotland, or ITV Central instead of ITV Anglia), you can use this manual re-tune If you are missing some services you may find they have moved to channel 800 or above, this guide will help you put them in your preferred position. If you find manual re-tuning too difficult, contact your local electrical retailer or installer.
4 ) Write down the “RF Channel” numbers for your transmitter using the Group boxes here: 5 ) Press MENU and use ◄ or ► to select Install and Retune. 6 ) Select Manual Channel Scan from the Installation menu and press OK. MENU 7 ) Select Search Type as Digital Aerial by using ◄ or ►. 8 ) Select Channel and use ◄ or ► to change the channel number. 9 ) Press OK to start search. 10 ) Press MENU button. You should find that you now have your preferred service installed.
Contents Digital Switchover ................................................... 2 Re-tuning: TOSHIBA Freeview Products ................ 3 Manual Re-tuning ................................................... 4 Safety Precautions ................................................. 7 Air Circulation ..................................................... 7 Heat Damage...................................................... 7 Mains Supply ...................................................... 7 Warning ..............
Safety Precautions This equipment has been designed and manufactured to meet international safety standards but, like any electrical equipment, care must be taken to obtain the best results and for safety to be assured. Please read the points below for your own safety. They are of a general nature, intended to help with all electronic consumer products and some points may not apply to the goods you have just purchased.
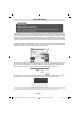
Installation and Important Information Where to install Sturdy tie (as short as possible) P Clip * Button and stand style is dependent on model. P Clip “P” Clip position on TV is dependent on model. Locate the television away from direct sunlight and strong lights. Soft, indirect lighting is recommended for comfortable viewing. Use curtains or blinds to prevent direct sunlight falling on the screen. Place the TV on a stable, level surface that can support the weight of the TV.
Important safety information WHEN THIS UNIT IS PLUGGED INTO THE WALL OUTLET, DO NOT PLACE YOUR EYES CLOSE TO THE OPENINGS TO LOOK INTO THE INSIDE OF THIS UNIT. USE OF CONTROLS OR ADJUSTMENTS OR PERFORMANCE OF PROCEDURES OTHER THAN THOSE SPECIFIED HEREIN MAY RESULT IN HAZARDOUS RADIATION EXPOSURE. DO NOT OPEN COVERS AND DO NOT REPAIR YOURSELF. REFER SERVICING TO QUALIFIED PERSONNEL. Headphone Warning Loud music can damage your hearing irreversibly.
Important safety information (continued) • Ensure that the unit is sufficiently ventilated! Never place it next to or underneath curtains! • When you leave your home for a long period of time, unplug the AC power cord for safety. • This set should only be connected to a 220-240V AC 50Hz mains power supply. Do not attempt to connect it to any other type of supply. • The unit becomes warm when in operation. Do not place any covers or blankets on the unit in order to prevent overheating.
Removing the pedestal stand (1) Carefully lay the front of the TV face down on a flat, cushioned surface such as a quilt or blanket. Leave the stand protruding over the edge of the surface. Note: Extreme care should always be taken when removing the pedestal stand to avoid damage to the LCD panel. (2) Remove the four screws on the stand. This will allow removal of the pedestal stand.
The Remote Control Simple at-a-glance reference of your remote control.
Connecting External Equipment Before connecting any external equipment, remove the mains plug from the wall socket. Side View COMMON INTERFACE The Common Interface is for a Conditional Access Module (CAM). USB HDMI Input Sockets USB Input 5Vdc Max:500mA RGB/PC Input Aerial Input DIGITAL AUDIO Socket +/- Controls P/V-AV Button SIDE AV Standby/On Button SIDE AV Input Headphone SCART Socket * a decoder could be Digital Satellite, Free to Air or any other compatible decoder.
Connecting an HDMI® or DVI Device to the HDMI Input The HDMI input on your TV receives digital audio and uncompressed digital video from an HDMI source device or uncompressed digital video from a DVI (Digital Visual Interface) source device. This input is designed to accept HDCP (High-Bandwidth Digital-Content Protection) programme material in digital form from EIA/CEA-861-D–compliant [1] consumer electronic devices (such as a set-top box or DVD player with HDMI or DVI output).
Connecting a Computer Connecting a USB Memory To Connect a Computer Connect a USB Memory With either an RGB/PC or an HDMI connection, you can watch your computer’s display on the TV and hear the sound from the TV’s speakers. • You can connect a USB memory to your TV by using the USB input of the TV. This feature allows you to display/play music, photo or video files stored in a USB memory.
Power Save Mode Environmental Information • This television is designed to consume less energy to save environment. • You not only help to save the environment but also can save money by reducing electricity bills, thanks to the energy efficiency feature of this TV. To reduce energy consumption, you should take the following steps: • You can use Power Save Mode setting, located on page 24.
Controlling the TV A wide variety of external equipment can be connected via the sockets located on the side and back of the TV. Whilst all the necessary adjustments and controls for the TV are made using the remote control, the buttons on the left side of the TV may be used for some functions.
Initial Installation Before switching on the TV, put your decoder and media recorder to Standby if they are connected and ensure the aerial is connected to your TV. To set up the TV, use the buttons on the remote control as detailed on page 12. IMPORTANT: Ensure that the aerial or cable is connected and a Common Interface module is not inserted before switching on the TV for the first time installation. 1. Connect the mains plug and switch the TV to on using the side standby switch.
Initial Installation - continued 10. The Auto tuning screen will appear and the television will start to search for available stations. The progress bar will move along the line. You must allow the television to complete the search.
General Operation Viewing Channel List Viewing Info Banner The channel order may be changed to suit your personal preference. • Press button. The information screen will appear giving details of the channel and programme currently being viewed. • Select Channel List from the main menu and press OK button. The following menu will be displayed: • Select Edit Channel List to manage all stored channels. Use Up or Down and OK buttons to select Edit Channel List.
Electronic Programme Guide (EPG), Input Selection Electronic Programme Guide • Select the on-screen guide by pressing GUIDE button, the guide screen will appear highlighting details of the channel and programme currently being viewed. This may take a few moments to appear. Input Selection Use the Input Selection window if the television does not switch over to a connected source automatically. • For information on a highlighted programme, press button.
Features in Brief Language Settings or Right button. Press Up or Down button to select Contrast. Using this menu you can configure the preferred language settings. Press MENU button and select Settings by using Left or Right button. Press OK button to continue. Use Up or Down button to select Language settings and then press OK button to continue. Sets the brightness value for the screen. Press MENU button and select Picture by using Left or Right button. Press Up or Down button to select Brightness.
Features in Brief - continued Note: The reset function does not reset the settings for Mode, Colour Temp, Noise Reduction, Picture Zoom and HDMI True Black. PC Picture Settings (*) (*) While in VGA (PC) mode, some items in Picture menu will be unavailable. Instead, VGA mode settings will be added to the Picture Settings while in PC mode. You can optimize your TV’s PC picture settings when using as a PC monitor. Select PC picture from the main menu by pressing Left or Right button.
Features in Brief - continued Other Settings Displays other setting options of the TV set. Press MENU button and select Settings by using Left or Right button. Press OK button to continue. Use Up or Down button to select Other Settings and then press OK button to continue. Background to On. Press MENU button and select Settings by using Left or Right button. Press OK button to continue. Use Up or Down button to select Other Settings and then press OK button.
Features in Brief - continued USB Media Browser This TV allows you to enjoy photo, video or music files stored on a USB memory. or Down button to select Other Settings and then press OK button. Select Auto TV Off using Up or Down button. Broadcast Type Press MENU button and select Settings by using Left or Right button. Press OK button to continue. Use Up or Down button to select Other Settings and then press OK button. Select Broadcast Type using Up or Down button and use Left or Right button to set.
USB Media Browser - continued This TV allows you to enjoy photo, video or music files stored on a USB memory. • Non-supported characters will be replaced with a square (□). accordance with the folder path. However, only the selected file types will be visible. Playing MP3 Files To play mp3 files from a USB memory, you can use this menu screen. When you select Music from Media Browser, available music files will be filtered and listed on this screen.
USB Media Browser - continued This TV allows you to enjoy photo, video or music files stored on a USB memory. . Note: If you set View Style from Media Browser Settings menu as ‘Folder’, media browser main selection screen will include ALL tab as well. In order to display movie subtitles correctly, you should set a “Movie Subtitle” language. You should display Language Settings menu for setting a Movie Subtitle languge. See the section, “Language Settings” on page 17 for displaying Language Settings menu.
Changing Picture Format Depending on the type of broadcast being transmitted, programmes can be viewed in a number of formats. Press QUICK button and select Picture Zoom. Press OK button repeatedly to select between auto, 16:9, subtitle, 14:9, 14:9 zoom, 4:3, panoramic or cinema. When auto is selected the format being displayed is determined by the picture being broadcast. Note: Using the special functions to change the size of the displayed image (i.e.
Appendix A: PC Input Typical Display Modes The display has a maximum resolution of 1360 x 768. The following table is an illustration of some of the typical video display modes. Your TV may not support different resolutions. Supported resolution modes are listed below. If you switch your PC to an unsupported mode, a warning OSD will appear on the screen.
Appendix B: AV and HDMI Signal Compatibility (Input Signal Types) Source EXT (SCART) SIDE AV YPbPr HDMI1 HDMI2 Supported Signals Available PAL 50/60 O NTSC 60 O RGB 50 O RGB 60 O PAL 50/60 O NTSC 60 O 480i 60Hz O 480p 60Hz O 576i 50Hz O 576p 50Hz O 720p 50Hz O 720p 60Hz O 1080i 50Hz O 1080i 60Hz O 1080p 50Hz O 1080p 60Hz O 480i 60Hz O 480p 60Hz O 576i 50Hz O 576p 50Hz O 720p 50Hz O 720p 60Hz O 1080i 50Hz O 1080i 60Hz O 1080p 50Hz O
Appendix C: Supported File Formats for USB Mode Media Movie Music Remarks Format File Extension Video Audio (Maximum resolution/Bitrate etc.) MPEG1 MPEG Layer 1/2/3 MPEG2 MPEG2 .mpg/ .dat/ MPEG2-TS EAC3/ AC3 .vob/ mkv H.264-TS MPEG4 PCM/MP3 MS ISO PCM/MP3 MPEG4 .avi MJPEG PCM MPEG 1/2 .mp3 - 20Mbit/sec 20Mbit/sec Support SP and ASP 30fps@VGA Sample Rate: 8k ~ 48kHz, Layer 1/ 2/ Bitrate: 128kbps~320kbps 3 (MP3) Photo .
Specifications and Accessories Broadcast Systems/Channels DVB-T, MPEG2, DVB-T, MPEG4 HD DVB-C, MPEG2, DVB-C, MPEG4 Video Input PAL, SECAM, NTSC 4.43 Stereo Nicam External Connections 1-SCART 1 Input 21-pin SCART RGB, A/V 2-YPbPr (via VGA) Input Mini D-Sub 15-Pin Analogue 3-FAV Input (Side) FAV Cable Jack 4-HDMI 1/2 Input Type A 5-PC Input Mini D-Sub 15-Pin Analogue RGB Signal 6-Digital Audio Output S/PDIF (Coaxial) USB Port Media Browser Interface Version: USB 2.
License Information • HDMI, the HDMI logo, and High-Definition Multimedia Interface are trademarks or registered trademarks of HDMI Licensing LLC in the United States and other countries. • DVB is a registered trademark of the DVB Project. • [1] EIA/CEA-861-D compliance covers the transmission of uncompressed digital video with high-bandwidth digital content protection, which is being standardized for reception of high-definition video signals.
Questions and Answers Questions Q A Q A Q A Q A Q A Q Why is there no sound or picture? Check the TV is not in standby mode. Check the mains plug and all mains connections. Why is there a picture but no sound? Check the volume has not been turned down or that sound mute has not been selected. What can cause a poor picture? Interference or a weak signal. Try a different TV station.
Questions Q A Q A Why doesn't the Media Browser feature operate? Make sure that USB memory is connected correctly. Incorrect behaviour may occur with a USB Hub connection. Why is the digital channel locked? Parental control is activated. Check parental settings.
Features Contents Features ............................................................... 36 General Properties............................................ 36 Safety Information ................................................ 37 Notes on Discs ..................................................... 37 On handling discs ............................................. 37 On cleaning....................................................... 37 Notes on moisture condensation ..........................
On cleaning Safety Information CAUTION DVD Player is a class 1 laser product. However this product uses a visible laser beam which could cause hazardous radiation exposure. Be sure to operate the player correctly as instructed. • Before playing, clean the disc with a cleaning cloth. Wipe the disc from the center out. CLASS 1 LASER PRODUCT • Do not use solvents such as benzine, thinner, commercially available cleaners or anti-static spray intended for vinyl LPs.
Licence Notification • This product incorporates copyright protection technology that is protected by U.S. patents and other intellectual property rights. Use of this copyright protection technology must be authorized by Rovi Corporation, and is intended for home and other limited viewing uses only unless otherwise authorized by Rovi Corporation. Reverse engineering and disassembly are prohibited.
DVD Control Panel Buttons A. Disc loader B. / Plays/pauses the disc. When DVD menu (root menu) is active, this button functions as “button select” (selects the highlighted item in menu) if this is not prohibited by the disc. C. / Stops playing disc / Ejects the disc. Note: • While playing a file, you should press / button three times to eject.
General Operation You can operate DVD, movie CD, music or picture CD’s content by using the proper buttons on your remote control. Below are main functions of commonly used remote control buttons. Buttons on the Remote Control DVD Playback Movie Playback Picture Playback Music Playback Play Play Play Play Pause Pause Pause Pause Stop Stop Stop Stop / e/f / / ANGLE SETUP Skip Skip Previous / Next backward/forward backward/forward Highlights a menu item.
11. For your convenience: General Playback If you attempt to enter a number greater than the total time of the current title, the time search box disappears and “ Input Invalid” message appears on up-left corner of screen. Basic Play 1. Press the button. 2. Insert a disc to the loader. The disc will be automatically loaded and play commences if the disc does not have any menus recorded on it.
Preference Setup Page Spdif Output Default You can set Spdif Output as RAW or PCM. If you select PCM from Spdif Output in DVD menu and play DVD with Dolby audio, you can get audio output with two channels via the speakers and the DIGITAL AUDIO socket. If you select RAW from Spdif Output in DVD menu and play DVD with Dolby audio, speakers will be muted and you can get 5+1 Dolby audio via the DIGITAL AUDIO socket. If you choose Reset and press OK button, the factory-presets are loaded.
Some functions (Angle, Zoom, etc.) do not work • These functions are not available on the DVD. • Angle can only be changed when the angle symbol is displayed. No picture • Have you pressed the correct buttons on the remote control? Try once more. DVD has a structure consisting of two 0.6-mm thin discs, which are adhered to each other. Since the thinner the disc, the higher the density at which the information can be recorded, a DVD disc has a greater capacity than a single 1.2 mm thick disc.
Disc Types Compatible with This Unit D is c Ty p e s (L o g o s ) R e c o r d in g Ty p e s D is c S iz e DVD 12 cm A u d io + V id e o 8 cm C h a r a c t e r is tic s • D V D c o n ta in s e x c e lle n t s o u n d a n d v id e o • V a r io u s s c r e e n a n d a u d io fu n c t io n s c a n b e d u e to D o lb y D ig i ta l a n d M P E G2 S y s te m . e a s ily s e l e c t e d t h r o u g h th e o n s c r e e n m e nu .
Supported File Formats Media File Extension .mpg/ .dat/ .vob Movie .avi (optional) DivX - Music Format Remarks Video Audio MPEG1 MPEG Layer 1/2/3 (Maximum resolution/Bitrate etc.) MPEG2 MPEG2 MPEG4 PCM/MP3 MS ISO MPEG4 PCM/MP3 Support SP and ASP PCM/MP3 DivX 3.11, 4.x, 5.x, 6.0 PCM Sample Rate: 8k ~ 48kHz MS ISO MPEG4 - MPEG 1/2 .
If you wish to view the advanced functions but do not have access to a computer or the internet then please contact your nearest owner's manual Helpline number from the numbers shown below.