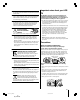
E F: FRANÇAIS F S: ESPAÑOL S Introduction E: ENGLISH Connecting your TV OWNER'S MANUAL Setting up your TV Using the Remote Control LCD TV/DVD Combination Owner's Record The model number and serial number are on the back of your TV/DVD. Record these numbers in the spaces below. Refer to these numbers whenever you communicate with your Toshiba dealer about this TV/DVD.
Dear Customer, Thank you for purchasing this Toshiba LCD TV/DVD Combination. This manual will help you use the many exciting features of your new TV/DVD Combination. Before operating the TV/DVD Combination, please read this manual completely, and keep it nearby for future reference. Safety Precautions WARNING: TO REDUCE THE RISK OF FIRE OR ELECTRIC SHOCK, DO NOT EXPOSE THIS APPLIANCE TO RAIN OR MOISTURE. WARNING: TO REDUCE THE RISK OF ELECTRIC SHOCK, DO NOT REMOVE COVER (OR BACK).
Important Safety Instructions Child Safety It Makes A Difference Where Your TV Stands Congratulations on your purchase! As you enjoy your new TV, keep these safety tips in mind: 1) 2) 3) 4) Read these instructions. Keep these instructions. Heed all warnings. Follow all instructions. 5) Do not use this apparatus near water. 6) Clean only with dry cloth. 7) Do not block any ventilation openings. Install in accordance with the manufacturer’s instructions.
15) The apparatus shall not be exposed to dripping or splashing and that no objects filled with liquids, such as vases, shall be placed on the apparatus. 16) CAUTION: To reduce the risk of electric shock, do not use the polarized plug with an extension cord, receptacle, or other outlet unless the blades can be inserted completely to prevent blade exposure. Installation, Care, and Service 25) Always operate the TV with a 100-240 V AC, 60Hz power source only.
31) While it is thundering, do not touch the connecting cables or apparatus. Failure to follow this instruction may result in electric shock. Important notes about your LCD TV 32) For added protection of your TV from lightning and power surges, always unplug the power cord and disconnect the antenna from the TV if you leave the TV unattended or unused for long periods of time. The following symptoms are technical limitations of LCD Display technology and are not an indication of malfunction.
Do not use the TV when moisture condensation may occur. If you use the TV in such a situation, it may damage discs and internal parts. Remove the disc, connect the power cord of the TV to the wall outlet, turn on the TV, and leave it for two or three hours. After two or three hours, the TV will have warmed up and evaporated any moisture. Keep the TV connected to the wall outlet and moisture ondensation will seldom occur.
Notes on copyright The unauthorized recording, use, distribution, or revision of television programs, videotapes, DVDs, and other materials is prohibited under the Copyright Laws of the United States and other countries, and may subject you to civil and criminal liability. This product incorporates copyright protection technology that is protected by U.S. patents and other intellectual property rights.
Introduction ................................................................ 9 Welcome to Toshiba ......................................................... 9 Supplied accessories ......................................................... 9 Connecting the power cord .............................................. 9 Exploring your new TV ................................................. 10 Rear terminal cover ................................................. 11 Cable clamper ...................................
E F Introduction S Introduction Welcome to Toshiba Using the Remote Control Connecting your TV Thank you for purchasing this Toshiba LCD TV/DVD combination. The goal of this manual is to guide you through setting up and operating your Toshiba TV as quickly as possible. The model and serial numbers are on the back of your TV. Write these numbers in the space provided on the front cover of this manual for your records. Instructions in this manual are based on using the remote control.
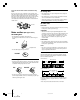
Exploring your new TV Introduction You can operate your TV by using the buttons on the top panel or the remote control. The A/V terminals for connecting other equipment to your TV are on the back panel and side panel (see illustrations below). Also see “Connecting your TV” on pages 12-18.
E Rear terminal cover The connection panel is hidden behind the terminal cover. 1. Remove the cover. Release the two hooks on the both sides of the cover. 2. Install cables as necessary. 3. Reinstall the cover. Align the holes on the TV back with the three tabs on the rear terminal cover as shown. 4. Close the cover. F Using the Remote Control Connecting your TV Introduction S Cable clamper The cable clamper can be used to bundle the connection cables (see page 12).
Connecting your TV Note: All required cables, if not provided with your other devices, can be purchased at many electronics accessory suppliers. ● Connecting your TV ● ● Coaxial (F-type) cable is used for connecting your antenna, cable TV service, and/or cable converter box to the ANT 75 Ω RF input on your TV. Standard A/V cables (composite video) usually come in sets of three, and are for use with video devices with standard audio and standard (composite) video output.
E Connecting a VCR F If you have a VCR with S-video, use an S-video cable (in the S-video jacks) instead of a standard video cable. Stereo VCR VIDEO From Cable Box or Antenna AUDIO L R The TV side panel can be used to connect a VCR with S-video. IN IN from ANT OUT to TV CH 3 CH 4 S Note: If you have a mono VCR, connect L to VCR Audio OUT using only one audio cable.
Connecting a DVD player with ColorStream® (component video) and a VCR Connecting your TV This connection allows you to watch DVD, VCR, and TV programs, and record TV programs. Your TV has ColorStream® (component video) inputs. Connecting your TV to a DVD player with component video can greatly enhance picture quality and realism. – To record one TV program while watching another TV program, tune the VCR to the channel to record, and tune the TV to the channel to watch.
E F Connecting a DTV receiver/set-top box with ColorStream® (component video) and a VCR From Antenna Introduction Note: For the highest possible picture quality, use component video cables between the TV and DTV receiver/set-top box. The TV side panel can be used to connect a VCR with S-video.
Connecting an HDMI™ or a DVI device to the HDMI input The HDMI[1] input on your TV receives digital audio and uncompressed digital video from an HDMI device or uncompressed digital video from a DVI[2] device. This input is designed to accept HDCP[3] program material in digital form from EIA/CEA-861/861B– compliant[4] consumer electronic devices (such as a settop box or DVD player with HDMI or DVI output).
E Connecting an audio system F S Note: Set the TV’s volume to the minimum level if necessary. Introduction This connection allows you to hear the TV sound through external speakers connected to an audio amplifier. The audio signal level (fixed) is not affected by pressing the volume buttons on the TV or the TV’s remote control. To control the audio through the amplifier, use the audio system’s remote control.
Connecting a personal computer (PC) Connecting your TV This connection allows you to view the image of a personal computer (PC) on the TV screen. When connecting a PC to the TV, use an analog RGB (15-pin) computer cable and a PC audio cable. – To use a PC, set the monitor output resolution on the PC before connecting it to the TV. The following signals can be displayed. • XGA: VESA 1024 × 768 @ 60Hz Other formats or non-standard signals may not be displayed correctly.
E F Using the remote control S Introduction Learning about the remote control The buttons used for operating the TV only are described here. POWER turns the TV on and off. Press POWER to turn on the TV. Press POWER again to turn off the TV (standby mode*).
Installing the remote control batteries To install the batteries: 1. Open the battery cover on the back of the remote control. 2. Install two batteries (R03 size “AAA”). Match the + and – signs on the batteries to the signs on the battery compartment. Caution: Never throw batteries into a fire. Note: • Be sure to use AAA size batteries. • Dispose of batteries in a designated disposal area. 3. Replace the battery cover on the remote control until the lock snaps.
E F Setting up your TV S Introduction Learning about the menu system Using the Remote Control Connecting your TV After you have installed the batteries, you will need to set some preferences on the TV by using the menu system. You can access the menu system using the buttons on the TV or remote control. 1. Press MENU to display the menu system. 2. Press x or • to select a menu. 3. Press ENTER, and then press y or z to select an item. 4. Press ENTER, and then press y or z to select or adjust a setting.
Changing the on-screen display language You can choose from three different languages (English, Spanish and French) for the on-screen display of adjustment menus and messages. To select a language: 1. Press MENU, and then press x or • until the Special menu appears. 2. Press ENTER, and then press y or z to highlight Language. 3. Press ENTER, and then press y or z to select your desired language.
E Adding and erasing channels manually After you have automatically programmed the active channels into the TV’s channel memory, you can manually add or erase specific channels. To add or erase channels: 1. Press MENU, and then press x or • until the Channel menu appears. 2. Press ENTER, and then press y or z to highlight Manual program. 3. Press ENTER, and then press x or • to select a channel you want to add or erase.
Using the TV’s features Switching between two channels using Channel Return The Channel Return feature allows you to switch between two channels without entering an actual channel number each time. To switch between two channels: 1. Select the first channel you want to view. 2. Select a second channel using the Channel Number buttons (0–9, 100). 3. Press CH RTN. The previous channel will be displayed.
E F You can view 480i, 480p, 720p, and 1080i format programs in a variety of picture sizes—Natural, TheaterWide 1, TheaterWide 2, TheaterWide 3, and Full. The way the image displays in any of the picture sizes will vary depending on the format of the program you are viewing. Select the picture size that displays the current program the way that looks best to you.
TheaterWide 1 picture size (For 4:3 format programs) • The picture is non-uniformly enlarged—the center of the picture remains close to its original proportion, but the left and right edges are stretched wider to fill the screen. • A small part of the picture at the top and bottom is hidden.
E Using the V-Chip menu S Introduction Some TV programs and movies include signals that classify the content of the program (violence, sex, dialog, language). The V-Chip control feature in this TV detects the signals and blocks the programs according to your selections. To use this feature, perform the following setup. 1. Enable the Lock. 2. Set a four-digit password. 3. Select the ratings and categories you want to block. F Note: The V-Chip function is available for the U.S. V-Chip system only.
V-Chip blocking (Parental control) setup 1. Press MENU, and then press x or • until the Special menu appears. 2. Press ENTER, and then press y or z to highlight V-Chip. Press ENTER. Special Special Language Language Caption/Text Caption/Text Captions Captions Panel lock To set V-Chip Number Enter code Panel lock _ V-Chip Auto off Auto off ENTER EXIT MENU 0 ~ 9 Enter Password • If you already set a password, enter your four-digit password.
E Adjusting the picture F Selecting the picture mode You can select your desired picture type from four picture modes: Dynamic, Standard, Movie, or Memory. S Dynamic Standard Movie Memory Bright and dynamic picture (factory setting) Standard picture setting (factory setting) Movie-like picture setting (factory setting) Your personal preference Picture Picture mode Contrast Dynamic Brightness Standard Color Movie Sharpness Memory Tint Using the Remote Control To select the picture mode: 1.
Using the closed caption feature The closed caption feature has two options: • Captions—An on-screen display of the dialogue, narration, and sound effects of TV programs and videos that are closed captioned (usually marked as “CC” in TV listings). • Text—An on-screen display of information not related to the current program, such as weather or stock data (when provided by individual stations). To select captions or text: 1. Tune the TV to the desired program. 2.
E To turn on or off the closed caption feature 1. Press MENU, and then press x or • to display the Special menu. 2. Press ENTER, and then press y or z to highlight Captions. 3. Press ENTER, and then press y or z to select On, Advanced mute or Off. • Advanced mute activates the selected Caption or Text mode when the TV sound is muted.
Adjusting the sound Muting the sound Press MUTE to temporarily turn off the sound. While the sound is off, the screen will display “ Mute” in the lower left corner. When you select “MUTE” mode, the closed caption feature is automatically activated. To deactivate this feature, deactivate MUTE. This feature works only when the closed caption mode is set to Advanced mute. See “Using the closed caption feature” on page 30 for more information.
E F Note: If the broadcast is monaural, the WOW sound effect will not work. Introduction S Connecting your TV Using the WOW surround sound feature WOW surround widens and deepens audio listening field to deliver exceptional sound from the TV's speakers. The feature uses stereo signals from a TV broadcast or video input. To activate the WOW feature: 1. Select Stereo mode (see “Selecting stereo/SAP broadcasts” on page 32). 2. Press MENU, and then press x or • until the Sound menu appears. 3.
Adjusting the sound quality You can change the quality of your TV’s sound by adjusting the bass, treble, and balance. To adjust the sound quality: 1. Press MENU, and then press x or • until the Sound menu appears. 2. Press ENTER, and then press y or z to highlight the item you want to adjust. Sound Sound mode Bass Treble Balance StableSound Treble ENTER EXIT MENU 3. Press ENTER. 4. Press x or • to adjust the level.
E Using the PC setting feature F TV top panel S Introduction You can adjust the horizontal/vertical picture position, clock (to minimize vertical stripes on the screen), and phase (to remove horizontal noise and sharpen the picture). You can auto-configure and reset these settings. 1. Confirm a PC is connected (see “Connecting a personal computer (PC)” on page 18). 2. Repeatedly press INPUT on the remote control (or press TV/ VIDEO on the TV top panel) to select PC input mode.
Using the Game Mode feature You can use the Game Mode feature for shorter frame delays when playing a video game requiring split-second timing between the onscreen display and input from the controller (such as music creation and high-action games). To turn on Game Mode: Press GAME. The TV will switch to the Game Mode when the onscreen display closes.
E F DVD Playback S Introduction Learning about the remote control The buttons used for operating the DVD only are described here. POWER turns the TV on and off.
DVD & VCD Operation Basic Playback 1. Press POWER. 2. Slide your chosen disc into the disc slot on the side panel. Be sure to face the top of the disc (with title etc.) toward the front of the screen. Playback starts. 3. Press EJECT to remove the disc. Stop Playback 1. Press STOP to stop playback. At this time, DVD video player stops playback temporarily and maintains the current playback position. • If PLAY is pressed, playback will resume from the location where you stopped playback. 2.
E A-B repeat playback A-B repeat playback allows you to repeat material between two selected points. 1. Press REPEAT A-B to select the start point during playback. “ A” is displayed on TV screen and the starting point of your selected segment is set up. 2. Press REPEAT A-B again to select the end point. “ AB” is displayed on TV screen and the ending point is set up. Playback starts at the point that you selected. Playback stops at the end point, returns to Point A automatically, then starts again. 3.
DVD Menu options If you press SETUP in the stop mode, the DVD menu is displayed, and in the play or pause mode, the TV setup menu is displayed. Selecting an audio language Select your preferred audio language. If an audio language is selected, the selected audio language is played whenever you start a new disc playback. (The disc must contain the selected language) 1. Press SETUP in the stop mode, and then press y or z to select Audio Language. 2.
E Audio Language Subtitle Language Menu Language Rating Level New Password TV Screen OSD Language Digital Output Special ---- F S Audio Language Subtitle Language Menu Language TV Screen OSD Language Audio Language Subtitle Language Menu Language Rating Level New Password 4 : 3 LB 4 : 3 PS 16 : 9 Wide : Move : Next 3. Press ENTER. 4. Press SETUP to resume normal playback. Note : Depending on the disc, the TV screen feature may not be available.
MP3/WMA files Playback options MP3/WMA Files Playback 1. When inserted, the MP3 menu screen appears automatically depending on the MP3 disc’s folder (directory) structure as shown to the below. 2. Press y or z to find desired folder and then press ENTER. 3. Press y or z to find the desired MP3 title and then press ENTER. Stop/Pause Playback Stop Playback Press STOP to stop playback. Pause Playback 1. Press PAUSE 2. Press PLAY playback. during playback.
E Audio CD Playback options Stop Playback 1. Press STOP to stop playback. At this time the DVD video player stops playback temporarily and maintains the current playback position. • If PLAY is pressed, playback will resume from the location where you stopped playback. 2. Press STOP again to stop playback fully. (At this time if you press PLAY , disc playback starts from the beginning.) Pause Playback (Still mode) 1. Press PAUSE during playback. 2. Press PLAY again to return to normal playback.
Image Zoom 1. Press ZOOM and use FF or REV to see the zoom mode at 50% ~ 200%. 2. Adjust the picture position using yzx • while in the enlarged picture mode. To exit Zoom mode, press ZOOM one more time. 3. Press STOP to return to the menu. Repeat playback You can show JPEG files repeatedly. 1. Press PLAY MODE during playback.
E F Appendix S Introduction Specifications • This model complies with the specifications listed below. • Designs and specifications are subject to change without notice. Power Consumption 95 W (110 V AC, Vol 30, DVD Play) 0.8 W in standby mode Audio Power 5W+5W Using the Remote Control Note: This TV does not provide HDMI OUTPUT.
Troubleshooting Before calling a service technician, please check the following table for a possible cause of the symptom and some solutions. Solution TV will not turn on • Make sure the power cord is plugged in, then press POWER. • The remote control batteries may be dead. Replace the batteries. No picture, no sound • Check the antenna/cable connections. No sound, picture OK • The sound may be muted. Press VOL + –. • The station may have broadcast difficulties. Try another channel.
E Solution F Playback doesn’t start • No disc is loaded. • The disc may be dirty. Clean the disc. • The TV cannot play CD-ROMs, etc. S No picture • TV selector is not set correctly. No sound • Make sure the input selector of the amplifier is set properly. • The TV is in the special playback mode. • Select the correct Audio Output/Input position on AV Amplifier. Picture is distorted during fast reverse/forward playback • The picture will be distorted occasionally.
Limited United States Warranty for 23” LCD TVs and 23” LCD TV/DVD Combinations (“LCD Product(s)”) Appendix Toshiba America Consumer Products, L.L.C. (“TACP”) makes the following limited warranties to original consumers in the United States. THESE LIMITED WARRANTIES EXTEND TO THE ORIGINAL CONSUMER PURCHASER OR ANY PERSON RECEIVING THIS LCD PRODUCT AS A GIFT FROM THE ORIGINAL CONSUMER PURCHASER AND TO NO OTHER PURCHASER OR TRANSFEREE. LCD PRODUCTS PURCHASED IN THE U.S.A. AND USED ANYWHERE OUTSIDE OF THE U.
E Limited Canada Warranty F for 23” LCD TVs and 23” LCD TV/DVD Combinations (“LCD Product(s)”) S Limited Warranty for Commercial Units TCL warrants LCD Products that are sold and used for commercial purposes as follows: all parts are warranted against defects in materials or workmanship for a period of ninety (90) days after the date of original retail purchase. DURING THIS PERIOD, TCL WILL, AT TCL’S OPTION, REPAIR OR REPLACE A DEFECTIVE PART WITH A NEW OR REFURBISHED PART WITHOUT CHARGE TO YOU.
Index AB ANGLE button ......................................................................39 Antenna cables (coaxial) ................................................. 12 AUDIO SELECT button ............................................. 32, 39 Audio system connection ................................................. 17 Auto Configure ..................................................................... 35 Auto off ....................................................................................
DVD playback Appendix #01E50-51_23HLV85 51 Black (E) 23HLV85 05.6.
HEAD OFFICE:82 TOTOWA ROAD, WAYNE, NEW JERSEY 07470, U.S.A. NATIONAL SERVICE DIVISION:1420B TOSHIBA DRIVE, LEBANON, TN. 37087, U.S.A. HEAD OFFICE/191 McNABB STREET MARKHAM, ONTARIO L3R 8H2, CANADA TEL: (905) 470-5400 SERVICE CENTERS: TORONTO: 191 McNABB STREET MARKHAM, ONTARIO L3R 8H2, CANADA TEL: (905) 470-5400 MONTREAL: 18050 TRANS CANADA, KIRKLAND, QUEBEC, H9J-4A1, CANADA TEL:(514)390-7766 VANCOUVER: 22171 FRASERWOOD WAY, RICHMOND, B.C.