OPERATING INSTRUCTIONS COLOUR TELEVISION WITH REMOTE CONTROL
Contents Safety Information...................................................2 Markings on the Product.........................................2 Environmental Information......................................4 Features..................................................................6 Accessories Included..............................................6 Standby Notifications...............................................6 TV Control Switch & Operation...............................
Safety Information CAUTION RISK OF ELECTRIC SHOCK DO NOT OPEN CAUTION: TO REDUCE THE RISK OF ELECTRIC SHOCK DO NOT REMOVE COVER (OR BACK). NO USER-SERVICEABLE PARTS INSIDE. REFER SERVICING TO QUALIFIED SERVICE PERSONNEL. In extreme weather (storms, lightning) and long inactivity periods (going on holiday) disconnect the TV set from the mains. The mains plug is used to disconnect TV set from the mains and therefore it must remain readily operable.
WARNING Do not ingest the battery, Chemical Burn Hazard This product or the accessories supplied with the product may contain a coin/button cell battery. If the coin/button cell battery is swallowed, it can cause severe internal burns in just 2 hours and can lead to death. Keep new and used batteries away from children. If the battery compartment does not close securely, stop using the product and keep it away from children.
Environmental Information This television is designed to be environment friendly. To reduce energy consumption, you can follow these steps: If you set the Energy Saving to Minimum, Medium, Maximum or Auto the TV will reduce the energy consumption accordingly. If you like to set the Backlight to a fixed value set as Custom and adjust the Backlight (located under the Energy Saving setting) manually using Left or Right buttons on the remote. Set as Off to turn this setting off.
REACH information The European Union (EU) chemical regulation, REACH (Registration, Evaluation, Authorization and Restriction of Chemicals), entered into force on 1 June 2007, with phased deadlines to 2018. Toshiba will meet all REACH requirements and is committed to provide our customers with information about the presence in our articles of substances included on the candidate list according to REACH regulation. Please consult the following website www.toshiba-tv.
Features Standby Notifications • Remote controlled colour TV • Fully integrated digital terrestrial/cable/satellite TV (DVB-T-T2/C/S-S2) • Fransat Installation Option • HDMI inputs to connect other devices with HDMI sockets • USB input • OSD menu system • Scart socket for external devices (such as DVD Players, PVR, video games, etc.) • Stereo sound system If the TV does not receive any input signal (e.g. from an aerial or HDMI source) for 3 minutes, it will go into standby.
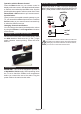
Operation with the Remote Control Press the Menu button on your remote control to display main menu screen. Use the directional buttons to select a menu tab and press OK to enter. Use the directional buttons again to select or set an item. Press Return/Back or Menu button to quit a menu screen. Antenna Connection Connect the aerial or cable TV plug to the AERIAL INPUT (ANT) socket or satellite plug to the SATELLITE INPUT (LNB) socket located on the back of the TV.
DVB is a registered trademark of the DVB Project. Notification TRADEMARK ACKNOWLEDGMENT The terms HDMI and High-Definition Multimedia Interface, and the HDMI Logo are trademarks or registered trademarks of HDMI Licensing Administrator, Inc. in the United States and other countries. Manufactured under license from Dolby Laboratories. Dolby Audio and the double-D symbol are trademarks of Dolby Laboratories.
Remote Control 1. Standby: Switches On / Off the TV 2. Numeric buttons: Switches the channel, enters a number or a letter in the text box on the screen. 3. Quick Menu: Displays a list of menus for quick access 4. Mute: Completely turns off the volume of the TV 5. Volume +/- 6. Menu: Displays TV menu 7. Navigation buttons: Helps navigate menus, content etc. and displays the subpages in TXT mode when pressed Right or Left 8.
Connections Connector Type Cables Device Scart Connection (back) VGA Connection (back) SIDE AV(**) SIDE AV(**) PC/YPbPr Audio Connection (side) PC/YPbPr Audio Connection (side) Side Audio/Video Connection Cable YPbPr/PC Audio Cable YPbPr/PC Audio Cable HDMI Connection (back) SPDIF(**) SPDIF (Optical Out) Connection (back) SPDIF(**) SPDIF (Coaxial Out) Connection (back) SIDE AV(**) SIDE AV(**) Side AV (Audio/Video) Connection (side) Side AV (Audio/Video) Connection (side) HEADPHONE Headphon
Switching On/Off To Switch the TV On Connect the power cord to a power source such as a wall socket (220-240V AC, 50 Hz). To switch on the TV from standby mode either: • Press the Standby button, Programme +/- or a numeric button on the remote control. • Press the side function switch on the TV until the TV comes on from standby. To Switch the TV Off Press the Standby button on the remote control or press the side function switch on the TV until the TV switches into standby mode.
available in System>Settings>More menu and can be turned off/on later. Press OK button on the remote control to continue and the Network/Internet Settings menu will be displayed, if you confirm the previously displayed message asking whether you want to do the network settings. Please refer to Connectivity section to configure a wired or a wireless connection. After the settings are completed press OK button to continue.
again. If the image is suitable(*) you will see it on the screen during the TV’s next boot up. Note: If you perform a First Time Installation the TV will return to using the default logo, if any. (*) Images should have an aspect ratio of 16:9 and they should be in .jpg, .jpeg or .jpe file formats. Only files with sizes no greater than 300KB are supported. The image cannot be set as boot logo, which’s resolution doesn’t appear on the info banner.
TV Menu Contents System - Picture Menu Contents Mode You can change the picture mode to suit your preference or requirements. Picture mode can be set to one of these options: Cinema, Game(optional), Sports, Dynamic and Natural. Contrast Adjusts the light and dark values on the screen. Brightness Adjusts the brightness values on the screen. Sharpness Sets the sharpness value for the objects displayed on the screen. Colour Sets the colour value, adjusting the colours.
System - Sound Menu Contents Volume Adjusts the volume level. Equalizer Selects the equalizer mode. Custom settings can be made only when in User mode. Balance Adjusts whether the sound comes from the left or right speaker. Headphone Sets headphone volume. Please ensure before using headphones that the headphone volume is set to a low level, to prevent damage to your hearing. Sound Mode You can select a sound mode (If the viewed channel supports).
System - Settings Menu Contents Conditional Access Controls conditional access modules when available. Language You may set a different language depending on the broadcaster and the country. Parental Enter correct password to change parental settings. You can easily adjust Menu Lock, Maturity Lock, Child Lock or Guidance in this menu. You can also set a new PIN or change the Default CICAM PIN using the related options.
Power Up Mode This setting configures the power up mode preference. Last State and Standby options are available. Virtual Remote Enable or disable the virtual remote feature. CEC With this setting you can enable and disable CEC functionality completely. Press Left or Right button to enable or disable the feature. CEC Auto Power On This function allows the connected HDMI-CEC compatible device to turn on the TV and switch to its input source automatically.
Child Lock: If this option is set to ON, the TV can only be controlled by the remote control. In this case the control buttons on the TV will not work. General TV Operation Using the Channel List The TV sorts all stored stations in the Channel List. You can edit this channel list, set favourites or set active stations to be listed by using the Channel List options. Press the OK/TV button to open the Channel List.
Options (OK button): Displays event options. Now/Next Schedule Options (OK button): Displays event options. Event Details (Info button): Displays detailed information about selected events. Filter (Blue button): Views filtering options. Event Options Use the directional buttons to highlight an event and press OK button to display Event Options menu. The following options are available. Select Channel: Using this option, you can switch to the selected channel.
PC Input Typical Display Modes AV and HDMI Signal Compatibility The following table is an illustration of some of the typical video display modes. Your TV may not support all resolutions.
Supported Video File Formats for USB Mode Extension Video Codec .dat, vob MPEG1/2 MPEG1/2, MPEG4 MPEG1/2, H.264, AVS, MVC .mpg, .mpeg .ts, .trp, .tp SPEC (Resolution) & Bit Rate .mp4, .mov, .3gpp, .3gp MPEG1/2, MPEG4, H.263, H.264, Motion JPEG .avi MPEG1/2, MPEG4, Sorenson H.263, H.263, H.264, WMV3, Motion JPEG .mkv MPEG1/2, MPEG4, H.263, H.264, WMV3, Motion JPEG .asf Sorenson H.263, H.264, WMV3, Motion JPEG .flv .swf .wmv WMV3 RV30/RV40 H.264, WMV3, VC1 .mp4, .mov, .3gpp, .
Supported Audio File Formats for USB Mode Extension .mp3, .avi .asf .mkv, .mka .ts, .trp, .tp, .dat, .vob, .mpg, .
Extension .wav .3gpp, .3gp, .mp4, .mov, .m4a .flv .ac3 .swf .ec3 .rm, .rmvb, .ra .wma, .wmv .webm Audio Codec Bit Rate Sample rate MPEG1/2 Layer1 MPEG1/2 Layer2 MPEG1/2 Layer3 LPCM IMA-ADPCM, MS-ADPCM G711 A/mu-law MPEG1/2 Layer3 AC3 EAC3 AAC, HEAAC VORBIS LPCM IMA-ADPCM, MS-ADPCM G711 A/mu-law MPEG1/2 Layer3 AAC, HEAAC AC3 AAC, HEAAC MPEG1/2 Layer3 EAC3 AAC, HEAAC 32Kbps ~ 448Kbps 8Kbps ~ 384Kbps 8Kbps ~ 320Kbps 64Kbps ~ 1.
Supported DVI Resolutions When connecting devices to your TV’s connectors by using DVI converter cable(DVI to HDMI cable - not supplied), you can refer to the following resolution information.
Connectivity Wired Connectivity To Connect to a Wired Network • You must have a modem/router connected to an active broadband connection. • Connect your PC to your modem/router. This can be a wired or wireless connection. • Connect your TV to your modem/router via an ethernet cable. There is a LAN port at the rear (back) of your TV. Broadband ISP connection LAN (ethernet) cable LAN input on the rear side of the TV and display the result when complete.
• The location where the transmission is most effective differs depending on the usage environment. • The Wireless feature of the TV supports 802.11 a,b,g & n type modems. It is highly recommended that you should use the IEEE 802.11n communication protocol in order to avoid any possible problems while watching videos. • You must change your modem’s SSID when there are any other modems around with the same SSID. You can encounter connection problems otherwise.
Wireless Display Wireless Display is a standard for streaming video and sound content by Wi-Fi Alliance. This feature provides the ability to use your TV as wireless display device. Using with mobile devices There are different standards which enable sharing of screens including graphical, video and audio content between your mobile device and TV. Plug the wireless USB dongle to TV first, if the TV doesn’t have internal WiFi feature.
Audio Video Sharing Nero MediaHome Installation Select the desired media type on the main media browser menu and press OK. If sharing configurations are set properly, Device Selection screen will be displayed after selecting the desired media type. If available networks are found, they will be listed on this screen. Select media server or network that you want to connect to using the Up or Down buttons and press OK. If you want to refresh the device list, press the Green button.
Internet Portal HINT: A broadband internet connection is required for high quality viewing. You must set the country option accordingly in the First Time Installation for proper operation of the internet portal. Portal feature adds your TV a feature that allows you to connect a server on the Internet and view the content provided by this server over your Internet connection. Portal feature allows you to view the music, video, clip or web content with defined short-cuts.
HBBTV System HbbTV (Hybrid Broadcast Broadband TV) is a new industry standard that seamlessly combines TV services delivered via broadcast with services delivered via broadband and also enables access to Internet only services for consumers using connected TVs and set-top boxes. Services delivered through HbbTV include traditional broadcast TV channels, catch-up services, video-on-demand, EPG, interactive advertising, personalisation, voting, games, social networking and other multimedia applications.
Smart Center Smart Center is a mobile application running on iOS and Android platforms. With your tablet or phone, you can easily stream your favourite live shows and programmes from your smart TV. Also; you can launch your portal applications, use your tablet as a remote control for your TV and share media files. Note: Being able to use all functions of this application depends on the features of your TV. Getting Started To use Smart Center features, connections have to be done properly.
FollowMe TV Feature (if available) Tap on the FOLLOW ME TV widget located at the bottom left of the screen of your mobile device to change the layout for FollowMe TV feature. Tap the play icon to start streaming of the content from the TV to your mobile device. Available if your device is in your routers operation range. Notes: Note that only digital(DVB-T/C/S) SD channels are supported. Multilanguage audio support and subtitle on/off features are not functional.
English - 33 -