9/22/26/32AV73*F /AV73*F1 et 32/40KV73*F Séries NUMÉRIQUES
Table des matières Précautions de sécurité................................ 3 Affichage de l’heure................................ 25 Installation et informations importantes..... 4 Emissions stéréo et bilingues................ 25 La télécommande.......................................... 6 Menu d’accès rapide............................... 25 Installation des piles et portée de la télécommande............................................ 7 Contrôles du son.........................................
Sélection de l’entrée et connexions AV..... 35 Verr. Panneau........................................... 46 Sélection de l'entrée................................ 35 Par défaut usine....................................... 46 Sélection du signal d'entrée................... 36 Ecran d’information numérique et Guide des émissions................................... 46 Contrôles REGZA-LINK............................... 36 Information............................................... 46 Contrôle d'équipement.
Précautions de sécurité Cet appareil a été conçu et fabriqué pour respecter les normes de sécurité internationales; cependant, comme avec la plupart des appareils électriques, il est important de faire attention lorsque vous l’utilisez pour des meilleurs résultats et réduire le risque d’accident. Veuillez lire les instructions suivantes pour votre sécurité.
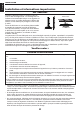
Français INSTALLATION Installation et informations importantes Où l’installer  Installez le téléviseur dans un endroit à l’abri du Câble robuste soleil et des éclairages forts ; un éclairage doux et indirect est recommandé lorsque vous regardez ce téléviseur pour en profiter pleinement. Utilisez des Crochet rideaux ou des stores pour protéger l’écran contre le soleil. Posez le téléviseur sur une surface plate et stable et capable de supporter le poids du téléviseur.
SYMBOLE DÉFINITION DES SYMBOLES TENSION DANGEREUSE : Le symbole de foudre avec une flèche à l’intérieur d’un triangle équilatéral, avertit l’utilisateur de l'existence d’un "COURANT ELECTRIQUE DANGEREUX" à l’intérieur du boîtier de l’appareil qui peut être suffisamment puissant pour électrocuter une personne.
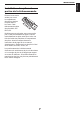
Français INSTALLATION La télécommande Guide de référence simplifié de la télécommande 2 3 4 1 2 1 5 6 3 4 7 5 6 7 8 9 10 11 12 8 9 12 10 11 14 16 13 15 13 14 15 16 17 18 17 19 18 19 20 20 6 Pour mettre en Marche/Veille Pour sélectionner l’entrée des sources externes Image fixe Pour afficher les services de texte en mode analogique et les services interactifs en mode numérique Pour afficher/enlever les sous-titres Emissions stéréo/bilingues Touches numériques Pour afficher/enlever la des
Installation des piles et portée de la télécommande Enlevez le couvercle arrière pour ouvrir le compartiment des piles et insérez les piles dans le bon sens. Cette télécommande utilise des piles AAA, IEC R03 1,5V. N’utilisez pas une pile usée avec une nouvelle pile ou des piles de différents types. Enlevez immédiatement les piles usées pour éviter une fuite de l'acide des piles dans le compartiment des piles. Jetez-les conformément aux instructions de la page 56 de ce manuel.
Français INSTALLATION Connexion à des appareils externes Avant de raccorder des appareils externes, éteignez toujours tous les boutons d’alimentation. Si un appareil n’a pas de bouton d'alimentation, débranchez le cordon de la prise de courant. Branchez le cordon d'alimentation sur la prise d’alimentation AC IN à l’arrière du téléviseur. Modèle 19/22 *un décodeur peut être un décodeur satellite ou n’importe quel type de décodeur compatible.
Câbles d’antenne : - - - - - - - - - - - - - - - - Branchez l’antenne sur la prise ANT à l’arrière du téléviseur. Si vous utilisez un décodeur et/ou un enregistreur vidéo, il est essentiel que le câble de l’antenne soit branché sur la prise d'antenne du décodeur et/ou sur l'enregistreur vidéo via le téléviseur. Prise PÉRITEL : - - - - - - - - - - - - - - - - Raccordez la prise ENTRÉE/SORTIE de l’enregistreur vidéo ou la prise TV du décodeur au téléviseur.
Français INSTALLATION Connexions REGZA-LINK Les fonctions basiques des appareils audio/vidéo raccordés peuvent être utilisés avec la télécommande du téléviseur si un appareil compatible avec REGZA-LINK est connecté.
Branchement d'un appareil HDMI® ou DVI sur l'entrée HDMI L’entrée HDMI de votre téléviseur reçoit l’audio numérique et la vidéo numérique non compressée d’un appareil HDMI, ou la vidéo numérique non compressée d’un appareil DVI (Digital Visual Interface). Cette entrée est conçu pour accepter les programmes numériques HDCP (High-Bandwidth DigitalContent Protection) d’appareils électroniques conformes à EIA/CEA-861-D (comme un boîtier décodeur ou un lecteur de DVD avec une sortie HDMI ou DVI).
Français INSTALLATION Modèle 26/32/40 1 2 Appareil HDMI HDMI out Pour regarder la vidéo de l’appareil HDMI, appuyez sur 12 pour sélectionner le mode.
Connecter un appareil DVI avec l’entrée HDMI Branchez un câble de conversion HDMI/DVI (connecteur de type HDMI A) sur la prise HDMI1 et les câbles audio sur la prise Audio PC/HDMI1 (voir l’illustration). • a longueur max. recommandée pour le câble de conversion HDMI/DVI est 6,6 pieds (2m). L Un câble de conversion HDMI/DVI ne transfère que la vidéo. • Des câbles audio analogiques séparés sont requis.
Français INSTALLATION Modèle 26/32/40 1 PC/HDMI 1 (AUDIO) Câble audio pour la connection HDMI/ téléviseur (pas fourni) 2 Câble de conversion HDMI/DVI (pas fourni) Appareil DVI REMARQUE : Pour vous assurer que votre appareil HDMI ou fonctionne correctement, il est recommandé de suivre les étapes suivantes : • orsque vous allumez les appareils, allumez en premier le téléviseur puis allumez l'appareil HDMI L ou DVI.
Connexion à un ordinateur Grâce à la connexion HDMI, vous pouvez regarder l’affichage de votre ordinateur sur le téléviseur et écouter le son via les hauts partleurs du téléviseur. Pour connecter un PC à la prise HDMI Lorsque vous connectez un PC à la prise HDMI du téléviseur, utilisez un câble de conversion HDMI/ DVI et des câbles audio analogiques. Si vous connectez un PC avec une prise HDMI, utilisez un câble HDMI (connecteur de type A).
Français INSTALLATION Signaux vidéo compatibles avec les prises HDMI Format Résolution Taux de rafraîchissement Fréquence H.
Utilisation des contrôles Bien que tous les réglages et les contrôles du téléviseur soient faits avec la télécommande, les boutons du téléviseur peuvent aussi être utilisés avec certaines fonctions. REMARQUE : INTERFACE COMMUNE (CI) L'interface commune est pour un Module d’accès conditionnel (CAM). Contactez un fournisseur de service pour plus de détails.
Français INSTALLATION Mise en marche Avant d'allumer le téléviseur, vérifiez que le câble de l'antenne est correctement branché sur le téléviseur et choisissez la source d'entrée TV. Si le voyant DEL rouge est éteint, vérifiez si le cordon d’alimentation est branché sur la prise de courant. Si l’image ne s'affiche pas, appuyez sur de la télécommande, cela peut prendre quelques secondes. Pour mettre le téléviseur en mode Veille, appuyez sur sur la télécommande.
Régler le téléviseur tilisez ou pour sélectionner votre U pays puis appuyez sur pour avancer à l’étape suivante. Avant d’allumer le téléviseur, mettez votre décodeur et enregistreur vidéo en Veille s’ils sont branchés. Vérifiez que le câble est correctement branché sur le téléviseur et choisissez TV comme source. Pour régler le téléviseur, utilisez les touches de la télécommande décrites à la page 6.
Français RÉGLER LE TÉLÉVISEUR Choisissez Balayage auto et appuyez sur . Réglage des chaînes REMARQUE : Lorsque la fonction Bloc chaînes est activée, le mot de passe à 4 chiffres doit être entré pour ouvrir le sous-menu Chaînes dans le menu RÉGLAGE.
Mise à jour balay. Pour chercher des nouvelles chaînes qui ne sont pas encore dans la liste des chaînes. Appuyez sur MENU et utilisez ou pour sélectionner RÉGLAGE. Sélection du réseau préféré S'il y a plus de deux réseaux détectés lorsque vous utilisez Balayage auto dans le menu Chaînes, vous devrez sélectionner le réseau désiré. Choisissez Chaînes dans le menu RÉGLAGE. Appuyez sur pour aller sur Chaînes et appuyez sur ou pour l'ouvrir.
Français RÉGLER LE TÉLÉVISEUR Choisissez Balayage analogique manuel et appuyez sur ou pour confirmer. Chaînes Balayage auto Mise à jour balay. Balayage analogique manuel Sélection du réseau préféré Saut de chaîne Triage chaînes Edition chaînes Saut de chaîne Pour éviter d’avoir à regarder certaines chaînes, les numéros de certaines chaînes peuvent être sautés. La télécommande ne doit pas être utilisée car ces chaînes seront toujours disponibles avec les touches numériques de la télécommande.
Triage chaînes Pour changer l’ordre de la liste des chaînes. Choisissez Chaînes dans le menu RÉGLAGE. Allez sur Triage chaînes et appuyez sur pour l'ouvrir. ou Les touches numériques de la télécommande correspondent aux caractères suivants. Utilisez ces caractères pour entrer du texte. Appuyez répétitivement sur les touches numériques pour changer le caractère de texte, appuyez sur pour effacer le caractère de texte précédent.
Français BOUTONS ET FONCTIONS Interface commune Rég. fin chaînes analog. Cette fonction vous permet de regarder certains services payants (services codés). Lorsqu’un module est inséré dans la fente CI, vous pouvez accéder au menu du module. Pour acheter un module et une carte intelligente, contactez votre revendeur. es fonctions de l’Interface commune peuvent ne pas marcher en fonction du pays où l’appareil est utilisé.
Contrôles généraux Menu d’accès rapide Sélectionner la position des programmes Le menu d’accès rapide vous permet d’accéder rapidement à certaines options, comme Mode Image, Dimensions de l’image, Sommeil, REGZA-LINK, et Lecteur multimédia. Appuyez sur le bouton RAPIDE pour afficher le menu Accès rapide et utilisez or pour sélectionner une option. Pour sélectionner la position d’un programme, utilisez les touches numériques de la télécommande.
Français BOUTONS ET FONCTIONS Son surround Description audio Description audio est un service de narration additionnel qui décrit les actions, les mouvements du corps, les expressions et les mouvements pour les personnes avec un handicap visuel qui regardent la TV. Cette fonction vous permet de choisir le type de narration. Cette fonction permet d’enrichir (augmenter et approfondir) la qualité du son. Dans le menu SON, appuyez sur pour sélectionner Son Surround.
4 Assurez-vous que l'option Sortie hautparleur est réglée sur Marche. Appuyez sur pour aller sur l'option Volume et appuyez sur ou pour régler le volume. • Type SPDIF : Envoie le signal audio numérique vers le système audio externe. Les options sont PCM, Dolby numérique, et Arrêt. Malvoyants Sortie haut-parleur Volume Marche 20 Fabriqué sous licence de Dolby Laboratories. « Dolby » et le symbole double D sont des marques commerciales de Dolby Laboratories.
Français BOUTONS ET FONCTIONS Visualisation sur écran large En fonction du type de signal reçu, les émissions peuvent être regardées avec des formats différents. Natif Ce réglage est disponible lorsque vous regardez une source vidéo via HDMI, et l’image affichée sera sans surbalayage. Large Utilisez ce réglage lorsque vous regardez un DVD ou une cassette vidéo au format Ecran large ou une émission au format 16:9 (lorsque disponible).
Utilisez ce réglage pour regarder une émission au format 14:9 14:9 Utilisez ce réglage si votre PC est branché via la prise HDMI ou RVB/ PC avec un signal au format PC. Ce réglage affichera l'image sans aucun redimensionnement. PC Large Utilisez ce réglage si votre PC est branché via la prise HDMI ou RVB/PC avec un signal au format PC. Ce réglage affichera l'image correctement sans déformations ou redimensionnement de l'image. PC Normal "Dot par Dot" est un type d'affichage sans redimensionnement.
Français BOUTONS ET FONCTIONS Contrôles de l’image Réglage du rétroéclairage Ajustez le Rétroéclairage pour améliorer la visibilité de l’écran. Mode Image Appuyez sur MENU et utilisez ou pour sélectionner IMAGE. Vous pouvez ajuster l’apparence de l’image en sélectionnant une valeur prédéfinie dans le Mode Image basé sur la catégorie de programme. Appuyez sur pour aller sur Rétroéclairage et appuyez sur ou pour ajuster. Appuyez sur MENU et utilisez ou pour sélectionner IMAGE.
Appuyez sur ou pour sélectionner Froid, Moyen, Chaud ou Utilisateur en fonction de vos préférences. Appuyez sur ou pour aller sur NR et appuyez sur ou pour l'ouvrir. Appuyez sur ou pour aller sur DNR et appuyez sur ou pour sélectionner Faible, Moyen, Fort, Auto ou Eteint. Temp. couleur Temp.
Français BOUTONS ET FONCTIONS Cont. Luma adaptatif Ajuste automatiquement la luminosité et le contraste en analysant le signal de la source. Cette fonction permet d’améliorer les couleurs et la profondeur de l’image. 3D Gestion des couleurs Lorsque 3D Gestion des couleurs est sélectionné, ceci permet à la fonction ‘Ajustement couleurs basiques' de devenir disponible. Dans le menu IMAGE, appuyez sur pour aller sur Vidéo avancée et appuyez sur ou pour l'ouvrir.
Position H./V. Appuyez sur ou pour aller sur Ajustement couleurs basiques et appuyez sur ou . Pour ajuster la Position H.orizontale et verticale de l’image. Dans le menu IMAGE, appuyez sur ou pour aller sur Vidéo avancée et appuyez sur pour l'ouvrir. ou Vidéo avancé Mode Cinéma Marche NR CTI Auto Cont. Luma adaptatif 7 Rétroéclairage actif Appuyez sur pour aller sur Position H./V. pour l'ouvrir.
Français BOUTONS ET FONCTIONS Contrôle du minuteur Fuseau horaire Lorsque vous sélectionnez un Fuseau horaire, l’heure de la télévision est réglée en fonction du fuseau horaire et du GMT (Greenwich méridien) qui est reçu avec le signal diffusé et l’heure est automatiquement réglé par le signal numérique. Heure L’heure est automatiquement réglée lorsque vous recevez un signal numérique. (Vous pouvez régler manuellement l’heure si le téléviseur ne reçoit aucun signal de TVN).
Minuterie Le téléviseur peut être réglé pour s’éteindre Arrêt automatiquement après une certaine durée. Appuyez sur pour aller sur Minuterie dans le menu APPLICATIONS. Appuyez sur ou pour régler le minuteur sur Eteint, 10, 20, 30, 40, 50, 60, 90 ou 120 Minutes. APPLICATIONS Lecteur multimédia Réglage heure Minuterie Sélection de l’entrée et connexions AV Définissez les prises ENTRÉE et SORTIE pour que le téléviseur puisse reconnaître les appareils connectés.
Français BOUTONS ET FONCTIONS Contrôles REGZA-LINK Sélection du signal d'entrée Ceci spécifie le type de signal allant dans la prise PÉRITEL au dos du téléviseur. Référez-vous aux instructions du fabricant des appareils connectés. Dans le menu RÉGLAGE, appuyez sur pour aller sur PÉRITEL et appuyez sur ou pour l'ouvrir. Cette fonction utilise la technologie CEC et permet de contrôler un appareil compatible avec Toshiba REGZA-LINK à partir de la télécommande du téléviseur.
Sélection de la source d'entrée Lorsqu'un équipement supportant la technologie CEC est connecté, l'icône REGZA-LINK apparaîtra dans la liste des sources d'entrée pour permettre de sélectionner individuellement des appareils. Appuyez sur . Une liste apparaît sur l'écran affichant tous les modes et tous les équipements externes. Les fonctions suivantes dépendent de l'équipement connecté. Référez-vous au manuel d'utilisation des équipements connectés pour plus d'informations sur le fonctionnement.
Français BOUTONS ET FONCTIONS Menus REGZA-LINK Lien PC Lorsque vous sélectionnez Activer REGZALINK dans le menu de réglage REGZA-LINK, les fonctions REGZA-LINK individuelles peuvent être activées. Cette fonction ajuste automatiquement le format large écran et les préférences de l'image lorsque connecté à un PC REGZA-LINK. REMARQUE : Cette fonction dépend de l'équipement connecté.
Lecteur multimédia Veille auto Lorsque Veille auto est activé, lorsque vous éteignez le téléviseur, tous les équipements REGZA-LINK connectés s'éteigneront automatiquement. Ouvrir le Lecteur multimédia Le Lecteur multimédia permet de regarder des photos (fichiers JPEG) et d'écouter des chansons (fichiers MP3) enregistrées sur une clé USB externe. (La compatibilité avec tous les appareils n'est pas garantie.) Dans le menu Configuration REGZALINK, appuyez sur pour aller sur Veille auto.
Français BOUTONS ET FONCTIONS Affichage Multi-Photo Jouer diaporama des photos Ce mode d'affichage affiche toutes les images dans un dossier sélectionné, simultanément avec une vue diapo en matrice. La position initiale indiquée en surbrillance sera l'image en haut à gauche dans la matrice. Ce mode d'affichage permet d'afficher toutes les images dans un dossier sélectionnée avec un diaporama, en les faisant défiler automatiquement.
Afficher des fichiers de musique Ce mode d'affichage affiche tous les fichiers de musique dans un dossier sélectionné, simultanément avec une vue diapo en matrice. La position initiale indiquée en surbrillance sera l'image en haut à gauche dans la matrice. • Trier :Choisissez le type de tri des fichiers de musique, avec Nom, Type, Artiste et Album. • Navigateur/Menu : Choisissez le mode de navigation des fichiers de musique, diapo ou mode liste. Jouer de la musique Ouvrir le Lecteur multimédia.
Français BOUTONS ET FONCTIONS Contrôle des préférences Sous-titres numériques Ss-titres analog. Vous pouvez activer ou désactiver les sous-titres lorsque vous regardez la télévision. Allez sur Sous-titre dans le menu PRÉFÉRENCES et appuyez sur ou pour l'ouvrir. Utilisez la fonction Sous-titres numériques lorsque deux ou plusieurs langues de soustitres sont disponibles. Si les données de soustitres pour la langue sélectionnée ne sont pas disponibles, la langue de sous-titres par défaut sera utilisée.
Canal audio Réglage du panneau latéral Si une émission stéréo ou double langue est diffusée, le mot Stéréo or Double apparaîtra sur l'écran chaque fois que la position du programme est changée, et disparaîtra après quelques secondes. Si l’émission n’est pas en stéréo, le mot Mono apparaîtra. La fonction Réglage du panneau latéral éclaircit ou assombrit les bandes de chaque côté de l'écran lorsqu'au format 4:3 or 14:9.
Français BOUTONS ET FONCTIONS Contrôle parental Contrôle parental Bloc chaînes Cette fonction bloque les chaînes ou les émissions que vous ne voulez pas regarder ou que vous ne voulez pas que vos enfants puissent les regarder. Un mot de passe doit être entré avant de pouvoir utiliser cette fonction. Le mot de passe par défaut est « 0000 ».
Modèle 26/32/40 Appuyez sur ou pour régler Class. par âge sur l'âge 4~18 ou sélectionnez Aucune pour désactiver cette fonction. Bloc entrées 1 Bloc programme Class. par âge TV 2 PÉRITEL 1 3 PÉRITEL 2 AV 4 Aucune Composante 5 6 HDMI 1 7 HDMI 2 8 HDMI 3 9 PC OK Choisir RETURN Retour EXIT Régler Choisir RETURN Retour EXIT Quitter REMARQUE : Le port "HDMI 3" est seulement disponible sur les modèles 32/40KV73*F.
Français BOUTONS ET FONCTIONS Ecran d’information numérique et Guide des émissions Verr. Panneau Vous pouvez verrouiller les boutons du panneau de contrôle du téléviseur en utilisant Verr. Panneau. Lorsque cette fonction est activée, seulement la télécommande ne pourra être utilisée pour contrôler le téléviseur. Les informations de l’écran et le guide des programmes permettent d’accéder aux informations des programmes de toutes les chaînes disponibles.
Mise à jour du logiciel et Informations du systeme Guide Ouvrez le guide sur l’écran en appuyant sur GUIDE, l’écran du guide s’affiche. Il contient des informations sur le programme que vous êtes en train de regarder. Il peut prendre plusieurs secondes avant de s’afficher. Téléchargement auto Cette fonction permet à votre téléviseur de télécharger automatiquement les mises à jour du logiciel via les ondes terrestres.
Français BOUTONS ET FONCTIONS OAD manuel Informations du systeme Cette fonction permet à votre téléviseur de mettre à jour manuellement le logiciel de votre téléviseur via les ondes terrestres. Cette fonction peut être utilisée pour vérifier la version du logiciel installé. Dans le menu RÉGLAGE, appuyez sur pour aller sur Mise a jour du logiciel et appuyez sur ou pour l'ouvrir. Dans le menu RÉGLAGE, appuyez sur pour aller sur Mise a jour du logiciel et appuyez sur ou pour l'ouvrir.
Services de texte Touches de contrôle Ce téléviseur a une mémoire de plusieurs pages, qui peut prendre plusieurs secondes pour se charger. Régler la langue Vous pouvez régler la langue du télétexte. Dans le menu PRÉFÉRENCES, appuyez sur pour aller sur Télétexte, puis appuyez sur ou pour confirmer.
Français RÉSOLUTION DES PROBLÈMES Questions et Réponses Vous trouverez ci-dessous quelque unes des questions les plus fréquentes. Q R Q R Q R Q R Q R Q R Q R Q R Q R Q Pourquoi n’y-a-t-il aucun son ou image ? Vérifiez si le téléviseur est en mode Veille. Vérifiez le cordon d'alimentation et tous les raccordements. R Pourquoi n’y-a-t-il aucun son ou le son est bizarre en mode TVN ? Appuyez sur pour vérifier si l'option pour malentendant a été sélectionnée.
Q R Q R Q R Q R Q R Pourquoi le téléviseur s’éteint-il tout seul ? Si aucun signal vidéo n’est reçu pendant environ 15 minutes, le téléviseur s’éteindra après 15 minutes pour économiser l'énergie. Ce téléviseur supporte-il DPMS ? Ce téléviseur est équipé d’une fonction d’économie d’énergie qui supporte le standard VESA Display Power Management Signaling (DPMS). Cela signifie que le moniteur doit être connecté à un ordinateur qui supporte le mode DPMS VESA.
Français INFORMATION Caractéristiques techniques et accessoires • • Ce téléviseur est conforme aux caractéristiques techniques listées ci-dessous. Design et caractéristiques sujettes à modifications sans préavis.
Informations de licence pour les téléviseurs Toshiba Le logiciel pré-installé sur les téléviseurs numériques de TOSHIBA est composé de plusieurs composants de logiciel indépendants. Chaque composant de logiciel est protégé par des droits d’auteur de TOSHIBA ou d’une autre partie. Les téléviseurs numériques TOSHIBA utilisent des composants de logiciel qui sont distribués gratuitement avec un contrat de licence utilisateur final ou une notice de copyright (appelé ici « CLUF »).
Français INFORMATION Exhibit A Des parties de ce logiciel sont protégés par des droits d’auteur © <2007> The FreeType Project (www. freetype.org). Tous droits réservés Exhibit B Licence ICU – ICU 1.8.1 ou plus NOTICE DE COPYRIGHT ET DE PERMISSION Copyright © 1995-2006 International Business Machines Corporation et autres Tous droits réservés.
DVB est une marque commerciale déposée de DVB Project HDMI, le logo HDMI et Interface Multimédia Haute Définition sont des marques commerciales ou des marques commerciales déposées de HDMI Licensing LLC, aux Etats-Unis et dans d'autres pays. Imprimé sur du papier recyclé. 100% sans chlorure. © TOSHIBA Television Central Europe Sp. z o.o. Tous droits réservés. Toute reproduction, qu'elle soit intégrale ou partielle, sans autorisation écrite est strictement interdite. TOSHIBA Television Central Europe Sp.
Français INFORMATION Remarques Pour votre information Nettoyage de l’écran et du boîtier… Coupez l’alimentation puis nettoyez l’écran et le boîtier avec un chiffon doux et sec. Nous recommandons de ne pas utiliser des produits de poli ou des solvants pour nettoyer l'écran ou le boîtier car ceux-ci peuvent les endommager.