Introduction Connecting your TV OWNER'S MANUAL IS O © 2002 TOSHIBA CORPORATION All Rights Reserved 140 P 01 FILE N o. A 9 6 23565661 Index CA RI 45 Serial No.: TOSHIBA AM E Model: TS, INC. DUC RO 32HF72 36HF72 Owner's Record The model number and serial number are on the back of your TV. Record these numbers in the spaces below. Refer to these numbers whenever you communicate with your Toshiba dealer about this TV.
Dear Customer, Child Safety Thank you for purchasing this Toshiba TV. This manual will help you use the many exciting features of your new TV. Before operating the TV, please read this manual completely, and keep it nearby for future reference.
Important Safety Instructions 1) 2) 3) 4) Installation, Care, and Service Installation Read these instructions. Keep these instructions. Heed all warnings. Follow all instructions. Follow these recommendations and precautions and heed all warnings when installing your TV: 15) Never modify this equipment. Changes or modifications may void: a) the warranty, and b) the user’s authority to operate this equipment under the rules of the Federal Communications Commission.
23) Always operate this equipment from a 120 VAC, 60 Hz power source only. 29) [This item applies to projection TVs only.] If the air temperature rises suddenly (for example, when the TV is first delivered), condensation may form on the lenses. This can make the picture appear distorted or the color appear faded. If this happens, turn off the TV for 6 to 7 hours to allow the condensation to evaporate.
Important Safety Information ............................. 2-4 Introduction ................................................................ 6 Welcome to Toshiba ......................................................... 6 Exploring your new TV ................................................... 6 Note regarding Quick Connect Guide .......................... 6 Connecting your TV .................................................. 7 Connecting a VCR ..........................................................
Introduction Introduction Connecting your TV Congratulations! You have purchased one of the finest TVs on the market. The goal of this manual is to guide you through setting up and operating your Toshiba TV as quickly as possible. This manual applies to models 32HF72 and 36HF72. Before you start reading, check your model number by looking at the rear of the TV. Instructions in this manual are based on using the remote control.
Introduction Connecting your TV Coaxial (antenna) cable Connecting your TV Note: Cables are not supplied with your TV. Coaxial cable is the cable that comes in from your antenna, cable TV service, or cable converter box. Coaxial cable uses “F” connectors. Standard stereo A/V cables usually come in sets of three, and are typically color-coded according to use: yellow for video, red for stereo right audio, and white for stereo left (or mono) audio.
Introduction Connecting a cable converter box Connecting your TV This connection allows you to watch basic and premium cable channels. To use the TV’s features, select ANT-1. To view premium channels, select ANT-2, tune the TV to channel 3 or 4 (whichever channel is vacant in your area), and use the converter box to change channels.
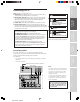
Introduction Connecting a DVD player or satellite receiver and a VCR From antenna Stereo VCR VIDEO AUDIO L R IN IN from ANT OUT to TV CH 3 CH 4 Connecting your TV Note: For the highest possible picture quality from a non-component video DVD player/satellite receiver, use an S-video cable between the TV and DVD player/satellite receiver. (If your DVD player or satellite receiver has component video connections, see page 10).
Introduction Connecting a DVD player with ColorStream® (component video) and a VCR Using the Remote Control Connecting your TV This connection allows you to watch DVD, VCR, and TV programs, and record TV programs. Your TV has ColorStream® (component video) inputs. Connecting your TV to a DVD player with component video (such as a Toshiba DVD player with ColorStream®) can greatly enhance picture quality and realism.
Introduction Connecting a DTV receiver/set-top box with ColorStream® (component video) and a VCR Connecting your TV Note: For the highest possible picture quality, use component video cables between the TV and DTV receiver. You can connect the component video cables from the DTV receiver to either ColorStream jack on the TV (HD1 or HD2). The ColorStream HD1 and HD2 jacks can be used with Progressive (480p) and Interlaced (480i,1080i) scan systems.
Introduction Connecting two VCRs Connecting your TV This connection allows you to record (dub/edit) from one VCR to another VCR while watching a videotape. You can also record from one TV channel while watching another TV channel.
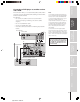
Introduction Connecting an audio system TV ANT(75 ANT-1 IN OUT IN S-VIDEO COLOR STREAM HD - 1 VIDEO L/MONO ) ANT-2 OUT COLOR STREAM HD - 2 Y L PB AUDIO PR AUDIO L Y VIDEO VAR AUDIO L/ PB MONO AUDIO CENTER CHANNEL IN AUDIO R VIDEO-1 VIDEO-2 R PR AUDIO L R R ON R OFF Connecting your TV This connection allows you to use an audio amplifier to adjust the audio level. This also allows you to use external speakers.
Introduction Using the remote control Preparing the remote control for use Connecting your TV With the remote control, you can operate your TV, most VCR models, and cable TV converters together, even if they are different brands. If you will be using your TV with a Toshiba VCR, your remote control is already programmed and ready to use. If you own different brands of VCRs and/or converters, you first have to program your remote control.
POWER MUTE TV/VIDEO TIMER 2 3 4 5 6 7 8 CH 9 VOL CH RTN 0 ENT ADV/ PIP CH OR IT E 100 Channel Number Enter PI C SI FA V ZE MENU/ ENTER IT FAV ADV/ PIP CH STOP SOURCE EX FAV Channel yz Connecting your TV 1 Using the Remote Control TV CABLE VCR BE RO PLAY PIP Note: • Each time you replace the batteries, you must reprogram the remote control. • Some newer VCRs are capable of working on either of two remote codes. These VCRs have a switch labeled “VCR1/VCR2.
Introduction VCR code table Brand name Adventura Aiko Aiwa Akai Using the Remote Control Connecting your TV American High Asha Audiovox Beaumark Bell & Howell Brandt Broksonic Using the TV’s Features Setting up your TV Calix Canon Capehart Carver CCE Citizen Colt Craig Curtis Mathes Cybernex Daewoo Daytron Dynatech Electrohome Electrophonic Emerex Emerson Index Appendix Fisher Fuji Funai Garrard GE Go Video Goldstar Gradiente Harley Davidson Harman/Kardon Harwood Headquarter HI-Q Hitachi 16 Code
Introduction Cable TV converter code table Connecting your TV Using the Remote Control 174 022,034,066 034,059 034 020 059 020 031,032,078 019 034 041,172 026 022 041,058,075,096, 172,210 046,079,230 019 419 Setting up your TV Viewstar Zenith Zentek 059,163 025,027,036,296 034,059 030 059 040 Using the TV’s Features Samsung Scientific Atlanta Signal Signature SL Marx Sprucer Standard Components Starcom Stargate Starquest Sylvania Teleview Texscan Tocom Toshiba Tusa Unika United Artists United Cable
Introduction Learning about the remote control POWER turns the TV on and off RECALL displays screen information (page 48) LIGHT RECALL POWER LIGHT illuminates the keypad for five seconds Connecting your TV TIMER sets the TV to turn off at a specific time (page 43) TV/VIDEO TV CABLE VCR selects video input source (pages 20, 41) MUTE mutes the sound (page 44) 1 2 3 4 5 6 7 8 CH TV/CABLE/VCR switches between TV, Cable and VCR (pages 14-15) Channel y z cycles through programmed channels (page 2
Introduction Setting up your TV Learning about the menu system Note regarding Quick Connect Guide The Quick Connect Guide automatically appears on-screen the first time the TV is turned on. This feature provides on-screen instructions to guide you through initial setup of your TV. Connecting your TV After you have installed the batteries and programmed the remote control, you will need to set some preferences on the TV using the menu system.
Introduction Changing the on-screen display language TV front panel Connecting your TV Choose from three different languages (English, French and Spanish) for the on-screen display of adjustment menus and messages. To select a language: 1. Press MENU, and then press x or • until the SET UP menu appears. 2. Press y or z to highlight LANGUAGE.
Introduction Adding channels to the TV’s memory MUTE TV/VIDEO TIMER 1 2 3 4 5 6 7 8 CH 100 0 VOL ENT ADV/ PIP CH FA VO R IT E SET UP PI C SI ZE MENU MENU/ ENTER FAV BE PO IT yzx • ADV/ PIP CH EX FAV ST 4. Press z to select CH PROGRAM.
Introduction 3. Press y or z to highlight ADD/ERASE. TV front panel DEMO MENU TV/VIDEO VOLUME CHANNEL SET UP 4. Press x or • to select ADD or ERASE, depending on the function you want to perform. 5. Repeat steps 1–4 for other channels you want to add or erase.
Introduction Adjusting the tilt correction feature LIGHT RECALL POWER 1 2 3 4 5 6 7 8 9 100 0 1 1 2 2 3 3 4 4 5 5 6 6 SET UP 7 Channel Number VOL CH RTN ENT ADV/ PIP CH PI C SI ZE MENU MENU/ ENTER FAV FAV yzx • 7 8 Channel yz CH FA VO RI T 1 2 3 4 5 6 7 8 9 10 11 12 13 14 15 16 17 18 19 20 21 22 23 24 25 26 27 28 29 30 31 32 33 34 35 MUTE TV/VIDEO TIMER Connecting your TV TV CABLE VCR E When you install the TV or change the direction of the TV, the picture m
Introduction Using the TV’s features Connecting your TV Switching between two channels using Channel Return The Channel Return feature allows you to switch between two channels without entering an actual channel number each time. 1. Select the first channel (or video mode) you want to view. 2. Select a second channel using the Channel Number buttons (0–9, 100). 3. Press CH RTN. The previous channel will display.
CH I NPUT 0 0 0 0 0 0 0 0 0 TV CABLE CLEAR ALL Connecting your TV 000 OFF Note: • The FAV zy buttons operate as MENU x • buttons when a menu is on-screen. • The favorite channel feature is not available in ANT2 mode. CUSTOM T I MER CC FAVOR I TE CH 1 FAVOR I TE CH2 CH L A B E L I NG V I DEO LABEL BACKGROUND Introduction 3. Press x or • to display the FAVORITE CH1 menu, for example. CH INPUT will be highlighted. 4. Press the Channel Number buttons to enter one of your favorite channels. 5.
Introduction Connecting your TV Labeling channels Channel labels appear above the on-screen channel number display each time you turn on the TV, change a channel, or press RECALL. You can choose any four characters to identify a channel. To create channel labels: 1. Press MENU, and then press x or • until the CUSTOM menu appears. 2. Press y or z to highlight CH LABELING. 3. Press x or • to display the CH LABELING menu. CH INPUT will be highlighted.
Introduction 5. Press z to highlight CLEAR. LIGHT RECALL POWER CUSTOM T I MER CC FAVOR I TE CH 1 FAVOR I TE CH2 CH L A B E L I NG V I DEO LABEL BACKGROUND CTV CABLE VCR 000 OFF 06 CH I NPUT ABCD LABEL CLEAR MUTE TV/VIDEO TIMER 1 2 3 4 5 6 7 8 6. Press x or • to erase the channel label. 7. Repeat steps 4–6 to erase other channel labels. OR IT E Note: The message “Not Available” will appear when the PIC SIZE button is pressed in a mode other than ColorStream HD1 or HD2.
Introduction Letterbox and Compression modes The Letterbox and Compression modes display a wide picture (16:9) with bars at top and bottom. The picture retains its true proportion. Connecting your TV Letterbox (recommended mode): • The picture is vertically compressed, with gray bars at top and bottom. • The picture quality is lower than in the Compression mode because of a reduction in the scanning lines.
Introduction Watching PIP/double-window Main window LIGHT RECALL POWER TV CABLE VCR MUTE TV/VIDEO TIMER 1 2 3 4 5 6 7 8 CH Sub-window 9 VOL CH RTN 0 ENT ADV/ PIP CH PI C VO RI TE 100 Connecting your TV The PIP/double-window feature allows you to watch two pictures at the same time. The sub-picture can be a TV broadcast or come from an external source, such as a VCR. To display a TV broadcast as a sub-picture: 1. Select the program you want to watch. 2.
Introduction Switching the main and sub-pictures Press SWAP while you are using the PIP feature to switch the main and sub-pictures. The main and sub-pictures will switch each time you press the SWAP button.
Introduction Using the Multi-Window feature 1 2 3 4 5 6 7 8 RI TE 0 VOL ENT ADV/ PIP CH FAVORITE PI C SI ZE ENTER MENU/ ENTER FAV FAV yzx • ST EX BE IT RO ADV/ PIP CH STOP SOURCE TV/VCR Using the Remote Control 7 9 CH RTN 100 Connecting your TV CH REC 6 MUTE TV/VIDEO TIMER VO Using the favorite function 1. Press FAVORITE to scan the channels you programmed in the TV memory using the favorite channel function (page 24). A 9-picture multi-window search will start.
Introduction Using the LOCKS menu The LOCKS menu includes the V-Chip, CH Lock, Video Lock, and New PIN Code functions. You can use these functions after entering the correct PIN code. Note: The V-Chip function is available only for the U.S. V-Chip system. The Canadian V-Chip system is not supported. Connecting your TV Entering the PIN code 1. Press MENU, and then press x or • until the LOCKS menu appears.
ENABLE BLOCKING 1. From the LOCKS menu, select ENABLE BLOCKING. 2. Press x or • to select ON or OFF. ON : To enable your setting (Lock) OFF: To release your setting (Unlock) LOCKS Y7, Y7FV Directed to Older Children (This program is designed for children age 7 and above. Note: Programs in which fantasy violence may be more intense or more combative than other programs in this category are designated Y7FV.) Y All Children (This program is designed to be appropriate for all children.
Introduction MPAA RATING (Independent rating system for movies) 1. From the LOCKS menu, select MPAA RATING. 2. Press x or • to display the MPAA RATING menu, then press z or y to highlight MPAA RATING. LOCKS menu LOCKS V - CH I P ENABLE BLOCK I NG TV RAT I NG MPAA RAT I NG BLOCK I NG OPT I ON CH LOCK V I DEO LOCK FRONT PANEL LOCK NEW P I N CODE Connecting your TV LOCKS MPAA RAT I NG X NC1 7 R PG1 3 PG G ON OFF OFF V - CH I P MENU To select each item: Press z or y . Using the Remote Control 3.
Introduction Unlocking programs temporarily 1. If you try to watch a TV program that exceeds the rating limits you set, the TV enters into the program lock mode. TH I S PROGRAM HAS BEEN BLOCKED ! TV-PG L V Connecting your TV EXCEEDS SET L I M I TS PUSH MUTE TO ENTER P I N CABLE 6 2. To temporarily unlock the program, press MUTE. 3. Press the Number buttons (0-9) to enter your 4-digit pin code.
Introduction To unlock individual channels: 1. From the LOCKS menu, select CH LOCK. 2. Press x or • to display the CH LOCK menu. 3. Press yzx • to highlight the channel you want to unlock, then press ENTER.
TV front panel DEMO MENU TV/VIDEO VOLUME CHANNEL Buttons to be locked Connecting your TV Lock the front panel buttons to prevent the buttons from being pressed accidentally (by children, for example). When the front panel lock is ON, all control buttons on the TV front panel (except POWER) do not operate. To lock the front panel: 1. From the LOCKS menu, select FRONT PANEL LOCK. 2. Press x or • to highlight ON.
Introduction Adjusting the picture Connecting your TV Selecting the picture mode You can select your desired picture type from four picture modes: Sports, Standard, Movie, and Preference. Mode Picture Quality Sports Standard Movie Preference Bright and dynamic picture (factory setting) Standard picture setting (factory setting) Movie-like picture setting (factory setting) Your personal preference* Using the Remote Control *(see “Saving new preference” on page 39.) To select the picture mode: 1.
MUTE TV/VIDEO TIMER 1 2 3 4 5 6 7 8 CH 9 VOL CH RTN 100 ENT ADV/ PIP CH PI C SI ZE FA V PREFERENCE MENU MENU/ ENTER FAV yzx • DONE RO IT ST BE ADV/ PIP CH Using the Remote Control FAV EX FLESH TONE OFF CableClear DNR OFF COLOR MEDI UM TEMPERATURE SAVE NEW PREFERENCE 0 OR IT E P I CTURE ANTENNA MODE Introduction LIGHT RECALL POWER TV CABLE VCR Connecting your TV Saving new preference You can save the PICTURE qualities (contrast, brightness, color, tint, and sharpness) y
Mode P I CTURE ANTENNA MODE PREFERENCE FLESH TONE ON AUTO CableClear DNR COLOR COOL / MED I UM / WARM TEMPERATURE SAVE NEW PREFERENCE cool medium warm LIGHT RECALL POWER TV CABLE VCR 1 2 3 4 5 6 7 8 CH Picture Quality blueish neutral reddish MUTE TV/VIDEO TIMER 9 0 100 E IT OR ENT ADV/ PIP CH SPORTS CONTRAST 100 50 BR I GHTNESS 50 COLOR 0 T I NT 50 SHARPNESS RESET SAVE NEW PREFERENCE DONE Index Appendix Selecting the cinema mode When you view a DVD movie (3-2 pulldown processed)
Introduction Selecting the video input source Press TV/VIDEO on the remote control or TV to view a signal coming from another device connected to your TV, such as a VCR or video disc player. You can select ANT 1, VIDEO 1, VIDEO 2, VIDEO 3, ColorStream HD1, ColorStream HD2, or ANT 2 depending on which input jacks are used for connecting the devices (see “Connecting your TV” on page 7.
Introduction Using the closed caption feature LIGHT RECALL POWER TV CABLE VCR MUTE TV/VIDEO TIMER 1 2 3 4 5 6 7 8 CH 0 100 E IT OR ADV/ PIP CH PI C SI ZE MENU MENU/ ENTER FAV yzx • BE RO IT ST CUSTOM VOL ENT V FA FAV Using the Remote Control 9 CH RTN ADV/ PIP CH EX Connecting your TV The closed caption feature has two options: • Captions—An on-screen display of the dialogue, narration, and sound effects of TV programs and videos that are closed captioned (usually marked
Introduction Setting the sleep timer Note : To display the amount of time left until the TV turns off automatically, press TIMER once. Connecting your TV To set the sleep timer to turn off the TV automatically: 1. Press TIMER to set the length of time until the TV turns off.
Introduction Adjusting the sound Muting the sound Press MUTE to temporarily reduce (1/2 MUTE) or turn off (MUTE) the sound. While the sound is off, the screen will display “1/2 MUTE” or “MUTE” in the lower right corner. Every time you press the button, the mute mode will change in the following order. Connecting your TV → Normal → 1/2 MUTE → MUTE RECALL LIGHT RECALL POWER TV CABLE VCR MUTE TV/VIDEO TIMER MUTE When you press MUTE, the closed caption feature is automatically activated.
Introduction Note: If the broadcast is monaural, the SRS 3D effect does not work. Connecting your TV Using the SRS* 3D surround sound feature The SRS 3D surround sound feature expands the audio listening field wider and deeper to create exceptional sound quality from the TV’s speakers. The feature uses stereo signals from a TV broadcast or video input. To turn on the SRS 3D surround: 1. Select STEREO mode (see “Selecting stereo/SAP broadcasts” on page 44). 2.
MUTE TV/VIDEO TIMER 1 2 3 4 5 6 7 8 CH 9 CH RTN 0 100 E IT OR VOL ENT ADV/ PIP CH V FA E Z SI Introduction Connecting your TV LIGHT RECALL POWER TV CABLE VCR C PI Resetting audio adjustments The RESET function returns the audio adjustments to the following factory settings: Bass .................. center (50) Treble ............... center (50) Balance ............ center (0) To reset the audio adjustments: 1. Press MENU, and then press x or • until the AUDIO menu appears. 2.
LIGHT RECALL POWER TV CABLE VCR MUTE TV/VIDEO TIMER 1 2 3 4 5 6 7 8 CH AUD I O 9 VOL CH RTN 0 ENT ADV/ PIP CH VO RI TE 100 PI C SI ZE FA RO yzx • PLAY PIP / C Setting up your TV BE ADV/ PIP CH STOP SOURCE C FAV IT ST Selecting the Audio OUT sound This feature allows you to select the sound source (MAIN or PIP) that is output from the Audio OUT jacks (See “Connecting two VCRs” on page 12).
Introduction Connecting your TV Using the StableSound® feature When the signal source is changed, the StableSound® feature limits the highest volume level to prevent extreme changes in volume (for example, to prevent the sudden increase in volume that often happens when a TV program switches to a commercial). To turn on the StableSound® feature: 1. Press MENU, and then press x or • until the AUDIO menu appears. 2. Press y or z to highlight STABLE SOUND. 3. Press x or • to select ON.
Introduction Viewing the demo mode Connecting your TV The demo mode automatically demonstrates several of your TV’s features. This function is provided for demonstration purposes only. To start the demo: Press DEMO on the TV front panel. To stop the demo: Press DEMO again. Understanding the auto power off feature The TV will automatically turn itself off after approximately 15 minutes if it is tuned to a vacant channel or a station that completes its broadcast for the day.
Introduction Appendix Television System NTSC standard Channel Coverage VHF: 2 through 13 UHF: 14 through 69 Cable TV: Mid band (A-8 through A-1, A through I) Super band (J through W) Hyper band (AA through ZZ, AAA, BBB) Ultra band (65 through 94, 100 through 125) Power Source 120 V AC, 60 Hz Power Consumption 32HF72: 186 W (average) 36HF72: 180 W (average) Audio Power 10 W + 10 W Speaker Type Two 2-3/8 × 4-3/4 inches (60 × 120 mm) Video/Audio Terminals S-VIDEO INPUT Y: 1 V(p-p), 75 ohm, negat
Introduction Troubleshooting Problem TV will not turn on Solution • Make sure the power cord is plugged in, then press POWER. • The remote control batteries may be dead. Replace the batteries. No picture, no sound • Check the antenna/cable connections. No sound, picture OK • • • • Poor picture, sound OK • Check the antenna connections. • The station may have broadcast difficulties. Try another channel. • Adjust the PICTURE menu.
Introduction Limited United States Warranty for 27'' FST PURE® and All Larger Television Models Connecting your TV Toshiba America Consumer Products, Inc. (“TACP”) and Toshiba Hawaii, Inc. (“THI”) make the following limited warranties to original consumers in the United States. THESE LIMITED WARRANTIES EXTEND TO THE ORIGINAL CONSUMER PURCHASER OR ANY PERSON RECEIVING THIS TELEVISION AS A GIFT FROM THE ORIGINAL CONSUMER PURCHASER AND TO NO OTHER PURCHASER OR TRANSFEREE. PRODUCTS PURCHASED IN THE U.S.A.
Introduction Limited Canada Warranty for 27'' FST PURE® and All Larger Television Models Limited Two (2) Year Warranty on Picture Tube* TCL further warrants the picture tube in this television against defects in materials or workmanship for a period of two (2) years after the date of original retail purchase.
Introduction Index A Connecting your TV A/V cables (standard) ......................................................... 7 A/V receiver connection ................................................... 13 ANT 1/2 ................................................................................... 20 Antenna cables (coaxial) ................................................... 7 AUDIO OUT sound, selecting ........................................ 47 Audio system connection .......................................
HEAD OFFICE: 82 TOTOWA ROAD, WAYNE, NJ 07470, U.S.A. NATIONAL SERVICE DIVISION:1420-B TOSHIBA DRIVE, LEBANON, TN 37087, U.S.A. HEAD OFFICE: 327 KAMAKEE STREET, HONOLULU, HI 96814, U.S.A. – TEL: (808) 591-9281 HEAD OFFICE: 191 McNABB STREET, MARKHAM, ONTARIO, L3R 8H2, CANADA – TEL: (905) 470-5400 SERVICE CENTERS: TORONTO: 191 McNABB STREET, MARKHAM, ONTARIO L3R 8H2, CANADA – TEL: (905) 470- 5400 MONTREAL: 1643 NORTH SERVICE RD.