32HL17_EN.book Page 1 Tuesday, April 24, 2007 11:06 AM Integrated High Definition LCD Television HIGH-DEFINITION TELEVISION 32HL17 32HL17U 37HL17 42HL17 32HL37 32HL37U For an overview of steps for setting up your new TV, see page 9. Note: To display a High Definition picture, the TV must be receiving a High Definition signal (such as an over-the-air High Definition TV broadcast, a High Definition digital cable program, or a High Definition digital satellite program).
32HL17_EN.book Page 2 Tuesday, April 24, 2007 11:06 AM Dear Customer, Thank you for purchasing this Toshiba LCD TV. This manual will help you use the many exciting features of your new LCD TV. Before operating your LCD TV, please read this manual completely, and keep it nearby for future reference. Safety Precautions WARNING: TO REDUCE THE RISK OF FIRE OR ELECTRIC SHOCK, DO NOT EXPOSE THIS APPLIANCE TO RAIN OR MOISTURE. WARNING RISK OF ELECTRIC SHOCK DO NOT OPEN.
2HL17_EN.book Page 3 Tuesday, April 24, 2007 11:06 AM Important Safety Instructions 15) CAUTION: • To reduce the risk of electric shock, do not use the polarized plug with an extension cord, receptacle, or other outlet unless the blades can be inserted completely to prevent blade exposure. • To prevent electric shock, match wide blade of plug to wide slot; fully insert. 1) Read these instructions. 2) 3) 4) Keep these instructions. Heed all warnings. Follow all instructions.
32HL17_EN.book Page 4 Tuesday, April 24, 2007 11:06 AM 23) Always place the back of the television at least four (4) inches away from any vertical surface (such as a wall) to allow proper ventilation. 24) Never allow anything to rest on or roll over the power cord, and never place the TV where the power cord is subject to wear or abuse. 25) Never overload wall outlets and extension cords. 26) Always operate this equipment from a 120 VAC, 60 Hz power source only.
32HL17_EN.book Page 5 Tuesday, April 24, 2007 11:06 AM Choosing a location for your LCD TV To Display your LCD TV on the included Pedestal Stand: Observe the following safety precautions: 1) Read and Follow the pedestal assembly instructions included with the pedestal. CAUTION: Before beginning pedestal assembly, carefully lay the front of the LCD Panel face down on a flat, cushioned surface such as a quilt or blanket.
32HL17_EN.book Page 6 Tuesday, April 24, 2007 11:06 AM FCC Declaration of Conformity Compliance Statement (Part 15): The Toshiba 32HL17, 32HL17U, 37HL17, 42HL17, 32HL37, and 32HL37U Televisions comply with Part 15 of the FCC rules. Operation is subject to the following two conditions: (1) this device may not cause harmful interference, and (2) this device must accept any interference received, including interference that may cause undesired operation.
32HL17_EN.book Page 7 Tuesday, April 24, 2007 11:06 AM Contents Important Safety Instructions .......................................... 3 Installation, Care, and Service ........................................ 3 Chapter 1: Introduction . . . . . . . . . . . . . . . . . . . . . . . . . . . . 8 Welcome to Toshiba . . . . . . . . . . . . . . . . . . . . . . . . . . . . . . . . 8 Features of your new TV . . . . . . . . . . . . . . . . . . . . . . . . . . . .
32HL17_EN.book Page 8 Tuesday, April 24, 2007 11:06 AM Chapter 1: Introduction Welcome to Toshiba Features of your new TV Thank you for purchasing this Toshiba LCD TV, one of the most innovative LCD TVs on the market. This digital television is capable of receiving analog basic, digital basic and digital premium cable television programming by direct connection to a cable system providing such programming. A security card provided by your cable operator is required to view encrypted digital programming.
32HL17_EN.book Page 9 Tuesday, April 24, 2007 11:06 AM Chapter 1: Introduction Overview of steps for installing, setting up, and using your new TV Follow these steps to set up your TV and begin using its many exciting features. 1 Carefully read the important safety, installation, care, and service information. Keep this manual for future reference. 2 Observe the following when choosing a location for the TV: • Read “Important notes about your LCD TV” (- page 6).
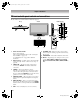
32HL17_EN.book Page 10 Tuesday, April 24, 2007 11:06 AM Chapter 1: Introduction TV front and side panel controls and connections Model 32HL37 is used in this manual for illustration purposes. TV top Right side panel TV front 4 8 5 9 6 10 7 Control panel 3 POWER 1 1 Green and Yellow LEDs Green = Power indicator Yellow = Power-On Mode indicator (- “Selecting the Power-On Mode” on page 34) See “LED indications” on page 60 for additional information.
32HL17_EN.book Page 11 Tuesday, April 24, 2007 11:06 AM Chapter 1: Introduction TV back panel connections For an explanation of cable types and connections, see pages 12–19. 1 2 TV back Power cord Cable Clamper 3 4 5 1 2 6 7 8 9 ColorStream® HD-1 and ColorStream® HD-2 — Two sets of ColorStream® high-definition component video inputs (with standard stereo audio inputs) for connecting devices with component video output, such as a Toshiba DVD player with ColorStream®.
32HL17_EN.book Page 12 Tuesday, April 24, 2007 11:06 AM Chapter 2: Connecting your TV Overview of cable types Cables can be purchased from most stores that sell audio/video devices. Before purchasing any cables, be sure of connector types required by your devices and the length of each cable. Coaxial (F-type) cable Coaxial (F-type) cable is used for connecting your antenna, cable TV service, and/or cable converter box to the ANT input on your TV.
32HL17_EN.
32HL17_EN.book Page 14 Tuesday, April 24, 2007 11:06 AM Chapter 2: Connecting your TV Connecting a VCR with S-video and a cable box An S-video connection will provide better picture performance than a standard (composite) video cable.
32HL17_EN.book Page 15 Tuesday, April 24, 2007 11:06 AM Chapter 2: Connecting your TV Connecting a DVD player with ColorStream® (component video), a VCR, and a satellite receiver Your TV has two sets of ColorStream® (component video) inputs.
32HL17_EN.book Page 16 Tuesday, April 24, 2007 11:06 AM Chapter 2: Connecting your TV Connecting a camcorder You will need: • standard A/V cables – For better picture performance, if your camcorder has S-video, connect an S-video cable (plus the audio cables) to VIDEO 1 on the TV back instead of the VIDEO 2 on the TV right side panel. Camcorder VIDEO AUDIO OUT L R VIDEO 2 inputs on TV right side panel To view the camcorder video: Select the VIDEO 2 video input source on the TV.
32HL17_EN.book Page 17 Tuesday, April 24, 2007 11:06 AM Chapter 2: Connecting your TV Connecting an HDMI™ or DVI device to the HDMI input The HDMI input on your TV receives digital audio and uncompressed digital video from an HDMI source device, or uncompressed digital video from a DVI (Digital Visual Interface) source device.
32HL17_EN.book Page 18 Tuesday, April 24, 2007 11:06 AM Chapter 2: Connecting your TV Connecting a digital audio system The TV’s DIGITAL AUDIO OUT terminal outputs a Dolby®* Digital g or 2-channel down-mixed PCM (pulse-code modulation) signal for use with an external Dolby® Digital decoder or other external audio system with optical audio input. You will need: • optical audio cable (Use an optical audio cable that has the larger “TosLink” connector and not the smaller “minioptical” connector.
32HL17_EN.book Page 19 Tuesday, April 24, 2007 11:06 AM Chapter 2: Connecting your TV Connecting a personal computer (PC) • Depending on the DVD’s title and the specifications of the PC on which you are playing the DVD-Video, some scenes may be skipped or you may not be able to pause during multi-angle scenes. • Signal names for mini D-sub 15-pin connector With either the PC IN or HDMI connection, you can watch your computer’s display on the TV and hear the sound from the TV’s speakers.
32HL17_EN.book Page 20 Tuesday, April 24, 2007 11:06 AM Chapter 3: Using the remote control Preparing the remote control for use • Always remove batteries from the remote control if they are dead or if the remote control is not to be used for an extended period of time. This will prevent battery acid from leaking into the battery compartment.
32HL17_EN.book Page 21 Tuesday, April 24, 2007 11:06 AM Chapter 3: Using the remote control Learning about the remote control The buttons used for operating the TV only are described here. For a complete list of the remote control’s functions, see the remote control functional key chart (- page 23). 1 POWER turns the TV on and off. When the TV is on, the green LED indicator on the TV front will be illuminated. 2 PIC MODE selects the picture mode (- page 42).
32HL17_EN.book Page 22 Tuesday, April 24, 2007 11:06 AM Chapter 3: Using the remote control Using the remote control to control your other devices If you have a non-Toshiba device or a Toshiba device that the remote control is not preprogrammed to operate, you must first program the remote control to recognize the device (if you have not already done so) (- pages 24–26). 1 POWER Turns the selected device on and off. 2 Channel Numbers (0-9) Press to directly access channels (as opposed to < ,).
32HL17_EN.book Page 23 Tuesday, April 24, 2007 11:06 AM Chapter 3: Using the remote control Remote Control functional key chart Note: • “---” = key does not send a signal in that remote control mode. • “sTV” = key will affect the TV, even though the remote control is in another mode. • * Not available for your TV.
32HL17_EN.book Page 24 Tuesday, April 24, 2007 11:06 AM Chapter 3: Using the remote control Programming the remote control to control your other devices Your Toshiba TV remote control is preprogrammed to operate most Toshiba devices. To program your TV remote control to operate a non-Toshiba device (or a Toshiba device that it is not preprogrammed to operate), follow the steps below. For details on using the remote control to operate the device, see page 22.
32HL17_EN.book Page 25 Tuesday, April 24, 2007 11:06 AM Chapter 3: Using the remote control Remote control codes In some cases you may not be able to operate your device with the TV remote control. Your other device may use a code that is not recognized by the TV remote control. If this happens, use the device’s remote control.
32HL17_EN.
32HL17_EN.book Page 27 Tuesday, April 24, 2007 11:06 AM Chapter 4: Menu layout and navigation Main menu layout The tables below and on the next page provide a quick overview of your TV’s menu system. To open the main menus (illustrated below), press Y on the remote control or TV control panel.
32HL17_EN.book Page 28 Tuesday, April 24, 2007 11:06 AM Chapter 4: Menu layout and navigation Setup/Installation menu layout The Installation menu contains the Terrestrial and System Status menus. To open the Installation menu (illustrated below), press Y on the remote control or TV control panel, open the Setup menu, select Installation, and press T. Icon Press Y, Terrestrial open the Setup menu, and then open the Installation System Status sub-menu.
32HL17_EN.book Page 29 Tuesday, April 24, 2007 11:06 AM Chapter 5: Setting up your TV Selecting the menu language You can choose from three different languages (English, French and Spanish) for the on-screen display of menus and messages. To select the menu language: 1 2 3 Press Y and open the Preferences menu. Configuring the antenna input source for the ANT terminal To configure the ANT input source: 1 2 Press Y and open the Setup menu. Highlight Installation and press T.
32HL17_EN.book Page 30 Tuesday, April 24, 2007 11:06 AM Chapter 5: Setting up your TV Programming channels into the TV’s channel memory 4 When you press < or , on the remote control or TV control panel, your TV will stop only on the channels you programmed into the TV’s channel memory. Follow the steps below to program channels into the TV’s channel memory. (A new set of Installation menu icons will appear, as shown below.
32HL17_EN.book Page 31 Tuesday, April 24, 2007 11:06 AM Chapter 5: Setting up your TV To add a channel to the channel memory: Highlight the unchecked box next to the channel number you want to add, and then press T to check the box. To manually add digital subchannels on a physical channel: Use the Channel Numbers and the Dash (=) on the remote control to enter the channel number (for example, 56–1). If the channel is found, the number will be added to the list and the box will be checked.
HL17_EN.book Page 32 Tuesday, April 24, 2007 11:06 AM Chapter 5: Setting up your TV 3 Press BbC c to highlight No Label and press T. 3 Channel Labeling {No Label} Channel Labeling ANT 24 A&E Highlight Yes from the deletion confirmation window and press T. TIMES ABC TLC Press CH UP/DOWN to change channels. ABCFAM TMC ABCHD TMCX AMAX 4 5 AMAXW Custom AMC Clear All ANIMAL Done No TMCw Repeat steps 2 and 3 for other channels. To save your settings, highlight Done and press T.
32HL17_EN.book Page 33 Tuesday, April 24, 2007 11:06 AM Chapter 5: Setting up your TV Viewing the digital signal meter Viewing the system status You can view the digital signal meter in the ANT digital TV input source only. To view the system status: To view the digital signal meter: 1 2 3 Press Y and open the Setup menu. Highlight Installation and press T. 1 2 3 A new set of Installation menu icons will appear, as shown below. Open the Terrestrial menu, highlight Signal Meter, and press T.
32HL17_EN.book Page 34 Tuesday, April 24, 2007 11:06 AM Chapter 5: Setting up your TV 6 Highlight Yes and press T. The TV will turn off automatically after a few seconds. After the TV turns off, unplug the TV power cord and then plug it in again to complete the reset process. System Information Press YES to confirm. After the TV turns off, unplug it and plug it back in to complete the reset. No To cancel the reset: Highlight No and press T.
32HL17_EN.book Page 35 Tuesday, April 24, 2007 11:06 AM Chapter 6: Using the TV’s features Selecting the video input source to view To select the video input source to view: 1 2 Press + on the remote control or TV control panel. And then either: a) Press 0–8; or b) Repeatedly press Bb on the remote control and then press T to change the input; or c) Repeatedly press + on the remote control or TV control panel to change the input.
32HL17_EN.book Page 36 Tuesday, April 24, 2007 11:06 AM Chapter 6: Using the TV’s features 4 Press C or c to select the desired label for that input source. If a particular input is not used, you can select Hide as the label, which will cause that input to be “grayed out” in the Input Selection screen and skipped over when you press + on the remote control. 5 To save the new input labels, highlight Done and press T. To revert to the factory default labels, highlight Reset and press T.
09C06.fm Page 37 Tuesday, April 24, 2007 1:24 PM Chapter 6: Using the TV’s features 4 Press b to highlight History List, and then press C or c to select the setting you prefer: either Power Off Clear (On), On, or Off. Note: When History List is set to On and the Power-On Mode (- page 34) is in Fast mode, the channels and inputs stored in the list will be saved every power on/off cycle.
32HL17_EN.book Page 38 Tuesday, April 24, 2007 11:06 AM Chapter 6: Using the TV’s features Clearing channels from the History List: • Reconfiguring the ANT input will clear the History List. Note: See page 29 for details on configuring the antenna input. • Once 32 channels or inputs are stored in the History List, the oldest item will be removed from the list when a new channel or input is tuned.
32HL17_EN.book Page 39 Tuesday, April 24, 2007 11:06 AM Chapter 6: Using the TV’s features Selecting the picture size You can view many program formats in a variety of picture sizes—Natural, TheaterWide 1, TheaterWide 2, TheaterWide 3, Full, 4:3 HD and Native. Note: The “picture size” illustrations are examples only. The format of the image (in any of the picture sizes) will vary depending on the format of the signal you are currently watching.
32HL17_EN.book Page 40 Tuesday, April 24, 2007 11:06 AM Chapter 6: Using the TV’s features TheaterWide 3 picture size (for letter box programs with subtitles) • The picture is stretched wider to fill the width of the screen, but only slightly stretched taller. • The top and bottom edges are hidden. To view the hidden areas (such as subtitles or captions), see “Scrolling the TheaterWide® picture.” ABCDEFG---------------- Note: • Native picture size is available for 720p, 1080i, and 1080p signals only.
32HL17_EN.book Page 41 Tuesday, April 24, 2007 11:06 AM Chapter 6: Using the TV’s features Using the auto aspect ratio feature When the auto aspect ratio feature is set to On, the TV will automatically select the picture size when one of the following input sources is received: • A 480i signal from the VIDEO 1, VIDEO 2, ColorStream HD-1, or ColorStream HD-2 input. • A 480i, 480p, 720p, 1080i, 1080p, or VGA signal from the HDMI input.
32HL17_EN.book Page 42 Tuesday, April 24, 2007 11:06 AM Chapter 6: Using the TV’s features Adjusting the picture Selecting the picture mode You can select your desired picture settings from four different modes, as described below. Adjusting the picture quality You can adjust the picture quality (Contrast, Back Light, DynaLight™, Brightness, Color, Tint, and Sharpness) to your personal preferences.
32HL17_EN.book Page 43 Tuesday, April 24, 2007 11:06 AM Chapter 6: Using the TV’s features Using the closed caption mode Base closed captions The closed caption mode has two options: • Captions—An on-screen display of the dialogue, narration, and sound effects of TV programs and videos that are closed captioned (usually marked “CC” in program guides). • Text—An on-screen display of information not related to the current program, such as weather or stock data (when provided by individual stations).
32HL17_EN.book Page 44 Tuesday, April 24, 2007 11:06 AM Chapter 6: Using the TV’s features CC Selector You can use the CC Selector to temporarily override the default analog caption mode (set in Base CC Mode) for a particular channel. However, once you change to another analog channel, the closed caption setting will automatically change back to the current Base CC Mode setting. You can also use the CC Selector to select digital closed caption services (if available).
32HL17_EN.book Page 45 Tuesday, April 24, 2007 11:06 AM Chapter 6: Using the TV’s features Selecting stereo/SAP broadcasts The multi-channel TV sound (MTS) feature allows you to output high-fidelity stereo sound. MTS also can transmit a second audio program (SAP) containing a second language, music, or other audio information (when provided by individual stations). When the TV receives a stereo or SAP broadcast, the word “STEREO” or “SAP” appears on-screen when E is pressed.
32HL17_EN.book Page 46 Tuesday, April 24, 2007 11:06 AM Chapter 6: Using the TV’s features Using the StableSound® feature 3 The StableSound® feature limits the highest volume level to prevent extreme changes in volume when the signal source changes (for example, to prevent the sudden increase in volume that often happens when a TV program switches to a commercial). Audio Setup PC Audio In the StableSound field, select On.
32HL17_EN.book Page 47 Tuesday, April 24, 2007 11:06 AM Chapter 6: Using the TV’s features When the correct PIN code is entered, the Locks menu opens. Using the Locks menu The Locks menu includes the Enable Rating Blocking, Edit Rating Limits, Channels Block, Input Lock, Front (control) Panel Lock, and New PIN Code features. You can use these features after entering the correct PIN code.
32HL17_EN.book Page 48 Tuesday, April 24, 2007 11:06 AM Chapter 6: Using the TV’s features Blocking TV programs and movies by rating (V-Chip) Downloading an additional rating system for blocking TV programs and movies Some TV programs and movies include signals that classify the content of the program (violence, sex, dialog, language). The V-Chip feature in this TV detects the signals and blocks the programs according to the ratings you select. (For rating descriptions, see the tables on the next page.
32HL17_EN.book Page 49 Tuesday, April 24, 2007 11:06 AM Chapter 6: Using the TV’s features Independent rating system for broadcasters Ratings Description and Content themes TV-MA TV-14 Mature Audience Only (This program is specifically designed to be viewed by adults and therefore may be unsuitable for children under 17.
32HL17_EN.book Page 50 Tuesday, April 24, 2007 11:06 AM Chapter 6: Using the TV’s features Using the input lock feature To block all channels at once: Highlight Block All in step 5 on previous page and then highlight Done and press T. To unblock all locked channels at once: Highlight Allow All in step 5 on previous page and then highlight Done and press T.
32HL17_EN.book Page 51 Tuesday, April 24, 2007 11:06 AM Chapter 6: Using the TV’s features Using the control panel lock feature You can lock the control panel to prevent your settings from being changed accidentally (by children, for example). When the control panel lock is On, none of the controls on the TV control panel will operate except POWER. To lock the control panel: 1 2 3 4 5 Press Y and highlight the Locks menu icon. Press b to display the PIN code entering screen.
32HL17_EN.book Page 52 Tuesday, April 24, 2007 11:06 AM Chapter 6: Using the TV’s features Setting the PC Audio Setting the sleep timer This function allows you to output the sound from your PC (if connected) or mute the sound from your PC and output the sound from your HDMI (DVI) connection. (- page 19) You can set the sleep timer to turn off the TV after a set length of time (maximum of 180 minutes).
32HL17_EN.book Page 53 Tuesday, April 24, 2007 11:06 AM Chapter 6: Using the TV’s features Displaying TV status information Understanding the auto power off feature To display TV status information using RECALL: Press E on the remote control. The following information will display (if applicable): • Current input (ANT, VIDEO 1, etc.) • If ANT is the current input, either “CABLE” (for cable TV) or “ANT” (for over-the-air broadcasts).
32HL17_EN.book Page 54 Tuesday, April 24, 2007 11:06 AM Chapter 7: Using the TV’s advanced features Using the advanced picture settings features Using the static gamma feature The static gamma feature allows you to adjust the levels of black in the picture.
32HL17_EN.book Page 55 Tuesday, April 24, 2007 11:06 AM Chapter 7: Using the TV’s advanced features Selecting the color temperature Using CableClear® digital noise reduction You can change the quality of the picture by selecting from three preset color temperatures (Cool, Medium, and Warm), as described below. The CableClear® digital noise reduction feature allows you to reduce visible interference in your TV picture.
32HL17_EN.book Page 56 Tuesday, April 24, 2007 11:06 AM Chapter 7: Using the TV’s advanced features Using MPEG noise reduction Using the Game Mode feature The MPEG noise reduction feature allows you to reduce visible interference caused by MPEG compression. Choices for MPEG noise reduction are Off, Low, Middle, and High. Off is automatically selected when this feature is disabled (“grayed out”).
32HL17_EN.book Page 57 Tuesday, April 24, 2007 11:06 AM Chapter 7: Using the TV’s advanced features Using the advanced audio settings features Using the SRS WOW™ surround sound feature SRS WOW™ is a special combination of SRS Labs audio technologies (SRS 3D, SRS Focus, and SRS TruBass) that creates a thrilling surround sound experience with deep, rich bass from stereo sound sources. Your TV’s audio will sound fuller, richer, and wider.
32HL17_EN.book Page 58 Tuesday, April 24, 2007 11:06 AM Chapter 8: Troubleshooting General troubleshooting Before calling a service technician, please check this chapter for a possible cause of the problem and some solutions you can try. Black box on-screen • The closed caption feature is set to one of the Text modes (T1, T2, T3, or T4). Set the closed caption feature to Off (- page 43).
32HL17_EN.book Page 59 Tuesday, April 24, 2007 11:06 AM Chapter 8: Troubleshooting • Your TV remote control may not operate certain features on your external device. Refer to the owner’s manual for your other device to determine its available features. If your TV remote control does not operate a specific feature on another device, use the remote control that came with the device (- pages 22–26). • If the TV still does not act as expected, use the Reset Factory Defaults procedure (- page 33).
32HL17_EN.book Page 60 Tuesday, April 24, 2007 11:06 AM Chapter 8: Troubleshooting LED indications The green and yellow LED lights on the TV front indicate the TV’s status, as described below. Note: If the TV loses A/C power (e.g., a power outage occurs or the power cord is unplugged), when power is restored, the yellow LED will blink while the TV is booting until the remote control is usable. This is normal and is not a sign of malfunction.
32HL17_EN.book Page 61 Tuesday, April 24, 2007 11:06 AM Chapter 9: Appendix Specifications Note: • This model complies with the specifications listed below. • Designs and specifications are subject to change without notice. • This model may not be compatible with features and/or specifications that may be added in the future.
32HL17_EN.book Page 62 Tuesday, April 24, 2007 11:06 AM Chapter 9: Appendix Limited United States Warranty for LCD Televisions 26” and Larger Toshiba America Consumer Products, L.L.C. (“TACP”) makes the following limited warranties to original consumers in the United States. THESE LIMITED WARRANTIES EXTEND TO THE ORIGINAL CONSUMER PURCHASER OR ANY PERSON RECEIVING THIS LCD TELEVISION AS A GIFT FROM THE ORIGINAL CONSUMER PURCHASER AND TO NO OTHER PURCHASER OR TRANSFEREE. LCD TELEVISIONS PURCHASED IN THE U.
32HL17_EN.book Page 63 Tuesday, April 24, 2007 11:06 AM Chapter 9: Appendix Limited Canadian Warranty for Toshiba Brand Flat Panel Televisions Toshiba of Canada Limited (“TCL”) makes the following limited warranties to original consumers in Canada. THESE LIMITED WARRANTIES EXTEND TO THE ORIGINAL CONSUMER PURCHASER OR ANY PERSON RECEIVING THIS TOSHIBA BRAND FLAT PANEL TELEVISION (the “TELEVISION(S)” or “Television(s)”) AS A GIFT FROM THE ORIGINAL CONSUMER PURCHASER AND TO NO OTHER PURCHASER OR TRANSFEREE.
32HL17_EN.book Page 64 Tuesday, April 24, 2007 11:06 AM Chapter 9: Appendix Disclaimer and Limitation of Remedy TO THE EXTENT NOT PRECLUDED BY LAW, ALL OTHER EXPRESS AND IMPLIED WARRANTIES, CONDITIONS AND REPRESENTATIONS FOR THIS TELEVISION, INCLUDING THE IMPLIED WARRANTIES, CONDITIONS AND REPRESENTATIONS OF MERCHANTABILITY AND FITNESS FOR A PARTICULAR PURPOSE, ARE HEREBY DISCLAIMED AND EXCLUDED.
32HL17_EN.book Page 65 Tuesday, April 24, 2007 11:06 AM Chapter 9: Appendix A copy of the GPL source code in this product may be obtained by contacting Toshiba Consumer Solutions at (800)631-3811. There will be a charge to cover the costs of providing the source code. A copy of the LGPL source code in this product may be obtained by contacting Toshiba Consumer Solutions at (800)631-3811. There will be a charge to cover the costs of providing the source code.
32HL17_EN.book Page 66 Tuesday, April 24, 2007 11:06 AM Index A H R Antenna cable ................................ 12 Antenna input configuration ............ 29 Audio quality adjustments ............... 45 Audio system connection ................ 18 Auto aspect .................................... 41 Auto power off ................................ 53 HDMI audio mode ........................... 32 HDMI cable .................................... 12 HDMI™ connection ..........................
32HL17_EN.
32HL17_EN.
32HL17_EN.
32HL17_EN.book Page 70 Tuesday, April 24, 2007 11:06 AM Corporate Headquarters: 82 TOTOWA ROAD, WAYNE, NJ 07470, U.S.A. NATIONAL SERVICE DIVISION: 1420-B TOSHIBA DRIVE, LEBANON, TN 37087, U.S.A.