RL85* Digital Series For product related help please visit http://www.toshiba.co.
English Contents Stereo and Bilingual transmissions .................................20 Sound controls .................................................................................21 Volume controls and mute sound ...................................21 Dual .............................................................................................21 Balance, Bass and Treble .....................................................21 Surround Settings ......................................................
Input selection and AV connections ........................................61 Input selection ........................................................................61 External input skip .................................................................61 Labeling video input sources ............................................62 Colour Decoding ....................................................................62 PC Audio ...................................................................................
English INSTALLING YOUR TV Safety Precautions WARNING: To prevent injury, this apparatus must be securely attached to the floor/wall in accordance with the installation instructions. See page 5. This equipment has been designed and manufactured to meet international safety standards but, like any electrical equipment, care must be taken to obtain the best results and for safety to be assured. Please read the points below for your own safety.
INSTALLING YOUR TV English Installation and important information Where to install Locate the television away from direct sunlight and strong lights. Soft, indirect lighting is recommended for comfortable viewing. Use curtains or blinds to prevent direct sunlight falling on the screen. Fixing strap Place the TV on a stable, level surface that can support the weight of the TV.
English INSTALLING YOUR TV The remote control 18 To exit menus Simple at-a-glance reference of your remote control. 19 2 3 6 7 To page up, down, left or right 20 When using menus, the arrows move the cursor on the screen up, down, left or right.
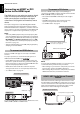
CONNECTING YOUR TV English Connecting external equipment Before connecting any external equipment, turn off all main power switches. If there is no switch, remove the mains plug from the wall socket. ILLUSTRATION SHOWS 42RL853.
English CONNECTING YOUR TV Connecting an HDMI® or DVI device to the HDMI input To connect a DVI device Connect an HDMI-to-DVI adaptor cable (HDMI type A connector) to the HDMI 3 terminal and audio cables to the PC/ HDMI 3 (AUDIO) socket (see illustration). • The recommended HDMI-to-DVI adaptor cable length is 6.6 ft (2m). • An HDMI-to-DVI adaptor cable transfers video only. Separate analogue audio cables are required. • See “HDMI 3 Audio” on page 62.
CONNECTING YOUR TV English REGZA-LINK connection You can control the basic functions of connected audio/video devices using the television’s remote control if you connect a REGZA-LINK compatible AV amplifier or playback device. For an explanation of setup and operations, see pages 64–65. the back of your television AV amplifier Playback device Playback device For the setup shown above, you will need three HDMI cables.
English CONNECTING YOUR TV Connecting a computer • Some PC models may output unique signals that the television may be unable to detect (see page 73). With either an RGB/PC or an HDMI connection, you can watch your computer’s display on the television and hear the sound from the television’s speakers. To connect a PC to the RGB/PC terminal When connecting a PC to the RGB/PC terminal on the television, use an analogue RGB (15-pin) computer cable and a PC audio cable for the PC/HDMI 3 (AUDIO) socket.
CONNECTING YOUR TV The LAN port allows your Toshiba TV to connect to your home network. You can use this revolutionary home entertainment networking system to access photo, video and audio files that are stored on a DLNA CERTIFIED™ server and play/display them on your TV. To connect the TV to a home network with an internet connection - Wireless Please refer to “Wireless Setup” section on page 32.
English CONNECTING YOUR TV Controls and input connections A wide variety of external equipment can be connected to the input sockets on the side of the television. While all the necessary adjustments and controls for the television are made using the remote control, the buttons on the television may be used for some functions. ILLUSTRATION SHOWS 42RL853. COMMON INTERFACE The Common Interface is for a Conditional Access Module (CAM). Contact a service provider.
SETTING UP YOUR TV Before switching on the television, put your decoder and media recorder, if applicable, to Standby. To set up the television, use the buttons on the remote control as detailed on page 6. Quick Setup a b c AutoView AutoView mode automatically adjusts picture settings to suit ambient light conditions. Do you wish to enable AutoView mode? No h Press the 1 button. The Menu Language screen will appear.
English SETTING UP YOUR TV l With the exception of DTV Scan Type and DTV Modulation items, all of the following items will have 2 operating modes. The first is Auto where the values for each item are preset by the system. The second is an Input mode where you will be able to enter a single value in place of the pre-set value. If no channel is currently tuned and the Input state is chosen, a system default value will be shown.
SETTING UP YOUR TV NOTE: As new services are broadcast, it will be necessary to re-tune the television in order to view them. Auto Tuning will completely re-tune the television and can be used to update the channel list. It is recommended that Auto Tuning is run periodically to ensure that all new services are added. All current channels and settings, i.e. locked channels, will be lost. a English ATV Manual Tuning Auto Tuning Press MENU and use C or c to select SETUP menu.
English SETTING UP YOUR TV a Press MENU and use C or c to select the SETUP menu. Press b to highlight ATV Manual Tuning and press OK to select. g h SETUP Menu Language English Country UK Ant/Cable In Each signal will show on the television. If it is not your media recorder, press B or b again to restart the search. When your media recorder signal is found, press c to move along to Station. Use B, b, C and c to put in the required characters, e.g. VCR.
SETTING UP YOUR TV Sorting positions To prevent certain channels from being viewed, positions can be skipped. Channels may be moved and saved to the position of your choice. a b Select ATV Manual Tuning from the SETUP menu. Use B or b to highlight the position to be skipped and press OK to select. ATV Manual Tuning Pos. Channel 1 C2 2 a b Select ATV Manual Tuning from the SETUP menu. With the list of channels showing, use B or b to highlight the channel you want to move and press c.
English SETTING UP YOUR TV DTV Manual Tuning DTV Settings NOTE: This feature varies depending on the Ant/Cable In setting. Channels The channel order may be changed to suit your personal preference. Manual Tuning a This feature is available for service engineers or can be used for direct channel entry if the multiplex channel is known. a b Select DTV Manual Tuning from the SETUP menu and press OK. Select DTV Settings from the SETUP menu and press OK. Select Channels and press OK.
SETTING UP YOUR TV DVB Character Set channel you wish to move and press OK to check. If you wish to move multiple channels at once, select another channel and check in the same way. Repeat as necessary. Once all desired channels have been checked, use the B or b buttons to place the focus at the position to which you wish to move the channels. The channels will be inserted above the highlighted channel. Press the GREEN button to execute the move.
English CONTROLS AND FEATURES General controls Mode Quick menu item Photo Frame Quick Menu Quick Menu helps you access some options quickly, such as Picture Mode, Picture Size, More Information, Sleep Timer etc. Press QUICK to display the Quick Menu and use B or b to select the option. Quick Menu Picture Mode AutoView Picture Size Super Live Description PICTURE See page 25. Picture Size See page 23. Selecting positions To select a position, use the numbered buttons on the remote control.
CONTROLS AND FEATURES English Sound controls Surround Settings Volume controls and mute sound Volume Press y or Y to adjust the volume. Sound Mute Press once to turn the sound off and again to cancel. Stereo Extension and Voice Enhancement help to create an enhanced surround sound experience. Your TV’s audio will sound fuller, richer, and wider. a In the SOUND menu, press b to highlight Advanced Sound Settings, and then press OK.
English CONTROLS AND FEATURES Audio Level Offset Audio Description Sometimes there can be large changes in volume when switching from a DTV 5.1ch to a DTV 2ch, an ATV channel, or an external input. Using the Audio Level Offset feature reduces these volume differences. Audio Description is an additional narrative sound track for visually impaired individuals to understand and enjoy the story line more fully. The letters AD will be displayed in the channel banner when programmes contain AD content.
CONTROLS AND FEATURES English Widescreen viewing Depending on the type of broadcast being transmitted, programmes can be viewed in a number of formats. WIDE 4:3 Use this setting when watching a widescreen DVD, widescreen video tape or a 16:9 broadcast (when available). Due to the range of widescreen formats (16:9, 14:9, 20:9 etc.) black bars may be visible on the top and bottom of the screen. Use this setting to view a true 4:3 broadcast.
English CONTROLS AND FEATURES NATIVE This setting will show the picture without overscan, i.e. WYSIWYG. PC NORMAL This setting will show the picture without overscan, i.e. WYSIWYG. This option is only available when watching a PC signal source via HDMI or PC terminal. PC WIDE This setting will show the picture without overscan or side panels. This option is only available when watching a PC signal source via HDMI or PC terminal. Dot by Dot Press the “Dot by Dot” is a non-scaling display.
CONTROLS AND FEATURES Picture preferences You can customize current picture mode settings as desired. For example, while selecting “Dynamic”, if you change the following items, such as Backlight, Contrast, Brightness, Colour, Tint, Sharpness and the Advanced Picture Settings items, your new settings are saved for “Dynamic” picture mode. Most of the picture controls and functions are available in both digital and analogue modes. PLEASE NOTE: Features not available will be greyed out.
English CONTROLS AND FEATURES Base Colour Adjustment Auto Brightness Sensor Settings The Base Colour Adjustment feature allows the adjustment of individual colours to suit personal preference. This can be useful when using an external source. When the Auto Brightness Sensor is activated, it will automatically optimise the backlighting levels to suit ambient light conditions. a In the Advanced Picture Settings menu, press b to select Base Colour Adjustment, and then press OK.
CONTROLS AND FEATURES DNR – Digital Noise Reduction When Active Backlight Control is activated, it will automatically optimize the backlighting levels for dark scenes. DNR allows you to ‘soften’ the screen representation of a weak signal to reduce the noise effect. a In the Advanced Picture Settings menu, press b to select Active Backlight Control. b Press C or c to select On or Off. a b Black/White Level Select DNR from the Noise Reduction menu.
English CONTROLS AND FEATURES Resetting the advanced picture settings This feature allows you to reset the current Advanced Picture Settings to the default values. a b In the Advanced Picture Settings menu, press b to select Reset. Press OK. Expert Picture Settings White Balance-Window Display This feature displays a special Window Pattern to be used when adjusting white balance with a measuring device. a In the Expert Picture Settings menu, press B or b to select White Balance, and then press OK.
CONTROLS AND FEATURES Automatic Format (Widescreen) This feature copies White Balance on the current input to all other inputs that are set to the same picture mode. Individual settings that are not allowed for a specific input will not be copied. When this television receives a true Widescreen picture and Auto format is On, it will automatically be displayed in Widescreen format irrespective of the television’s previous setting.
English CONTROLS AND FEATURES Picture Position Blue Screen The picture position may be adjusted to suit personal preference and can be particularly useful for external inputs. When Blue Screen is selected, the screen will turn blue and the sound will be muted on analogue channels and external input modes when no signal is received. a b In the PREFERENCES menu, highlight Display Settings and press OK. In the Display Settings menu, highlight Picture Position.
CONTROLS AND FEATURES Wireless LAN and your Health This TV is a DLNA CERTIFIED™ Player and Renderer. This TV can play digital content stored on a DLNA CERTIFIED™ product with server function. If you want to use this TV as a DLNA CERTIFIED™ Player or Renderer, you will have to configure the network on your TV (see page 11). If you want to use your home network, you will have to configure the network on your TV.
English CONTROLS AND FEATURES Setting up the Network Easy Setup using PBC (Push Button Configuration) a You can select the Network Type. a In the PREFERENCES menu, highlight Network Setup and press OK. PREFERENCES REGZA-LINK Setup b Press B or b to highlight Wireless Setup, and press OK. c Press B or b to highlight Easy Setup, and press OK.
CONTROLS AND FEATURES e Press RETURN while searching for the AP. A message will appear; then, press C or c to select Yes and press OK. Assisted Setup a b In the PREFERENCES menu, highlight Network Setup and press OK. f Press B or b to highlight Authentication, and then press C or c to select Open System, Shared Key, WPA-PSK or WPA2-PSK. g Press B or b to highlight Encryption, and then press C or c to select None, WEP, TKIP or AES. Press B or b to highlight Wireless Setup, and press OK.
English CONTROLS AND FEATURES Wireless Information The settings configured in Wireless Setup can be confirmed. a Press QUICK to open the Quick Menu. NOTE: Even if an AP for IEEE 802.11n is used when Encryption is set to WEP or TKIP, the Speed value might be low. It is recommended that Encryption be changed to AES (see “Manual Setup” on see page 33). Notes on wireless LAN environment: b Press B or b to select Wireless Information and press OK.
CONTROLS AND FEATURES Auto Setup On IP Address 133 . 177 . 108 . 157 Subnet Mask 255 . 255 . 255 . 0 Default Gateway . . . NOTE: Other items will be grayed out when Auto Setup is set to On. Manual Setup: a DNS Setup Highlight Auto Setup, and then press C or c to select On. IP Address Setup In the PREFERENCES menu, highlight Network Setup and press OK.
English CONTROLS AND FEATURES MAC Address You can view the fixed MAC address for the TV and for the Dual Band WLAN Adaptor, if one is installed. a In the PREFERENCES menu, highlight Network Setup and press OK. Using the software keyboard You can enter text by using the Software Keyboard. The Software Keyboard window will appear when you press OK on a field that accepts character input. To enter text using the software keyboard: b Press B or b to highlight Advanced Network Setup, and press OK.
CONTROLS AND FEATURES Terminology: Change the password by using the Software Keyboard (see page 36), and then press the BLUE button. NOTE: The Web Password can be up to 15 characters long. DMS: DLNA CERTIFIED™ Server DMR: DLNA CERTIFIED™ Renderer i Highlight Done, and then press OK. DMC: DLNA CERTIFIED™ Controller j The TV can be configured as a DMR. When operating as a DMR, the TV displays content provided by a DMS. The selection of the media is done by the DMC - the TV does not select the input.
English CONTROLS AND FEATURES Web Password Setup Maximum Volume Setup This setup determines the password that is necessary for the DMC to access built-in web pages on the DMR. This feature allows you to set the maximum volume of the TV when it receives volume operation commands from a DMC. a b a In the Media Renderer Setup menu, highlight Web Password Setup, and press OK. Highlight the Password field and press OK. The Software Keyboard window will appear.
CONTROLS AND FEATURES English Using BBC iPlayer Using YouTube™ You can watch and listen to great BBC programmes from the last 7 days on BBC iPlayer. YouTube is a video-sharing service managed by YouTube, LLC. This TV allows you to view YouTube content. NOTE: • You need to configure a home network before using this feature (see page 11). • If Network Lock is set to On, it will be necessary to enter your four-digit PIN code in order to access network features (see page 55).
English CONTROLS AND FEATURES To use the Drag Mode: Using the Function Menu The Function Menu provides easy access to functions that are commonly used. a Press the BLUE button while displaying YouTube. The Function menu window will appear. Back Forward Reload Home Pointer Menu a Press B or b to select Pointer: ON, and press OK. b Press the BLUE button. c From the Function menu, press C or c to select Pointer, and then press OK. d Press B or b to select Drag Mode, and press OK.
CONTROLS AND FEATURES Item a Press B, b, C or c to select the setting items, and press OK. A check will appear in the box. To remove the check, press OK again. b Press B, b, C or c to select OK field, and press OK. Item When jumping from a protected page to an unprotected page, the message is displayed when the check is applied to Notify of secure/non-secure page changes. Apply the check to select SSL version from SSL Version to use (SSL2.0, SSL3.0, TSL1.0).
English CONTROLS AND FEATURES Flickr Using the Media Player “Flickr” is a online photo sharing service. View photos that have been shared online by accessing this feature from your TV. This TV allows you to enjoy movie, music and photo files stored on a USB device connected to the USB port. Moreover, you can also play photos, movies or music files from your PC by connecting the TV to your home network. NOTE: • You need to configure a home network before using this feature (see page 11).
CONTROLS AND FEATURES a Using Media Player with USB When Auto Start is enabled, you will be asked if you want to start the Media Player whenever a USB device is inserted. If Auto Start is disabled (or if you want to connect to a DMS on the network), you must manually start the Media Player from the menu. b c To change the Auto Start setting: a b Press MENU and C or c to select the APPLICATIONS menu. Insert USB device into the USB socket on the left side of the TV.
English CONTROLS AND FEATURES To select a file in the list of contents: a b Viewing photo files (on a DLNA CERTIFIED™ Server or USB device) Press B or b to select a file or folder. There are three types of viewing modes. Press OK to move to the next layer, or press RETURN to return to the previous layer. Multi View This view allows you to search for photos in a grid format. The pictures are displayed using thumbnail data in each image file. To close the Media Player: a Press EXIT.
CONTROLS AND FEATURES c To sort the folders and files Press B to rotate the image 90° clockwise. Press b to rotate the image 90° counterclockwise. a Press to display file status information (file number, photo title, date and time taken, resolution etc.). NOTE: The information may not be correctly displayed depending on the content, DMC or DMS. Press QUICK to open the Quick Menu from Multi View mode. b Press B or b to select Sort.
English CONTROLS AND FEATURES Viewing movie files (on a DLNA CERTIFIED™ Server or USB device) You can select movies from a list of available files. Movie list example Movie /Folder Total Time Sort: Title Movie 1 2/16 Movie 2 WWWWWWWWW 00:00:00 WWWWWWWWW 00:00:00 WWWWWWWWW 00:00:00 WWWWWWWWW 00:00:00 WWWWWWWWW 00:00:00 WWWWWWWWW 00:00:00 WWWWWWWWW 00:00:00 WWWWWWWWW 00:00:00 OK Play a QUICK Features P 1 During playback: • Press W/w to pause.
CONTROLS AND FEATURES a Press QUICK to open the Quick Menu in list mode. b Press B or b to select Sort. c Press C or c to select Title/File Name, New or Old to set the sorting rule. Playing music files (on a DLNA CERTIFIED™ Server or USB device) You can listen to music from a list of available files. Music list example Item Title (DMS) Music /Folder File sorting rules: 1. Unicode priority 2. (0, 1, ..., 9), capital alphabet (A, B, ...,Z), small alphabet (a, b, ..., z) 3.
English CONTROLS AND FEATURES To set the repeat mode: To display the device information a Press QUICK to open the Quick Menu. a Press QUICK to open the Quick Menu in list mode. b Press C or c to select Off, All or 1. b Press B or b to select Device Information. Mode Description NOTE: When the music files on the USB device are used, or the TV is used as a DMR, this feature is not available. Off Files in the same folder are played back once.
CONTROLS AND FEATURES c Press c to select Start, and then press OK to open Photo Frame. You can use the TV screen as a digital photo frame. One image (pre-installed or user-installed) can be displayed. Date info can also be superimposed, if desired. You can overwrite the photo file with a file from a USB storage device or DLNA CERTIFIED™ Server. To open Photo Frame Open from Menu a Press MENU and C or c to select the PREFERENCES menu. b Press b to select Photo Frame Setup, and then press OK.
English CONTROLS AND FEATURES c Settings Press B b C c to select the photo you want to copy from the USB storage device or DLNA CERTIFIED™ server to the TV’s flash memory, and then press OK. Photo Select a Press B or b to select Settings, and then press OK. b Press B or b to select Clock, Position or Auto Power Off. /Folder Settings --/-- (---) -- 10:10 1/54 E05265464.
CONTROLS AND FEATURES English Other features The timers Panel Lock Programme Timers – digital only Panel Lock disables the buttons on the television. All buttons on the remote control can still be used. This feature will set the television to go to a specific channel at a certain time. It can be used to view a particular programme, or by setting the mode to daily or weekly, can be used to view a series of programmes. a In the PREFERENCES menu, select Panel Lock and choose On or Off using C or c.
English CONTROLS AND FEATURES On Timer Sleep Timer The feature allows you to set the television to turn on automatically to a preset channel at a certain time of day or after a certain length of time. The television can be set to turn itself Off after a certain length of time. a In the APPLICATIONS menu, press b to select On Timer and press OK. b Press B or b to select Enable On Timer, and then press C or c to select On.
CONTROLS AND FEATURES Digital on-screen information and Programme Guide Automatic Power Down When viewing in digital mode, the on-screen information and programme guide provide access to programme details for all available channels. The TV will automatically turn itself off (standby) after 4 hours, if you do not operate the TV either from the remote control or the TV control panel. a In the PREFERENCES menu, highlight Energy Saving Settings and press OK.
English CONTROLS AND FEATURES To display More Information Guide a Press QUICK to open the Quick Menu. b Press b to highlight More Information and press OK. a Select the on-screen guide by pressing GUIDE, and the guide screen will appear highlighting details of the channel and programme currently being viewed. This may take a few moments to appear.
CONTROLS AND FEATURES Digital settings – parental control From the guide screen, you can use the genre selection and search features. In order to prevent viewing of unsuitable films and programmes, channels and menus can be locked in digital mode. These can then only be accessed with a security code PIN. a b Press the QUICK button from the guide screen. Press B or b to highlight Genre Colour in the Quick Menu, and then press OK.
English CONTROLS AND FEATURES Parental Setup The Parental Control feature allows you to block programmes according to their rating levels. If a PIN has been set, you will need to enter it before adjusting the level. a b In the DTV Settings menu, press b to select Parental Control, and then press OK. Use C or c to choose an option (None or an age setting (4-17 or 4-18 depending on the Country setting)). Parental Control Parental Setup None To view blocked programmes, enter the PIN.
CONTROLS AND FEATURES This feature allows you to set channels that will be skipped when Pu or PU are used to tune. a Subtitles Select the channel you want to skip in your channel list. b From the Quick Menu, press b to select Channel Options and press OK. c Press c repeatedly to highlight the skip (8) box. d Press OK to select. A tick will appear in the box. e Repeat steps 1 through 4 for other channels. f Press EXIT.
English CONTROLS AND FEATURES Common Interface Software Upgrade and Licences The Common Interface Slot, situated on the side of the television, enables the insertion of a CAM (Conditional Access Module) and card. These are purchased from a service provider and allow additional subscription broadcasts to be viewed. For information, see a service provider. a b c Insert the CAM and card into the Common Interface Slot, following the instructions provided with the CAM.
CONTROLS AND FEATURES System Information and Reset TV TOSHIBA may offer upgrades for the TV’s software in the future. The TV’s software is upgraded via the Network. System Information Before downloading software; This feature can be used to check the version of software currently installed. When in DTV mode, it includes additional diagnostic information such as signal strength, signal quality, centre frequency, modulation, etc. Configure your TV to connect to the Internet.
English CONTROLS AND FEATURES PC Settings Sampling Clock Adjusting the Sampling Clock alters the number of pulses per scan, this will clear vertical lines on the screen. Horizontal and Vertical Position Connect the PC (as shown in the ‘Connecting a computer’ section) and ensure that a picture is showing on the television screen. The picture position may now be adjusted to suit personal preference. a In the PREFERENCES menu, press B or b to highlight Display Settings and press OK.
CONTROLS AND FEATURES English Input selection and AV connections External input skip This feature is designed to make input selection more convenient by allowing you to skip unused inputs. See page 7 for a detailed image showing recommended connections. a Most media recorders and decoders send a signal through the SCART lead to switch the television to the correct Input socket. Alternatively, press the external source selection button o until the picture from connected equipment is shown.
English CONTROLS AND FEATURES Labeling video input sources PC Audio These input labels are shown in the input selector. You can label video inputs according to the devices you have connected to the TV. In order to receive sound from a connected PC, plug the audio cable into the back of the television (as shown in the ‘Connecting a computer’ section), and then use the PC/HDMI 3 Audio setting. a In the PREFERENCES menu, press b to highlight AV Connection and press OK.
CONTROLS AND FEATURES Digital Audio Output Some early HDMI equipment may not work properly with your HDMI TV. Please try setting the Enable Content Type and INSTAPORT™ options to Off. Adjusting these settings should allow your early HDMI source to operate properly with your television. When connecting a surround sound amplifier to the digital audio output (Sony/Philips Digital Interface Format [S/PDIF]), the following options can be selected.
English CONTROLS AND FEATURES Using REGZA-LINK Amplifier Control This is a new feature that uses CEC technology and allows you to control Toshiba REGZA-LINK compatible devices from the television remote control via HDMI connection (page 9). When the Enable REGZA-LINK item in the REGZA-LINK Setup menu is set to On, individual functions also set to On will be activated. When Amplifier Control is set to On, it allows the “Speaker Preference” feature to become available.
CONTROLS AND FEATURES Press c and a second selection screen will appear showing all connected REGZA-LINK equipment. Inputs TV 1 2 3 1 DVD 2 VCR/DVR 3 CBL/SAT 4 GAME/TV 5 AUX HDMI 1 HDMI 2 HDMI 3 REGZA-LINK HDMI 4 PC d REGZA-LINK one touch play When connected equipment is switched on, REGZA-LINK will automatically detect the television through the input selection. If the television is in standby, it will be switched on automatically.
English TEXT SERVICES Text services Navigating pages using Auto This television has a multi-page text memory, which takes a few moments to load. It offers two Modes of viewing text – Auto will display Fastext, if available. LIST will save your four favorite pages. If Fastext is available, four coloured titles will appear at the base of the screen. To access one of the four given subjects, press the relevant coloured button on the remote control.
TEXT SERVICES English Control buttons Below is a guide to the functions of the remote control text buttons. k To display the index/initial page: Press k to access the index/initial page. The one displayed is dependant on the broadcaster. TEXT To display a page of text: Press TEXT to display text. Press again to superimpose text over a normal picture. Press again to return to normal television viewing. Channels cannot be changed until this has been done.
English PROBLEM SOLVING Q A Questions and Answers Below are the answers to some of the most common queries. Q A Q A Why is there no sound or picture? a Check the television is not in standby mode. Check the mains plug and all mains connections. There is a picture, but why is there little or no colour? b Country Colour System b Q A Q A Select the ATV Manual Tuning menu. Highlight the station and press OK. Then press c to select Manual Fine Tuning.
PROBLEM SOLVING Q A Q A Q A Q A Q A Q A What is DVB-T? Digital Video Broadcast via an aerial/antenna. What is DVB-C? Digital Video Broadcast via a cable connection. How are radio channels selected? Press TV on the remote control and select DTV Radio. Alternatively select from the GUIDE. Why is a page number visible at the top of the screen but no text? Text has been selected but Teletext information is currently unavailable on the current source.
English PROBLEM SOLVING Q A Q A Why doesn’t the Media Player feature operate? Make sure that devices are connected correctly. Incorrect behavior may occur with a USB Hub connection. Check your network setup if using DLNA CERTIFIED™ Server. What do the LEDs on the front of the television indicate? Check the table below.
INFORMATION English License Information • Manufactured under license from Dolby Laboratories. Dolby and the double-D symbol are trademarks of Dolby Laboratories. • HDMI, the HDMI logo, and High-Definition Multimedia Interface are trademarks or registered trademarks of HDMI Licensing, LLC. • DLNA®, the DLNA Logo and DLNA CERTIFIED™ are trademarks, service marks, or certification marks of the Digital Living Network Alliance.
English INFORMATION Cleaning the screen and cabinet… Turn off the power, clean the screen and cabinet with a soft, dry cloth. We recommend that you do not use any proprietary polishes or solvents on the screen or cabinet as this may cause damage. Disposal… The following information is only for EU-member states: Disposal of products The crossed out wheeled dust bin symbol indicates that products must be collected and disposed of separately from household waste.
INFORMATION English Information Before connecting any external equipment, turn off all main power switches. If there is no switch, remove the mains plug from the wall socket. Signal information for Mini D-sub 15 pin connector Pin No. Signal name Pin No. Signal name Pin No.
English INFORMATION Acceptable video or PC signals through the HDMI terminals The HDMI inputs on this TV only accept VGA, SVGA, XGA, WXGA, and SXGA signal formats which are compliant with VESA as shown in the table below. Since some PCs and HDMI or DVI devices input signals which are different from the resolution and frequency described in the table below, the following phenomenon may occur; incorrect display, false format detection, picture position failure, blur, or judder.
INFORMATION English Media Player Supported Format Photo Media Format Extension JPEG .jpg, .jpeg Data compatibility: JPEG Exif ver 2.2 Maximum viewable resolution: 4096 x 4096 (HW decode) 16384 x 16384 (SW decode) Maximum photo size: 9MB Maximum number of files: 2000/folder Data compatibility: JPEG EXIF Ver.1.x or later, JFIF 1.
English INFORMATION Specifications and accessories Receiving systems Stereo DVB-T Broadcast systems/channels UK UHF 21-68 Broadcast systems/channels PAL-I UHF UK21-UK69 France VHF 05-10 (VHF 01-05) UHF 21-69 PAL-B/G UHF E21-E69 VHF E2-E12, S1-S41 Germany VHF 05-12 UHF 21-69 SECAM-L UHF F21-F69 VHF F1-F10, B-Q VHF 05-12 UHF 21-69 SECAM-D/K UHF R21-R69 VHF R1-R12 Austria Visible Screen Size (approx.