TOSHIBA Quick Setup Before using the TV, please read this guide carefully and keep it for future reference.
Copyright statement © 2021 Hi sense Group All Rights Reserved. Copyright protected material in this Quick Setup Guide may be owned by Hi sense group, its contractors or other third parties. Unless otherwise stated, the exercise of any of the exclusive rights under the copyright laws in relation to the material on this site is not permitted without the consent of the rights owner or as otherwise covered by a statutory license.
This Quick Setup Guide supports the following models: 32v35KU 43V35KU Table of Contents What's in the Getting started Step 1. Attach stand or mount. Step 2. Connect devices to your TV Step 3. Get your remote Step 4. Power on the TV 1 Step 5. Complete the first-time 1 Step 6. Enjoy your TV! 11 Troubleshooting Product Specifications Certification and AMAZON TERMS & POLICIES...
Congratulations on the purchase of your Toshiba TV! If you would like fo know "all things Toshiba’, contact us using the support info: The model and serial number of the TV is located on the back and/or on one side of the TV. We recommend that you record this if you ever need service.
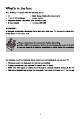
What's in the box Your Toshiba TV comes with the following items: TV » Quick Setup Guide (this document) # offset AAA batteries * remote control # Important Safety Information and Warranty Card # base stands ® 4 screws (M4x25) IMPORTANT: To prevent accidentally discarding items that came with your TV, be sure to check ALL of the foam in the carton box.
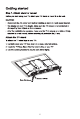
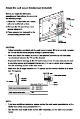
Getting started Step 1. Attach stand or mount Before you start using your TV, attach your TV stand or mount it on the wall. CAUTION: + Disconnect the AC power cord before installing a stand or a wall mount bracket. + The display on your TV is fragile. Make sure the TV screen is not scratched or damaged by hard objects or from pressure. = After the installation is complete, make sure the TV is steady on a table or firmly attached to a wall mount, before removing all protective film, if any.
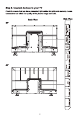
Attach the wall mount bracket {not Included) Before you begin the third-party manufacturer instructions, be sure to do the following things: 1. Place the TV face down on a clean, safe and cushioned surface. 2. Remove the TV stand If you have Aad already attached It. Cw 3. Place spacers {not included) in the corresponding bracket holes. (indigent) Bracket (not included) CAUTION: = Follow instructions provided with the wall mount bracket.
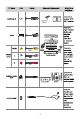
Step 2. Connect devices to your TV Check to ensure that you have connected right cables for right ports securely. Loose connections can affect the quality of the picture image and color.
Brief De. ascription ANT/CABLE Antenna Cre) aor Connect an outdoor VHF! UHF antenna. HDMI VIDEO VIDEO INPUT Connects High Definition Multimedia Interface (HDMI) cable from an external device. Connects composite video cable and left-right audio cables from an textual AV device. DIGITAL AUDIO ouT Connect an optical cable from an external digital audio system. HEADPHONE Connect headphones to hear audio from the TV. Headphones with microphones are not supported.
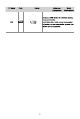
label able eternal Brief Equipment iPhone Connect a USB device for browsing photos, music and movies. uss Hard disks with a total current consumption or impulse current consumption greater than 500mA are not supported.
Step 3. Get your remote ready The following table shows the buttons on your remote control and describes what they are for, ole OE Os TOSHIBA Ne NOTE: (D POWER: Tum your TV on or off @ Solos button: Hold down the Voice Button to activate the microphone (@ Select: Confirm a selection or action (@ D-pad (up/downfieftiright navigation buttons) (8) Back: Re tum to the previous place in the menu or app REWIND: Rewind streaming video (D PLAY/PAUSE: Pause or resume playback.
Insert the batteries Remove the battery door and Insert the two AAA batteries Into your Alexei Vole Remote. Important Information about the remote and batteries « Discard batteries In a designated disposal area. Do not throw them Into a fire. * Remove old batteries Immediately to prevent them from Soaking Into the battery compartment. If you do not Intend to use the remote control for a long time, then remove the batteries. + Battery chemicals can cause a rash.
Step 4. Power on the TV Connect the power cord to the power outlet. Your TV will display a launch screen showing the Toshiba logo. Step 5. Complete the first-time setup The first time you tum on your TV, there is a guided setup to make it easy to connect your TV to the Internet and complete the setup of your TV. Your TV will automatically pair with your new Alexei Voice Re mate. 1. If there are issues with the remote pairing, you will be prompted to pair your remote by pressing the Home button.
Troubleshooting I you are having trouble with your TV, first try muting it off and on again. If this doses not fix the problem, check the tips in the following table. If your problem is not listed in the following table, then contact us at one of the phone numbers on Page 2. Possible solutions » Check if the power cord is plugged into a powered AC outlet. = Press the Power button on the remote control to activate the unit from 'Standby’ mode. + Check to see if the LED light is on or not.
Product Specifications Mabel 32V35KU 43V35KU pros nit St 28.2 x 16.9 x 34 inches 37.6% 22.0 x 3.4 inches x (717 x 428 x 86 mm) (955 x 558 x 87 mm) 28.2% 18.6 x 7.3 inches 37.6 x 23.9 x 7.9 inches (717 x 473 x 186 mm) (955 x 608 x 200 mm) ot St B8.41bs (3.8 kg) 14.1 Ibs (6.4 kg) Stan 8.6 Ibs (3.9 kg) 14.3 Ibs (6.5 kg) x "bullfinches | inches (661 x 186 mm) (787 x 200 mm) lass. az" 43° Serena Ste (Diagonal) 31.5 Inches (80.0 cm) 42.5 Inches (107.
Certification and Compliance FCC Notice This device has been tested and found te comply with the limits for a Class B digital device pursuant to Part 15 of the FCC Rules. These limits are designed to provide reasonable protection against harmful interference in a residential installation. This device generates, uses, and can radiate radio frequency energy and, if not installed and used in accordance with the instructions, may cause harmful interference to radio communications.
Hom The terms HDMI and HDMI High-Definition Multimedia Interface, and the HDMI Logo are trademarks or registered trademarks of HDMI Licensing Administrator, Inc. in the United States and other countries. Daley, Dolby Audio, and the double-D symbol are trademarks of Dolby Dd Dolby Laboratories Licensing Corporation. Manufactured under license AUDIO from Dolby Laboratories. Confidential unpublished works. Copyright 1892-2019 Dolby Laboratories. All rights reserved. dts. For DTS patents, see dotcom.
AMAZON TERMS & POLICIES Before using Fire TV Edition, please read the terms located at www.amazon.com/ deviceservices/support. Please also read all terms and policies for services related to Fire TV Edition, including but not limited to Amazon's Privacy Notice located at www. Amazon's Conditions of Use located at www.amazon.com/ condition's, and any other terms or usage provisions available at amazonian. com/deviceservices/support.