Introduction Connecting your TV Using the Remote Control OWNER'S MANUAL IS O 140 01 FILE N o. A 9 6 23565901 Index Serial No.: CONSUMER CA P RI 45 Model: TOSHIBA AM E Owner's Record The model number and serial number are on the back of your TV. Record these numbers in the spaces below. Refer to these numbers whenever you communicate with your Toshiba dealer about this TV. TS, INC.
Dear Customer, Thank you for purchasing this Toshiba TV. This manual will help you use the many exciting features of your new TV. Before operating the TV, please read this manual completely, and keep it nearby for future reference. Safety Precautions WARNING TO REDUCE THE RISK OF FIRE OR ELECTRIC SHOCK, DO NOT EXPOSE THIS APPLIANCE TO RAIN OR MOISTURE. WARNING: TO REDUCE THE RISK OF ELECTRIC SHOCK, DO NOT REMOVE COVER (OR BACK). NO USER-SERVICEABLE PARTS INSIDE.
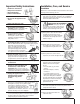
Important Safety Instructions 1) 2) 3) 4) Read these instructions. Keep these instructions. Heed all warnings. Follow all instructions. 5) Do not use this apparatus near water. Installation, Care, and Service Installation Follow these recommendations and precautions and heed all warnings when installing your TV: 16) Never modify this equipment.
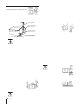
24) Always operate this equipment from Antenna lead-in wire Ground clamp Electric service equipment Ground clamps Antenna discharge unit (NEC Section 810-20) Grounding conductors (NEC Section 810-21) Power service grounding electrode system (NEC Art 250 Part H) QUALIFIED SERVICE TECHNICIAN 4 0303
Important Safety Precautions for Split Cabinet Feature (Models 57H83 and 65H83 only) Toshiba TV models 57H83 and 65H83 have a split cabinet feature that allows disassembly of the cabinet into two sections during installation. For details, please refer to the insert titled “Disassembly/ Reassembly Instructions for Split Cabinet Feature” that accompanied this owner’s manual in the accessory pack. If you do not have the insert, you can download a copy of it from our Web site (www.toshiba.com/tacp in the U.S.A.
Important Safety Information ............................. 2-5 Introduction ................................................................ 7 Welcome to Toshiba ......................................................... 7 Exploring your new TV ................................................... 7 Note regarding Quick Connect Guide ........................ 7 Connecting your TV .................................................. 8 Connecting a VCR ..........................................................
Introduction Introduction Welcome to Toshiba Congratulations! You have purchased one of the finest projection TVs on the market. The goal of this manual is to guide you through setting up and operating your Toshiba TV as quickly as possible. This manual applies to models 46H83, 51H83, 57H83, and 65H83. Before you start reading, check the model and serial numbers on the back of your TV. Write these numbers in the space provided on the front cover of this manual for your records.
Introduction Connecting your TV Note: Cables are not supplied with your TV. ● Connecting your TV ● ● ● Using the Remote Control ● Coaxial cable is the cable that comes in from your antenna, cable TV service, or cable converter box. Coaxial cable uses “F” connectors. Standard A/V (audio/video) cables usually come in sets of three, and are typically color-coded according to use: yellow for video, red for stereo right audio, and white for stereo left (or mono) audio.
Introduction Connecting a cable converter box ANT( 75 ANT-1 Connecting your TV This connection allows you to watch basic and premium cable channels. To watch basic cable and use the TV’s features, select ANT-1. To view premium channels, select ANT-2, tune the TV to channel 3 or 4 (whichever channel is vacant in your area), and use the converter box to change channels.
Introduction Connecting a DVD player or satellite receiver and a VCR Connecting your TV This connection allows you to watch DVD/satellite, VCR, and TV programs, and record one TV channel while watching another channel.
Introduction Connecting a DVD player with ColorStream® (component video) and a VCR IN from ANT OUT to TV VIDEO From Antenna AUDIO L R IN CH 3 CH 4 OUT Connecting your TV You can connect the component video cables to either set of the ColorStream jacks on the TV (HD1 or HD2). For DVI/HDCP connection, see page 14.
Introduction Connecting a DTV receiver/set-top box with ColorStream® (component video) and a VCR Setting up your TV Using the Remote Control Connecting your TV This connection allows you to watch DTV (digital TV), VCR, and TV programs, and record DTV and TV programs. Your TV has ColorStream (component video) inputs. Connecting your TV to a DTV receiver with component video inputs can greatly enhance picture quality and realism.
Introduction Connecting two VCRs Connecting your TV This connection allows you to record (dub/edit) from one VCR to another VCR while watching a videotape. You can also record from one TV channel while watching another TV channel.
Introduction Connecting a device to the DVI/HDCP1 input Connecting your TV The DVI/HDCP input on your TV is designed to accept HDCP program material in digital form from EIA/CEA-861–compliant 2 consumer electronic devices, such as a set-top box or DVD player equipped with a DVI-D digital single-link output connection.3 The DVI/HDCP input is designed for best performance with 1080i high-definition video signals. The DVI/HDCP input also will accept and display 480p, 720p, and 480i picture signals.
Introduction Connecting an audio system Amplifier LINE IN L R TV ANT( 75 ANT-1 Note: To hear sound when using an external audio amplifier, the volume of both the TV and the amplifier must be set above 0 (zero). ) OUT DVI/HDCP IN ANT-2 Connecting your TV This connection allows you to use an audio amplifier to adjust the audio level. This also allows you to use external speakers.
Introduction Using the remote control Preparing the remote control for use Connecting your TV Your TV remote control can operate your TV and most cable converter boxes, satellite receivers, VCRs, DVD players, and HTIBs (home theater in a box), even if they are different brands. If you have a Toshiba device: Your TV remote control is preprogrammed to operate most Toshiba devices. See page 19.
Index Appendix Using the TV’s Features Setting up your TV Using the Remote Control Connecting your TV Introduction
Introduction Remote control codes (cont.) Satellite receiver (cont.
Introduction Using the remote control to operate a cable converter box, satellite receiver, VCR, DVD player, or HTIB (home theater in a box) Note: Even after the TV remote control is programmed, it may not operate certain features on your other device. If this happens and you wish to use those features, you will need to use the device’s original remote control.
Index Appendix Using the TV’s Features Setting up your TV Using the Remote Control Connecting your TV Introduction
Introduction Setting up your TV Learning about the menu system Using the Remote Control Connecting your TV After you have installed the batteries and programmed the remote control, you will need to set some preferences on the TV using the menu system. You can access the menu using the buttons on your TV or remote control. 1. Press MENU to display the menu system. 2. Press x or • to select menu. 3. Press y or z select an item. 4. Press x or • to select or adjust a setting.
Changing the on-screen display language 1 2 3 4 5 6 7 8 1 2 2 3 3 4 4 5 5 6 8 LANGUAGE ENGL I SH / FRANCA I S / ESPANOL CLOCK SET 00:00 ANT 1 / 2 ANT 1 TV / CABLE CABLE CH PROGRAM ADD / ERASE ADD QU I C K CONNECT GU I DE 9 10 11 13 14 15 16 9 10 11 12 13 14 15 16 17 TV / VIDEO 18 3 4 5 6 7 8 INFO 9 10 11 12 13 14 15 16 17 18 19 20 21 22 23 24 25 26 27 28 29 30 31 32 33 34 35 TV/VIDEO 3. Press x or • to highlight your desired language.
Introduction Adding channels to the TV’s memory When you press Channel y or z, your TV will stop only on the channels stored in the TV’s channel memory. Follow the steps below and on the next page to program all active channels into the TV’s memory. 2 3 4 5 6 7 8 Using the Remote Control 1 Connecting your TV Programming channels automatically Your TV can automatically detect all active channels in your area and store them in its memory.
3. Press y or z to highlight ADD/ERASE.
Introduction Changing channels Connecting your TV To change to a specific channel (programmed or unprogrammed): Press the Channel Number buttons (0–9 and 100). For channels 100 and higher, press the 100 button, and then the next two numbers. For example, to select channel 125, press 100, 2, 5. To change to the next programmed channel: Press Channel y or z on the TV or remote control.
1 2 3 4 5 6 7 8 9 10 11 12 131714 15 16 TV / VIDEO POWER RECALL INFO 1 2 3 4 5 6 7 8 9 Number 18 19 20 21 22 23 24 25 26 27 28 29 30 32 31 CHRTN Using the n Remote Control Setting tup your TV 6. 7.
Introduction Using the TV’s features Adjusting the channel settings 2 3 4 5 6 7 8 9 0 TE CH RTN ENT GU ID FAV Using the Remote Control FA ZE SI VO RI C TO P Channel Number CHRTN +10 100 NU ME Connecting your TV TV/VIDEO 1 E CHANNEL MEMOR I ZED POWER RECALL INFO MENU DVDMENU ER FAV TV CBL/SAT VCR DVD AR EX IT R TE EN T EN Switching between two channels using SurfLock™ The SurfLock™ feature temporarily “memorizes” one channel in the CH RTN button, so you can return to
Introduction 3. Press x or • to display the FAVORITE CH1 menu, for example. CH INPUT will be highlighted. 1 2 3 4 5 6 7 8 9 10 11 12 13 14 15 16 17 18 19 20 21 22 23 24 25 26 27 28 29 30 31 32 33 34 35 1 1 2 2 3 3 4 4 5 5 6 6 CUSTOM 7 7 8 8 T I MER ON SLEEP CC FAVOR I TE CH1 FAVOR I TE CH 2 CH L A B E L I NG V I DEO L A B E L BACKGROUND 9 10 11 12 13 14 15 Connecting your TV 16 17 2 3 4 5 6 7 8 • The favorite channel feature is not available in ANT2 mode.
5 6 7 8 2 3 4 5 6 7 8 9 Introduction CHRTN +10 0 100 NU ME ENT GU ID FAV TO P FA VO RI TE Channel Number MENU yzx • 9 10 11 12 13 14 15 16 17 18 19 20 21 22 23 24 25 26 27 28 29 30 31 32 33 34 35 1 1 2 2 3 3 4 4 5 Connecting your TV 4 1 ZE SI 3 INFO C 2 POWER RECALL E 1 TV / VIDEO PI Labeling channels Channel labels appear above the on-screen channel number display each time you turn on the TV, change a channel, or press RECALL.
Introduction Viewing the wide-screen picture formats 4 5 6 7 8 0: 1: 2: 3: 4: NATURAL THEATER W I DE THEATER W I DE THEATER W I DE FULL 1 2 3 0 – 4 : TO SELECT 2 3 4 5 6 7 8 9 10 11 12 13 14 15 16 17 18 19 20 21 22 23 24 25 26 27 28 29 30 31 32 33 34 35 Natural picture size Setting up your TV 5 6 8 7 9 CHRTN +10 0 ENT GU ID E FAV IT VO R TO P 100 NU ME MENU DVDMENU PIC SIZE ER FAV TV CBL/SAT VCR DVD CH AR EX IT yzx • CL E VOL POP DIRECT CH MUTE SLEEP 9 10 11 1
Introduction Theater Wide 1 picture size Note: • To adjust the picture size, press PIC SIZE on the remote control or select PICTURE SIZE in the THEATER menu. Theater Wide 2 picture size example Avoid displaying stationary images on your TV screen for extended periods of time. Fixed (non-moving) images (such as still PIP/POP windows or black/gray bars in wide-screen picture or PIP/POP formats) can become permanently engrained in the picture tube.
6 7 8 1 2 3 4 4 5 5 6 6 7 12 13 14 15 16 8 9 ON ON OFF 6 8 0 100 NU ME ENT GU ID FAV 11 12 14 15 V I DEO 16 17 4 5 6 7 8 9 10 11 12 13 14 15 16 17 18 19 20 21 22 23 24 25 26 27 28 29 30 31 32 33 34 35 IT EX 3 ER 4. Press x or • to display the scroll adjustment mode. TV CBL/SAT VCR DVD FAV CH CL SCROL L AD JUSTMENT 0 : TO ADJUST Setting up your TV 5. Press y or z to adjust the vertical position of the picture.
4:3 Theater Wide 2 TV / VIDEO 16:9 Full Not defined (no ID-1 data) User-selected picture size (pgs.
TV / VIDEO Introduction Switching the main and POP pictures Press SWAP while you are using the POP feature to switch the main and POP pictures.
Introduction POP double-window aspect ratio The POP double-window feature displays each picture according to its input signal aspect ratio, as illustrated below.
3 4 5 Introduction Connecting your TV Using the favorite channel search function You can use the favorite channel search function to quickly scan your favorite channels (see “Programming your favorite channels” on page 27). 1. Press FAVORITE. The TV automatically enters POP mode, and begins a sevenpicture scan of your favorite channels in the POP window. 6 7 8 CABLE 6 9 6 4 5 6 7 Setting up your TV 8 Appendix Using the TV’s Features 6 Index 3 Using the Remote Control 2.
Introduction Using the LOCKS menu The LOCKS menu includes the V-Chip, CH Lock, Video Lock, and New PIN Code functions. You can use these functions after entering the correct PIN code. Connecting your TV Entering the PIN code 1. Press MENU, and then press x or • until the LOCKS menu appears.
Introduction Using the V-CHIP menu Some TV programs and movies include signals that classify the content of the program (violence, sex, dialog, language). The V-CHIP conrol feature in this TV detects the signals and blocks the programs according to your selections. To use this feature, perform the following setup.
Introduction MPAA RATING (Independent rating system for movies) 1. From the LOCKS menu, select MPAA RATING. 2. Press x or • to display the MPAA RATING menu, then press z or y to highlight MPAA RATING.
Introduction Unlocking programs temporarily 1. If you try to watch a TV program that exceeds the rating limits you set, the TV enters program lock mode. After 4 seconds, the TV starts the auto favorite channel search function (see page 37). You can either unlock the program temporarily (see steps 2-4) or select a non-locked program to watch.
Introduction To unlock individual channels: 1. From the LOCKS menu, select CH LOCK. 2. Press x or • to display the CH LOCK menu. 3. Press yzx • to highlight the channel you want to unlock, then press ENTER.
Introduction Using the game timer 1 2 3 4 5 6 7 8 Note: To watch a VIDEO source after the game timer has activated the video lock, you will need to set the VIDEO LOCK feature to OFF (in the LOCKS menu). Connecting your TV You can use the GAME TIMER feature to automatically activate the VIDEO LOCK feature, to set a time limit for playing a video game (the VIDEO LOCK is set to VIDEO). To set the game timer: 1. From the LOCKS menu, select GAME TIMER. 2.
Introduction Adjusting the picture Mode Picture Quality Sports Standard Movie Preference Bright and dynamic picture (factory setting) Standard picture setting (factory setting) Movie-like picture setting (factory setting) Your personal preference* Using the Remote Control *(see “Saving new preference” on page 45.) To select the picture mode: 1. Press MENU, and then press x or • until the PICTURE menu appears. 2. Press z or y to select MODE. 3. Press x or • to highlight the mode you prefer.
Introduction Connecting your TV Saving your new preferences You can save the PICTURE qualities (contrast, brightness, color, tint, and sharpness) you adjusted in the picture preference mode. To save your new preferences: 1. Press MENU, and then press x or • until the PICTURE menu appears. 2. Press y or z to highlight SAVE NEW PREFERENCE. 3. Press x or •. When complete, the menu displays “DONE”.
Introduction TV / VIDEO RECALL POWER INFO 1 2 3 4 5 6 8 7 9 CHRTN +10 0 100 NU ME ENT GU ID PI TO P FA VO RI TE FAV E Connecting your TV Using the flesh tone feature This feature displays natural flesh tones by correcting the tint. To turn on the flesh tone feature: 1. Press MENU, and then press x or • until the PICTURE menu appears. 2. Press y or z to highlight FLESH TONE. 3. Press x or • to highlight ON.
Introduction Connecting your TV Selecting the display format (for 480p signals only) Use this feature to convert a 480p input signal to 540p or 1080i. To select the display format: 1. Press MENU, and then press x or • until the PICTURE menu appears. 2. Press y or z to highlight DISPLAY FORMAT. 3. Press x or • to select 540p or 1080i as you desire.
Introduction Selecting the video input source Connecting your TV Press TV/VIDEO on the remote control or TV to view a signal from another device connected to your TV, such as a VCR or video disc player (see illustrations below). You can select ANT 1, VIDEO 1, VIDEO 2, VIDEO 3, ColorStream HD1, ColorStream HD2, DVI, or ANT 2 depending on which input jacks are used for connecting the devices (see “Connecting your TV” on page 8).
Introduction The closed caption feature has two options: • Captions—An on-screen display of the dialogue, narration, and sound effects of TV programs and videos that are closed captioned (usually marked as “CC” in TV listings). • Text—An on-screen display of information not related to the current program, such as weather or stock data (when provided by individual stations). To view captions or text: 1. Tune the TV to the desired program. 2. Press MENU, and then press x or • to display CUSTOM menu. 3.
Introduction Setting the ON timer INFO 1 2 3 4 5 6 8 7 0 TE RI VO FA ZE SI Using the Remote Control Setting up your TV EX IT FAV CH AR R TE EN T EN Using the TV’s Features GU ID MENU DVDMENU CL E VOL POP DIRECT CH MUTE SLEEP STOP PLAY TV/VCR PAUSE REW FREEZE FF SPLIT SOURCE SKIP / SEARCH SWAP POP CH LIGHT CH SCAN REC Appendix ENT FAV C TO P 100 NU ME ER Index 9 CHRTN +10 TV CBL/SAT VCR DVD 50 POWER RECALL E Connecting your TV TV / VIDEO PI To set the O
Introduction Setting the clock 2 3 4 5 6 7 8 1 2 2 3 3 4 4 5 5 6 6 SET UP 8 12 13 14 6 8 0 100 11 12 NU ME 13 14 ENT GU ID FAV C 15 9 CHRTN +10 10 ZE SI 17 18 5 9 16 17 4 E 16 3 PI 15 2 TO P FA VO RI TE 11 RECALL 1 7 7 8 LANGUAGE ENGL I SH 09 : 25 CLOCK SET ANT 1 / 2 ANT 1 TV / CABLE CABLE CH PROGRAM ADD / ERASE ADD QU I C K CONNECT GU I DE 9 10 POWER RECALL INFO 9 10 11 12 13 14 15 16 17 18 19 20 21 22 23 24 25 26 27 28 29 30 31 32 33 34 35 1 7
Introduction Adjusting the sound TV / VIDEO 6 7 8 1 2 2 3 3 4 4 7 8 8 MTS BASS TREBLE BALANCE RESET 9 Using the TV’s Features 10 11 12 13 STEREO / SAP / MONO 50 50 0 9 10 11 12 13 14 14 15 15 16 16 17 17 18 18 1 2 3 4 5 6 7 8 9 10 11 12 13 14 15 16 17 18 19 20 21 22 23 24 25 26 27 28 29 30 31 32 33 34 35 You can leave your TV in STEREO mode because it will automatically output the type of sound being broadcast (stereo or monaural).
1 2 3 4 5 6 7 8 Introduction Note: If the broadcast is monaural, the SRS 3D effect does not work. Connecting your TV Using the WOW™ surround sound feature WOW is the latest audio enhancement technology combined with SRS 3D and TruBass of SRS Labs individual technologies. The feature uses stereo signals from a TV broadcast or video input. To adjust the WOW feature: 1. Select STEREO mode (See “Selecting stereo/SAP broadcasts” on page 52). 2.
7 8 5 6 8 7 0 100 NU ME 5 6 6 ER FAV T 4 5 EN 3 4 AUD I O Using the Remote Control 7 8 8 MTS BASS TREBLE BALANCE RESET 11 12 13 STEREO 50 50 0 9 TV CBL/SAT VCR DVD 11 15 TV/VCR PAUSE REW FREEZE FF SPLIT SOURCE SKIP / SEARCH SWAP POP CH 17 18 18 1 2 3 4 5 6 7 8 PLAY 9 10 11 12 13 14 15 16 17 18 19 20 21 22 23 24 25 26 27 28 29 30 31 32 33 34 35 CH SCAN REC Using the sub-bass system (SBS) The sub-bass system allows you to enhance bass performance, even when t
1 2 3 4 5 6 7 8 Introduction Note: Make sure the volume control of your audio amplifier is set to a moderate listening level. Connecting your TV Turning off the built-in speakers Use this feature to turn the TV speakers off when you connect an audio system (See “Connecting an audio system” on page 15). To turn off the built-in speakers: 1. Press MENU, then press x or • until AUDIO menu appears. 2. Press y or z to highlight SPEAKERS. 3. Press x or • to highlight OFF.
Index Appendix Using the TV’s Features Setting up your TV Using the Remote Control Connecting your TV Introduction
Introduction Viewing the demo mode Connecting your TV The demo mode automatically demonstrates several of your TV’s features. This function is provided for demonstration purposes only. To start the demo: Press and hold MENU on the TV front panel for 4 seconds. To stop the demo: Press RECALL, EXIT, or POWER.
Introduction Appendix Specifications Connecting your TV Television System NTSC standard Channel Coverage VHF: 2 through 13 UHF: 14 through 69 Cable TV: Mid band (A-8 through A-1, A through I) Super band (J through W) Hyper band (AA through ZZ, AAA, BBB) Ultra band (65 through 94, 100 through 125) Using the Remote Control Power Source 120 V AC, 60 Hz Power Consumption 190 W (average) Index Appendix Using the TV’s Features Setting up your TV Audio Power 20 W + 20 W 43-3/8 inches (1102 mm) 40 inches
Introduction Troubleshooting Problem TV will not turn on Solution • Make sure the power cord is plugged in, then press POWER. • The remote control batteries may be dead. Replace the batteries. No picture, no sound • Check the antenna/cable connections. No sound, picture OK • • • • Poor picture, sound OK • Check the antenna connections. • The station may have broadcast difficulties. Try another channel. • Adjust the PICTURE menu.
Introduction Limited United States Warranty for 27'' FST PURE® and All Larger Television Models Connecting your TV Toshiba America Consumer Products, Inc. (“TACP”) and Toshiba Hawaii, Inc. (“THI”) make the following limited warranties to original consumers in the United States. THESE LIMITED WARRANTIES EXTEND TO THE ORIGINAL CONSUMER PURCHASER OR ANY PERSON RECEIVING THIS TELEVISION AS A GIFT FROM THE ORIGINAL CONSUMER PURCHASER AND TO NO OTHER PURCHASER OR TRANSFEREE. PRODUCTS PURCHASED IN THE U.S.A.
Introduction Limited Canada Warranty for 27'' FST PURE® and All Larger Television Models Limited Two (2) Year Warranty on Picture Tube* TCL further warrants the picture tube in this television against defects in materials or workmanship for a period of two (2) years after the date of original retail purchase.
Introduction OP A/V cables (standard) ......................................................... 8 A/V receiver connection ................................................... 15 Ambient light sensor (ALS) ............................................. 45 ANT 1/2 ................................................................................... 22 Antenna cables (coaxial) ................................................... 8 AUDIO OUT sound, selecting ........................................
HEAD OFFICE: 82 TOTOWA ROAD, WAYNE, NJ 07470, U.S.A. NATIONAL SERVICE DIVISION:1420-B TOSHIBA DRIVE, LEBANON, TN 37087, U.S.A. HEAD OFFICE: 327 KAMAKEE STREET, HONOLULU, HI 96814, U.S.A. – TEL: (808) 591-9281 HEAD OFFICE: 191 McNABB STREET, MARKHAM, ONTARIO, L3R 8H2, CANADA – TEL: (905) 470-5400 SERVICE CENTERS: TORONTO: 191 McNABB STREET, MARKHAM, ONTARIO L3R 8H2, CANADA – TEL: (905) 470- 5400 MONTREAL: 1643 NORTH SERVICE RD.