For an overview of steps for installing, setting up, and using your new TV, see page 8. OWNER'S MANUAL 51H93 57H93 65H93 140 45 IS O CONSUMER CA P RI TS, INC. DUC RO TOSHIBA AM E Projection Television 01 FILE N o. A 9 6 Owner’s Record The model number and serial number are on the back of your TV. Record these numbers in the spaces below. Refer to these numbers whenever you communicate with your Toshiba dealer about this TV.
Dear Customer, Child Safety Thank you for purchasing this Toshiba TV. This manual will help you use the many exciting features of your new TV. Before operating the TV, please read this manual completely, and keep it nearby for future reference.
Important Safety Instructions 1) 2) 3) 4) Installation, Care, and Service Installation Read these instructions. Keep these instructions. Heed all warnings. Follow all instructions. Follow these recommendations and precautions and heed all warnings when installing your TV: 16) Never modify this equipment. Changes or modifications may void: a) the warranty, and b) the user’s authority to operate this equipment under the rules of the Federal Communications Commission.
24) Always operate this equipment from a 120 VAC, 60 Hz power source only. 30) [This item applies to projection TVs only.] If the air temperature rises suddenly (for example, when the TV is first delivered), condensation may form on the lenses. This can make the picture appear distorted or the color appear faded. If this happens, turn off the TV for 6 to 7 hours to allow the condensation to evaporate.
Important Safety Precautions for Split Cabinet Feature (Models 57H93 and 65H93 only) Toshiba TV models 57H93 and 65H93 have a split cabinet feature that allows disassembly of the cabinet into two sections during installation. For details, please refer to the insert titled “Disassembly/ Reassembly Instructions for Split Cabinet Feature” that accompanied this owner’s manual in the accessory pack. If you do not have the insert, you can download a copy of it from our Web site (www.toshiba.com/tacp in the U.S.A.
Contents (continued from previous page) Chapter 5: Quick Connect Guide & TV Guide On Screen™ setup ........................................................ 36 Starting the Quick Setup Guide assisted setup ............... 36 Setting up the TV GUIDE On Screen system ................ 37 Completing the Quick Setup Guide assisted setup ......... 40 Chapter 6: Setting up your TV ........................................ 41 Selecting the menu language ..........................................
1 Introduction Welcome to Toshiba Thank you for purchasing this Toshiba TV, one of the most innovative projection TVs on the market. The goal of this manual is to guide you through setting up and operating your TV as quickly as possible. • This manual applies to models 51H93, 57H93, and 65H93. Before you start reading, check the model number on the back of your TV. • Instructions in this manual are based on using the remote control.
Chapter 1: Introduction Overview of steps for installing, setting up, and using your new TV Follow these steps to set up your TV and begin using its many exciting features. 1. Carefully read the important safety, installation, care, and service information on pages 2–4. Keep this manual for future reference. 2. Do not plug in any power cords until AFTER you have connected all cables and devices to your TV. 3.
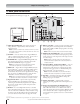
2 Connecting your TV TV front panel controls and connections 1 2 3 4 5 6 789 0 Press/lift to open control panel door. VOLUME CHANNEL !™ { { { MENU !¡ EXIT TV/VIDEO TouchFocus S-VIDEO VIDEO L/MONO R AUDIO RESET !£ 1 Remote control sensor (behind the screen) — Point the remote control toward this area of the TV screen. 9 TouchFocus™ — Press to automatically adjust the color convergence (see page 50). 2 POWER — Press to turn the TV on and off.
Chapter 2: Connecting your TV TV back panel connections 3 } 2 } 1 For an explanation of cable types, see page 11.
Chapter 2: Connecting your TV Overview of cable types Note: Two dual-blaster IR blaster cables are included with your TV. These IR blaster cables have specific characteristics that allow them to work with this TV’s IR OUT and G-LINK ports. Other aftermarket IR blaster cables may not function correctly and could cause damage. SUCH DAMAGE IS NOT COVERED BY YOUR TOSHIBA WARRANTY because it is a result of misuse.
Chapter 2: Connecting your TV About the connection illustrations You can connect different types and brands of devices to your TV in several different configurations. The suggested connection illustrations in this manual are representative of typical device connections only. The input/output jacks on your devices may differ from those illustrated herein. For details about connecting and using your specific devices, refer to each device’s owner’s manual.
Chapter 2: Connecting your TV Connecting a VCR and Cable box You will need: one Cable signal splitter five coaxial cables one set of standard A/V cables From Cable TV Cable box CH 3 CH 4 OUT • For better picture performance from your VCR: If your VCR has S-video, connect an S-video cable (plus the audio cables) instead of the standard video cable. Do not connect an S-video cable and a standard video cable to VIDEO 1 (or VIDEO 2) at the same time or the picture performance will be unacceptable.
Chapter 2: Connecting your TV Connecting a VCR and satellite receiver You will need: three coaxial cables one set of component video cables (if your satellite receiver does not have component video, connect the standard A/V cables only) two sets of standard A/V cables • For better picture performance, if your satellite receiver and VCR have S-video, connect S-video cables (plus the audio cables) instead of the standard video cables from the satellite receiver to the VCR to VIDEO 1 on the TV.
Chapter 2: Connecting your TV Connecting a DVD player with S-video and a VCR You will need: five coaxial cables one set of standard A/V cables • If you have a mono VCR, connect L/MONO on the TV (VIDEO 2) to your VCR’s audio out jack using the white audio cable only. From antenna or Cable TV one S-video cable one pair of standard audio cables Cable box Note: OUT • If your DVD player does not have S-video, use a standard video cable instead.
Chapter 2: Connecting your TV Connecting a DVD player with component video and a VCR Your TV has ColorStream® (component video) inputs. Connecting a DVD player with component video output (such as a Toshiba DVD player with ColorStream®) can greatly enhance picture quality.
Chapter 2: Connecting your TV Connecting two VCRs From antenna or Cable You will need: two coaxial cables two sets of standard A/V cables • Do not connect the same VCR to the output and input jacks on the TV at the same time. To view the antenna or Cable signal: VIDEO IN from ANT AUDIO CH 3 CH 4 L R L OUT to TV • For better picture performance, if VCR 1 has S-video, use an S-video cable (plus the audio cables) instead of the standard video cable.
Chapter 2: Connecting your TV Connecting a DVI/HDCP device The DVI/HDCP1 input on your TV is designed to accept HDCP program material in digital form from EIA/CEA-861– compliant 2 consumer electronic devices, such as a set-top box or DVD player with a DVI-D digital single-link output connection.3 The DVI/HDCP input is designed for best performance with 1080i high-definition video signals. The DVI/HDCP input also will accept and display 480p, 480i, and 720p signals.
Chapter 2: Connecting your TV Connecting a digital audio system Dolby Digital decoder or other digital audio system The TV’s DIGITAL AUDIO OUT jack outputs a or 2-channel down-mixed PCM (pulse-code modulation) signal for use with an external Dolby Digital decoder or other external audio system with optical audio input. You will need: one optical audio cable To control the audio: Turn on the TV and the digital audio device. Press MENU on the TV’s remote control and open the AUDIO menu.
Chapter 2: Connecting your TV Connecting an A/V receiver This connection allows you to use an A/V (audio/video) receiver to enhance your TV’s sound. If your sound system has Dolby Pro Logic surround sound, you can add to the realism of the sound by using the TV’s internal speakers as center channel speakers.
Chapter 2: Connecting your TV Controlling infrared remote-controlled devices through the TV (IR pass-through) You can use the TV’s IR OUT jack (infrared pass-through) to remotely operate (through the TV) many infrared remote-controlled devices (such as a Toshiba infrared remote-controlled VCR or DVD player or an IEEE-1394 device) enclosed within an entertainment center or similar cabinet. Without the IR OUT connection, the device typically would need to be visible to operate it remotely.
Chapter 2: Connecting your TV Connecting IEEE-1394 (Firewire™) video devices You can use the two bi-directional IEEE-1394 ports on the back of your TV to connect digital video devices that meet CEA specifications for IEEE-1394 (also known as Firewire). Because these ports are bi-directional, they can be used for both playback and recording. • This TV is not intended for connection to and should not be used with a PC (personal computer).
Chapter 2: Connecting your TV Connecting IEEE-1394 (Firewire™) video devices (cont.) IEEE-1394 device initialization IEEE-1394 device management When you connect a new IEEE-1394 device to the TV and turn it on, the device immediately announces its presence to the TV (and other networked IEEE-1394 devices, if any), and the following device initialization screen automatically appears. The IEEE-1394 device information is saved permanently in the TV’s memory.
Chapter 2: Connecting your TV Connecting IEEE-1394 (Firewire™) video devices (cont.) IEEE-1394 device interconnection IEEE-1394 devices can be interconnected (instead of each device having to be connected to a separate input on the TV) in either of two ways: (1) a device-to-device chain connection or (2) a hub connection. Chain connection Connect the first IEEE-1394 device to one of the TV’s IEEE-1394 inputs, and then connect each subsequent device to the preceeding device in the chain.
Chapter 2: Connecting your TV G-LINK connection This connection is necessary to enable the TV Guide On Screen™ system’s device control and one-touch recording features. After you connect your devices to the TV (pages 12–24), you will need to connect the G-LINK cable (one of the dual-wand IR blaster cables included with your TV) from your VCR and Cable box (if applicable) to the G-LINK jack on the TV.
3 Using the remote control Learning about the remote control THEATER NET FAV ENTER – Copyright © 2003 TOSHIBA CORPORATION. All rights reserved. – 100 GE 26 +10 ACTION MENU + PA The buttons used for operating the TV only are described here. For a complete list of the remote control’s functions, see the remote control functional key chart on pages 28–29.
Chapter 3: Using the remote control Installing the remote control batteries To install the remote control batteries: 1. Slide the battery cover off the back of the remote control. Caution: • Dispose of batteries in a designated disposal area.Do not throw batteries into a fire. • Do not mix battery types or combine used batteries with new ones. 2. Install two “AA” size alkaline batteries. Match the + and – symbols on the batteries to the symbols on the battery compartment.
Chapter 3: Using the remote control Remote Control functional key chart Toshiba TV Cable Satellite VCR DVD/LD Receiver (TV) (CBL/SAT) (CBL/SAT) (AUDIO) LIGHT Lights the remote key, and toggles between enabled and disabled Illumination mode.
Chapter 3: Using the remote control Remote Control functional key chart (continued) Key Label CH RTN/ DVD RTN SLOW/ • DIR x SKIP/ • SEARCH x REW PAUSE/STEP PLAY FF TV/VCR AM/FM DISC STOP REC/VCR+ POP CH yz Toshiba TV (TV) Previous channel --------VCR VCR VCR VCR Cable (CBL/SAT) Previous channel --------VCR VCR VCR VCR Satellite (CBL/SAT) Previous channel --------VCR VCR VCR VCR VCR --- ----- VCR VCR VCR+/REC --POP channel up/down SPLIT POP Split POP DIRECT CH POP Direct ch FREEZE POP Freeze SWAP POP
Chapter 3: Using the remote control Programming the remote control to operate your other devices Device code setup 1. Refer to the multi-brand remote control device code table on pages 32–33 to find the code for the brand of your device. If more than one code is listed, try each one separately until you find the one that works. 2. Press MODE until the Mode indicator for the device (CABLE/SAT, VCR, DVD, AUDIO 1, AUDIO 2) lights up. 3.
Chapter 3: Using the remote control Programming the remote control to operate your other devices (continued) Using the volume lock feature (8000) Operational feature reset (8900) For the TV, CABLE/SAT, VCR, and DVD modes, the volume controls (VOL y/z and MUTE) can be locked to the selected device mode. This feature does not apply to the AUDIO 1 and AUDIO 2 modes. This feature clears all setup features not related to “Device code set up” and resets the Volume Lock to “TV.
Chapter 3: Using the remote control Multi-brand remote control device codes VCRs Brand ADMIRAL AIWA AKAI AUDIO DYNAMIC BELL&HOWELL BROKSONIC CANON CCE CITIZEN CRAIG CURTIS MATHES DAEWOO DBX DIMENSIA EMERSON FISHER FUNAI GE GO VIDEO GOLDSTAR GRADIENTE HITACHI INSTANT REPLAY JENSEN JVC KENWOOD LG LXI MAGNAVOX MARANTZ MARTA MEMOREX MGA MINOLTA MITSUBISHI MULTITECH NEC OLYMPIC OPTIMUS ORION PANASONIC PENNEY 32 Code 0135 0127, 0132, 0181 0129, 0114, 0115, 0116 0139, 0111 0105, 0113 0120, 0126, 0180 0123,
Chapter 3: Using the remote control Multi-brand remote control device codes (continued) Receivers (cont.
4 Menu layout and navigation The illustrations below and on the next page provide a quick overview of your TV’s menu system. Main menu layout To open the main menus (illustrated below), press MENU on the remote control or TV front panel.
Chapter 4: Menu layout and navigation Setup / Installation menu layout (continued) To open the INSTALLATION menu (illustrated below): press MENU on the remote control or TV front panel, open the SETUP menu, select INSTALLATION, and press ENTER.
5 Quick Connect Guide & TV Guide On Screen™ setup This section includes instructions on using the Quick Connect Guide to assist you in configuring the following basic settings for your TV: – Choosing your preferred language (English, French, or Spanish) for on-screen menus. (See Chapter 7 for details on this feature.) – Setting up the TV Guide On Screen™ interactive program guide. (See Chapter 7 for details on this feature.) – Configuring the antenna input sources.
Chapter 5: Quick Connect Guide & TV Guide On Screen setup Setting up the TV Guide On Screen system Note: This is a continuation of the Quick Connect Guide assisted setup from the previous page. If you are not using the Quick Connect Guide assisted setup and want to manually start the TV Guide On Screen system setup process: 2. Enter the ZIP code (U.S.A.
Chapter 5: Quick Connect Guide & TV Guide On Screen setup Setting up the TV Guide On Screen system (continued) 4. Read the on-screen information about the Cable box to G-LINK connection, and then press ENTER. For G-LINK connection details, see page 25. 2. When testing is done, if your Cable box tuned itself to channel 09, select YES and press ENTER. Go to “Configuring your VCR setup” below.
Chapter 5: Quick Connect Guide & TV Guide On Screen setup Setting up the TV Guide On Screen system (continued) 3. Select your VCR brand, and then press ENTER. Code testing begins. VCR code testing 3. If the correct code is not found, the following screens appear, with helpful hints for finding the code. Confirming your settings 1. To allow the TV Guide On Screen system to find the correct code for your brand of VCR, tune your VCR to channel 02, turn the VCR OFF, leave the TV ON, and then press ENTER.
Chapter 5: Quick Connect Guide & TV Guide On Screen setup Completing the Quick Connect Guide assisted setup The following screen appears. Highlight NEXT and press ENTER. Quick Connect Guide Selecting the picture mode Highlight the picture mode you prefer, and then press ENTER. • For details on the picture modes, see page 72. Please connect as follows: For advanced connection, please see owner’s manual. Quick Connect Guide From CABLE or ANTENNA -----> ANT 1 TV Please select your favorite Picture Mode.
6 Setting up your TV For menu navigation instructions, see Chapter 4. Selecting the menu language Configuring the antenna input sources Note: If you already selected the menu language during the Quick Connect Guide assisted setup, you can skip this step. You can choose from three different languages (English, French and Spanish) for the on-screen display of adjustment menus and messages. (The TV Guide On Screen menus are in English, regardless of the language selected in this menu.
Chapter 6: Setting up your TV Programming channels into the TV’s channel memory When you press CHANNEL y or z on the remote control or TV front panel, your TV will stop only on the channels stored in the TV’s channel memory. Follow the steps below to program channels into the TV’s channel memory. 5. Highlight ANT 1 or ANT 2, depending on which antenna input you want to program channels for, and then press ENTER to start automatic channel programming.
Chapter 6: Setting up your TV Programming channels into the TV’s channel memory (continued) Manually adding and deleting channels in the channel memory After you have programmed the channels automatically, you can manually add or delete individual channels in the channel memory. To add or delete channels in the channel memory: 1. Press MENU and open the SETUP menu. 2. Highlight INSTALLATION and press ENTER. (A new set of INSTALLATION menu icons will appear on-screen, as shown in step 3).
Chapter 6: Setting up your TV Programming your favorite channels You can program a maximum of 14 of your favorite channels from the ANT 1 and/or ANT 2 inputs into the Favorite Channels sets (two sets of seven favorite channels). You can then scan through your favorite channels only, skipping other channels you do not normally watch. To add and delete channels in the Favorite Channels lists: 1. Press MENU and open the PREFERENCES menu. 2. Highlight FAVORITE CHANNELS and press ENTER.
Chapter 6: Setting up your TV Setting up and using TheaterNet™ on-screen device control The TheaterNet feature allows you to control many brands of IEEE-1394 and/or infrared remote-controlled A/V devices through your TV using on-screen control icons and the TV’s remote control. Note: • Although the TheaterNet on-screen device control feature includes codes for many devices, it may not include codes for some or all of the features on certain devices you wish to control.
Chapter 6: Setting up your TV Setting up and using TheaterNet™ on-screen device control (continued) Using the TheaterNet control icons 1. Set up your infrared devices in TheaterNet, if you have not already done so (see page 45). Note: IEEE-1394 devices do not need to be set up in TheaterNet because they appear automatically in the TheaterNet menu (as shown in step 3 below). Following are illustrations of the TheaterNet on-screen control icons for other types of devices. DVD Video 1 VCR VIDEO 2 2.
Chapter 6: Setting up your TV TheaterNet IR device codes Amplifiers Brand Aiwa Bose Carver Curtis Mathes Denon GE Harman/Kardon JVC Left Coast Linn Luxman Magnavox Marantz NEC Nakamichi Optimus Panasonic Parasound Philips Pioneer Polk Audio RCA Realistic Sansui Shure Sony Soundesign Technics Victor Wards Yamaha Code 0406 0674 0269 0300 0160 0078 0892 0331 0892 0269 0165 0269 0892, 0321, 0269 0264 0321 0395, 0300 0308, 0521 0246 0892, 0269 0013, 0300 0892, 0269 0300 0395 0321 0264 0689, 0220 0078, 0211 030
Chapter 6: Setting up your TV TheaterNet IR device codes (continued) Video accessory (HDTV decoder) Receivers (cont.
Chapter 6: Setting up your TV TheaterNet IR device codes (continued) VCRs (cont.
Chapter 6: Setting up your TV Adjusting the color convergence This projection TV uses three separate image tubes: red, green, and blue. The red, green, and blue images are projected onto the screen where they converge to form a full-color picture. You can see a clear picture only when the three images converge correctly. Convergence may drift over time or if you move the TV. If you can see clear images on your TV screen, skip this procedure.
Chapter 6: Setting up your TV Adjusting the color convergence Setting the time and date (continued) Note: If you already set up the TV Guide On Screen system, the time and date were set automatically and you can skip this step. To set the time and date: 1. Press MENU and open the SETUP menu. 2. Highlight INSTALLATION and press ENTER. (A new set of INSTALLATION menu icons will appear on-screen, as shown in step 3 below.) RED BLUE : TO ADJUST ENTER : TO SELECT COLOR EX I T : TO SELECT POSITION 8.
Chapter 6: Setting up your TV Checking system status Viewing the digital signal meter To check the system status: 1. Press MENU and open the SETUP menu. 2. Highlight INSTALLATION and press ENTER. (A new set of INSTALLATION menu icons will appear on-screen, as shown in step 3). You can view the digital signal meter for ANT 1 and ANT 2 digital TV input sources only. To view the digital signal meter: 1. Press MENU and open the SETUP menu. 2. Highlight INSTALLATION and press ENTER.
7 Using the TV Guide On Screen™ interactive program guide The TV Guide On Screen system is a free, interactive, on-screen program guide built in to your Toshiba TV that lists schedules and information for TV programs in your area. Note: Over-the-air or cable access to stations carrying TV Guide On Screen data is required for the TV Guide On Screen system to operate. TV Guide On Screen data is not provided by Toshiba America Consumer Products, Inc.
Chapter 7: Using the TV Guide On Screen interactive program guide About the TV Guide On Screen menu screens The menu screens in the TV Guide On Screen system contain some or all of the following elements, depending on which menu is active: • Menu Bar (LISTINGS, SORT, PROMOTIONS, SETUP, MESSAGES, and SCHEDULE) • Video Window with lock icon • Program and/or channel listings • Panel ads • Blue and Green ACTION buttons • INFO button Video Window (unlocked) Note: • The TV Guide On Screen menus shown in this m
Chapter 7: Using the TV Guide On Screen interactive program guide Navigating the TV Guide On Screen system To open the TV Guide On Screen system: Using the remote control: Press GUIDE. Using the menus: Press MENU, open the APPLICATIONS menu, highlight TV GUIDE ON SCREEN, and then press ENTER.
Chapter 7: Using the TV Guide On Screen interactive program guide LISTINGS menu The LISTINGS menu appears when you open the TV Guide On Screen program guide.
Chapter 7: Using the TV Guide On Screen interactive program guide LISTINGS menu (continued) Direct tuning To directly tune the TV to a program: In the LISTINGS menu, select a program or a broadcast-related panel ad or channel ad, and press ENTER. The TV tunes itself to the selected program and the TV Guide On Screen system closes. • If you highlight a program in a future time slot, or a panel ad or channel ad for a future program, the TV will tune to the current program on the related channel.
Chapter 7: Using the TV Guide On Screen interactive program guide LISTINGS menu (continued) Viewing panel ads and channel ads Panel ads and channel ads provide promotional information for programs or products. Before your TV has received its first program listing download from the TV Guide On Screen system, the panel ad windows will display TV Guide On Screen features and operating tips. • Select a panel ad or channel ad and press INFO to display detailed information.
Chapter 7: Using the TV Guide On Screen interactive program guide SCHEDULE menu SETUP menu The SCHEDULE menu displays a list of the programs you set as favorites or to record. The SETUP menu allows you to change your TV Guide On Screen system settings, change the channel display, and turn the auto display feature on and off. To open the SETUP menu: 1. Press GUIDE to open the TV Guide On Screen system. 2. Press MENU to select the Menu Bar. 3. Use the x • buttons to select the SETUP menu. 4.
Chapter 7: Using the TV Guide On Screen interactive program guide PROMOTIONS menu The PROMOTIONS menu displays a list of the promotions that appear in the panel ad window, along with TV Guide On Screen features and tips. PROMOTIONS menu To open the PROMOTIONS menu: 1. Press GUIDE to open the TV Guide On Screen system. 2. Press MENU to select the Menu Bar. 3. Use the x • buttons to select the PROMOTIONS menu. 4. Use the yz buttons to highlight an item, and then press INFO to display the item.
8 Using the TV’s features Selecting the video input source to view To select the video input source to view: 1. Press INPUT on the remote control or TV/VIDEO on the TV front panel. 2. Press 0–7 to select the input source you want to view, depending on which input jacks you used for connecting your devices (see “Connecting your TV” on pages 9–25). The current signal source displays at the top of the INPUT SELECTION screen.
Chapter 8: Using the TV’s features Labeling the video input sources You can label each video input source according to the type of device you connected to each source, from the following preset list of labels: – – (default label) Audio Receiver VCR Video Recorder Laser Disk Compact Disc DVD DTV SAT (Satellite box) CBL (Cable box) DVI (DVI/HDCP device) Note: • If you set up devices in TheaterNet, the associated inputs are automatically labeled and cannot be relabeled until you remove the device from Theater
Chapter 8: Using the TV’s features Tuning channels Tuning to the next programmed channel Note: This feature will not work unless you program channels into the TV’s channel memory (see page 42). To tune to the next programmed channel: Press CHANNEL y or z on the remote control or TV front panel. Using SpeedSurf to change to a specific programmed channel Note: This feature will not work unless you program channels into the TV’s channel memory (see page 42).
Chapter 8: Using the TV’s features Selecting the picture size You can view many program formats in a variety of picture sizes—Natural, Theater Wide 1, Theater Wide 2, Theater Wide 3, and Full—as described below and on the next page. The way the image displays in any of the picture sizes will vary depending on the format of the program you are viewing. Select the picture size that displays the current program the way that looks best to you.
Chapter 8: Using the TV’s features Selecting the picture size (continued) To select the picture size, press PIC SIZE on the remote control. Theater Wide 1 picture size • The picture is non-uniformly enlarged—the center of the picture remains close to its original proportion, but the left and right edges are stretched wider to fill the screen. • A small part of the picture (at the top and bottom) is hidden; however, this mode cannot be scrolled. You also can select the picture size using the menu system.
Chapter 8: Using the TV’s features Scrolling the Theater Wide picture (Theater Wide 2 and 3 only) 1. Press MENU and open the VIDEO menu. 2. Highlight THEATER SETTINGS and press ENTER. Using the auto aspect ratio feature (480i signals only) When the AUTO ASPECT feature is set to ON and the TV receives a 480i signal, the picture size is automatically selected, as described in the following table.
Chapter 8: Using the TV’s features Selecting the cinema mode When you view a DVD (3:2 pulldown processed) from a DVD player connected to the ColorStream (component video) or DVI/HDCP inputs on the TV, smoother motion can be obtained by setting the CINEMA MODE to FILM. To set the CINEMA MODE to FILM: 1. Press MENU and open the VIDEO menu. 2. Highlight THEATER SETTINGS and press ENTER. You can use this feature to convert a 480p input signal to 540p or 1080i. To select the display format: 1.
Chapter 8: Using the TV’s features Using the POP features Using the POP double-window feature The POP (picture-out-picture) double-window feature splits the screen into two windows so you can watch two programs at the same time. The program displayed in the POP window can come from a TV broadcast or an external device. To display a program in the POP window: 1. Select the program you want to watch in the main window. 2. Press SPLIT to open the POP window.
Chapter 8: Using the TV’s features Using the POP features (continued) NET Switching the main and POP pictures FAV Press SWAP while the POP double-window is open to switch the main and POP pictures. Note: This feature is not available when viewing a digital source in the main window. ENTER GE + PA – VCR+ REC POP CH SPLIT POP DIRECT CH FREEZE SWAP CH SCAN SOURCE FREEZE SWAP Freezing the main picture in the POP double-window CT-90168 1. While the POP double-window is not open, press FREEZE.
Chapter 8: Using the TV’s features Using the POP features (continued) POP double-window aspect ratio The POP double-window feature displays each picture according to its input signal aspect ratio, as illustrated below. 480i 480i 480p/720p/1080i Note: The AUTO ASPECT RATIO feature (page 66) does not operate in POP double-window mode.
Chapter 8: Using the TV’s features Using the POP features (continued) +10 Using the favorite channel search feature ACTION MENU – 100 THEATER NET You can use the favorite channel search feature to quickly scan the channels you programmed as favorite channels in a seven-picture POP multi-window. Note: The favorite channel search feature will not work unless you program channels into the favorite channel memory (see “Programming your favorite channels” on page 44).
Chapter 8: Using the TV’s features Adjusting the picture Selecting the picture mode Adjusting the picture quality You can select your desired picture settings from four picture modes, as described below. You can adjust the picture quality (contrast, brightness, color, tint, and sharpness) to your personal preferences.
Chapter 8: Using the TV’s features Adjusting the picture (continued) Using the ALS (ambient light sensor) Using the flesh tone feature The ALS feature automatically adjusts the picture contrast based on the room’s current lighting conditions. For example, when the room is dark, the ALS will automatically reduce the contrast, which reduces eye strain. The ALS is activated when the ALS is set to ON. This feature automatically adjusts the tint to display more natural flesh tones.
Chapter 8: Using the TV’s features Adjusting the picture (continued) Using CableClear™ DNR (digital noise reduction) Selecting the color temperature The CableClear digital noise reduction feature allows you to reduce visible interference in your TV picture. This is useful when receiving a broadcast with a weak signal (especially a Cable channel) or playing back a video cassette or disc damaged by repeated use.
Chapter 8: Using the TV’s features Using the closed caption mode The closed caption mode has two options: • Captions—An on-screen display of the dialogue, narration, and sound effects of TV programs and videos that are closed captioned (usually marked “CC” in program guides). • Text—An on-screen display of information not related to the current program, such as weather or stock data (when provided by individual stations). To view captions or text: 1. Press MENU and open the PREFERENCES menu. 2.
Chapter 8: Using the TV’s features Adjusting the audio Muting the sound Selecting stereo/SAP broadcasts Press MUTE to temporarily reduce (1/2 MUTE) or turn off (MUTE) the sound. Each time you press MUTE, the mute mode will change in the following order. The multi-channel TV sound (MTS) feature allows you to output high-fidelity stereo sound from your TV’s speakers.
Chapter 8: Using the TV’s features Adjusting the audio (continued) Adjusting the audio quality Using the sub-bass system (SBS) You can adjust the audio quality by adjusting the bass, treble, and balance. The sub-bass system enhances bass performance, even when the volume is low. To adjust the audio quality: 1. Press MENU and open the AUDIO menu. 2. Highlight AUDIO SETTINGS and press ENTER. To turn on the SBS and adjust the SBS level: 1. Press MENU and open the AUDIO menu. 2.
Chapter 8: Using the TV’s features Adjusting the audio (continued) Using the StableSound® feature The StableSound® feature limits the highest volume level to prevent extreme changes in volume when the signal source changes (for example, to prevent the sudden increase in volume that often happens when a TV program switches to a commercial). To turn on the StableSound® feature: 1. Press MENU and open the AUDIO menu. 2. Highlight AUDIO SETTINGS and press ENTER. 3.
Chapter 8: Using the TV’s features Adjusting the audio (continued) Turning off the built-in speakers Selecting the AUDIO OUT sound Use this feature to turn off the TV speakers when you connect an audio system to your TV (see “Connecting a digital audio system” and “Connecting an analog audio system” on page 19). This feature allows you to select the audio source (MAIN or POP) that is output from the AUDIO OUT jacks.
Chapter 8: Using the TV’s features Using the ™ memory card picture viewer You can use the SmartMedia™ picture viewer to view photos on your TV screen that you took with a digital camera and saved in a compatible JPEG format on a SmartMedia or SD (Secure Digital™) memory card. You can display your photos in thumbnail mode or view them as a slide show. Viewing digital photos on your TV 1. Insert a Smart Media™ or SD memory card into the SmartMedia slot on the front of your TV.
Chapter 8: Using the TV’s features ™ Using the memory card picture viewer (continued) 5. Press y or z to select another picture as the large picture. 6. Press ENTER to view your pictures in a slide show. To restart the picture viewer while the memory card is still inserted: 1. Press MENU and open the APPLICATIONS menu. 2. Highlight PICTURE VIEWER and press ENTER.
Chapter 8: Using the TV’s features Setting the ON/OFF timer Setting the sleep timer You can use the ON/OFF timer to turn the TV on and off at a preset time on a recurring basis. You can set the sleep timer to turn off the TV at a set length of time, to a maximum of 3 hours. The sleep timer turns off the TV one time only, as opposed to the ON/OFF timer, which turns off the TV on a recurring basis. Note: You must first set the time (see page 51). To set the ON/OFF timer: 1.
Chapter 8: Using the TV’s features Displaying TV setting information on-screen Understanding the auto power off feature Press RECALL to display the following information on-screen: • Antenna mode (when in TV mode) • Channel number or VIDEO mode selected • Time (if set) • ON timer setting (if set) • Remaining time on SLEEP timer (if set) • Stereo or SAP audio status • V-CHIP rating status • Picture size • MUTE status (if full MUTE mode is in effect) The TV will automatically turn itself off after approxi
9 Using the Locks menu The LOCKS menu includes the RATING BLOCKING, CHANNELS BLOCK, INPUT LOCK, FRONT PANEL LOCK, GAME TIMER, and NEW PIN CODE features. You can use these features after entering the correct PIN code. Entering the PIN code 1. Press MENU and highlight the LOCKS menu icon. If you cannot remember your PIN code While the PIN code entering screen is displayed, press RECALL four times within five seconds. The PIN code will be reset and you can enter a new PIN code.
Chapter 9: Using the Locks menu Blocking TV programs and movies by rating (V-Chip) Some TV programs and movies include signals that classify the content of the program (violence, sex, dialog, language). The V-Chip feature in this TV detects the signals and blocks the programs according to the ratings you select. (See the tables at right for rating descriptions.) Note: Rating blocking is a function of the V-Chip feature in this TV, which supports the U.S. V-Chip system only.
Chapter 9: Using the Locks menu Blocking channels Unlocking programs temporarily With the CHANNELS BLOCK feature, you can block specific channels. You will not be able to tune locked channels unless you clear the setting. If you try to watch a TV program that exceeds the rating limits you set, the TV enters program lock mode. You can either unlock the program temporarily or select a non-locked program to watch. To block channels: 1. Press MENU and highlight the LOCKS menu icon. 2.
Chapter 9: Using the Locks menu Using the game timer Using the front panel lock feature You can use the game timer to set a time limit for playing a video game (30–120 minutes). When the game timer is activated, the TV enters VIDEO LOCK mode and locks out the input source for the video game device. You can lock the front panel buttons to prevent your settings from being changed accidentally (by children, for example).
10 Troubleshooting Before calling a service technician, please check the following table for a possible cause of the problem and some solutions. Problem Solution TV will not turn on • Make sure the power cord is plugged in, and then press POWER. • The remote control batteries may be dead. Replace the batteries or try the front panel buttons. • Press the RESET button on the TV front panel (page 9). Picture problems • Check the antenna/cable connections (pages 12–17).
Chapter 10: Troubleshooting Problem Solution Sound problems • Check the antenna/cable connections (see Chapter 2). • If the POP window is not open, the FIXED AUDIO OUT terminals will output the main audio signal, even if AUDIO OUT is set to POP in the AUDIO SETUP menu (page 79). • The station may have broadcast difficulties. Try another channel. • The sound may be muted. Press VOLUME. • If you hear no sound, try setting set the MTS feature to STEREO mode (page 76).
Chapter 10: Troubleshooting TV Guide On Screen FAQs The following are frequently asked questions about the TV Guide On Screen system. The answers represent the most likely solutions to the problem. Setup Questions 1. Q: What if I move and my ZIP code or postal code changes? A: Open the TV Guide On Screen SETUP menu and follow the on-screen prompts to enter new information (see page 37 for details). The TV Guide On Screen data will be updated within 6 to 10 hours. 2.
Chapter 10: Troubleshooting TV Guide On Screen FAQs (continued) 14. Q: Why won’t my VCR turn on? A: There are several possibilities: a) The wired remote VCR is incompatible. b) The VCR does not have remote power capability. The user must leave the VCR ON for recording. c) The VCR remote mode was set to “B” or “2.” The remote should be set to “A” or “1.” d) An incorrect or “no VCR” code was entered during the TV Guide On Screen initial setup.
Chapter 10: Troubleshooting TV Guide On Screen FAQs (continued) 9. Q: Can I move my favorite stations to the top of the TV Guide On Screen display screen? A: Yes. Use the “Change channel display” feature to make adjustments. Highlight the station call letters to be moved, then use the BLUE, GREEN, and/or Nuttons to reassign the position of the station. OPERATIONS 10. Q: My cable box will not change channels with the TV Guide On Screen system.
11 Appendix Specifications Design and specifications are subject to change without notice. Television System NTSC standard ATSC standard (8VSB) Digital Cable (64 QAM, 256 QAM; in-the-clear, un-encrypted) Video/Audio Terminals (cont.) AUDIO CENTER CHANNEL INPUT 300 mV(rms) (30% modulation equivalent, 10 k ohm) DVI/HDCP INPUT HDCP compliant E-EDID* 1.
Chapter 11: Appendix Limited United States Warranty for 27'' FST PURE® and All Larger Television Models Toshiba America Consumer Products, Inc. (“TACP”) and Toshiba Hawaii, Inc. (“THI”) make the following limited warranties to original consumers in the United States. THESE LIMITED WARRANTIES EXTEND TO THE ORIGINAL CONSUMER PURCHASER OR ANY PERSON RECEIVING THIS TELEVISION AS A GIFT FROM THE ORIGINAL CONSUMER PURCHASER AND TO NO OTHER PURCHASER OR TRANSFEREE. PRODUCTS PURCHASED IN THE U.S.A.
Chapter 11: Appendix Limited Canada Warranty for 27'' FST PURE® and All Larger Television Models Toshiba of Canada Limited (“TCL”) makes the following limited warranties to original consumers in Canada. THESE LIMITED WARRANTIES EXTEND TO THE ORIGINAL CONSUMER PURCHASER OR ANY PERSON RECEIVING THIS TELEVISION AS A GIFT FROM THE ORIGINAL CONSUMER PURCHASER AND TO NO OTHER PURCHASER OR TRANSFEREE. PRODUCTS PURCHASED IN THE U.S.A. AND USED IN CANADA ARE NOT COVERED BY THESE WARRANTIES.
Notes 96 Copyright © 2003 TOSHIBA CORPORATION. All rights reserved.
Notes Copyright © 2003 TOSHIBA CORPORATION. All rights reserved.
Index A EFGI ALS (Ambient Light Sensor) ................................................ 73 A/V receiver connection ........................................................ 20 ANT 1/2 ........................................................................................ 41 Antenna cables ......................................................................... 11 AUDIO OUT sound, selecting ............................................. 79 Audio system connection ..........................................
Index (continued) R T RECALL button ......................................................................... 83 Remote control: Battery installation .............................................................. 27 Device code table ............................................................... 32 Functional key chart ........................................................... 28 Learning about the buttons ............................................ 26 Operational feature reset ........................
HEAD OFFICE: 82 TOTOWA ROAD, WAYNE, NJ 07470, U.S.A. NATIONAL SERVICE DIVISION:1420-B TOSHIBA DRIVE, LEBANON, TN 37087, U.S.A. HEAD OFFICE: 327 KAMAKEE STREET, HONOLULU, HI 96814, U.S.A. – TEL: (808) 591-9281 HEAD OFFICE: 191 McNABB STREET, MARKHAM, ONTARIO, L3R 8H2, CANADA – TEL: (905) 470-5400 SERVICE CENTERS: TORONTO: 191 McNABB STREET, MARKHAM, ONTARIO L3R 8H2, CANADA – TEL: (905) 470- 5400 MONTREAL: 1643 NORTH SERVICE RD.