
user manual

– 109 –
EN-16 16
Super Digital Inverter
Optional Installation Parts
(Locally procured)
Refrigerant Piping Connection
CAUTION
TAKE NOTE OF THESE 4 IMPORTANT POINTS BELOW
FOR PIPING WORK
1.Keep dust and moisture away from inside the connecting
pipes.
2.Tightly connect the connection between pipes and the
unit.
3.Evacuate the air in the connecting
pipes using a
VACUUM PUMP.
4. Check for gas leaks at connection points.
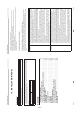
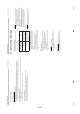
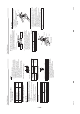
Piping connection
Flaring
1. Cut the pipe with a pipe cutter.
Be sure to remove burrs that may cause a gas leak.
2.Insert a flare nut into the pipe, and then flare the pipe.
Use the flare nuts supplied with the air
conditioner or
those for R410A.
Insert a flare nut into the pipe, and flare the pipe.
As the flaring sizes of R410A differ from those of
refrigerant R22, the flare tools newly manufactured for
R410A are recommended.
However, the conventional tools can be used by
adjusting the projection margin of the copper pipe.
Projection margin in flaring: B (Unit: mm)
Rigid (Clutch type)
Flaring diameter
size: A (Unit: mm)
* In case of flaring for R410A with the conventional flare
tool, pull the tool out approx. 0.5 mm more than that for
R22 to adjust it to the specified flare size.
The copper p
ipe gauge is useful for adjusting the
projection margin size.
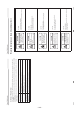
Parts nameQ’ty
A
Refrigerant piping
Liquid side: Ø9.5 mm
Gas side: Ø15.9 mm
One each
B
Pipe insulating material
(polyethylene foam, 10 mm thick)
1
C Putty,
PVC tape One each
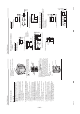
Liquid side
Outer diameter Thickness
Ø9.5 mm 0.8 mm
Gas side
Outer diameter Thickness
Ø15.9 mm 1.
0 mm
Outer diam. of
copper pipe
R410A tool used
Conventional tool
used
R410A
1.0 to 1.59.5
0 to 0.5
15.9
Outer diam. of copper pipeA
9.513.2
15.9 19.
7
B
A
+0
–0.4
17 17-E
N
Super Digital Inverter
T
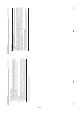
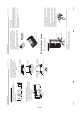
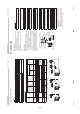
ightening of Connecting Part
1. Align the centers of the connecting pipes and fully tighten
the flare nut with your fingers. Then fix the nut with a
wrench as shown in the figure and tighten it with a torque
wrench.
2. As
shown in the figure, be sure to use two wrenches to
loosen or tighten the flare nut of the valve on the gas
side. If you use a single crescent, the flare nut cannot be
tightened to the required t
ightening torque.
On the other hand, use a single crescent to loosen or
tighten the flare nut of the valve on the liquid side.
(Unit: N•m)
CAUTION
1. Do not put the crescent wrench on the cap or cover.
The valve may break.
2.If applying excessive torque, the nut may break
according to some installation conditions.
•After the installation work, be sure to check for gas leaks
of the pipe connections with nitrogen.
• Pressure of R410A is higher than that of R22 (Approx.
1.6 times).
Therefore, using a torque wrench, tighten the flare
pipe
connecting sections that connect the indoor/outdoor units
at the specified tightening torque.
Incomplete connections may cause not only a gas leak,
but also trouble with the refrigeration cycle.
Outer dia. of copper pipeTightening torque
9.5 mm (diam.)33 to 42 (3.3 to 4.2 kgf•m)
15.9 mm (diam.)68 to 82 (6.8 to 8.2 kgf•
m)
Half union or packed valve Flare nut
Externally
threaded side
Internally threaded
side
Fix with wrench.Tighten with torque wrench.
Cover
Piping valve
Tightened
Flare nut
Cap
Loosened
Valve at gas side
Do not apply refrigerating machine oil to the flared
surface
.
NO GOOD
Cover
Cap