
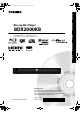
User's Manual


8EN
INTRODUCTION
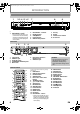
(*) The unit can also be turned on by pressing these buttons.
1. ON/STANDBY Q button
• Press to turn on the unit, or to
turn the unit into the standby
mode. (To completely turn off
the unit, you must unplug the
mains cable.)
2. ON/STANDBY Q indicator
3. PAUSE F button
4. STOP C button
5. PLAY B button*
6. OPEN/CLOSE A button*
7. Disc tray
8. Display
9. Infrared sensor window
10. SD card slot
1. LAN terminal
2. HDMI OUT jack
3. AUDIO OUT jacks
4. COMPONENT VIDEO OUT jacks
5. Mains cable
6. DIGITAL OUT (OPTICAL /
COAXIAL) jacks
7. VIDEO OUT jack
(*) The unit can also be turned on by pressing
these buttons.
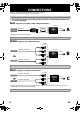
1. HDMI button
2. OPEN/CLOSE A button*
3. Number buttons
4. SEARCH button
5. Red / Green / Yellow / Blue
buttons
6. TOP MENU button
7. K / L / s / B buttons
8. SETUP button
9. REV E button
10. SKIP H button
11. PLAY B button*
12. MODE button
13. REPEAT button
14. PIP button
15. ON/STANDBY Q button
• Press to turn on the unit, or to
turn the unit into the standby
mode. (To completely turn off
the unit, you must unplug the
mains cable.)
16. ANGLE button
17. AUDIO button
18. SUBTITLE button
19. DISPLAY button
20. CLEAR button
21. POP MENU / MENU button
22. ENTER button
23. RETURN button
24. FWD D button
25. SKIP G button
26. STOP C button
27. PAUSE F button
28. A-B button
Functional Overview
Front Panel
ON/STANDBY
OPEN/CLOSE
PAUSE STOP PLAY
12
3
4 5* 7 8 96*
10
Rear Panel
P
R
/C
R
P
B
/C
B
YL
R
COMPONENT
VIDEO OUT
AUDIO
VIDEO
COAXIALOPTICAL
HDMI
OUT
LAN
DIGITAL OUT
PCM/ BITSTREAM
OUT
5
7
6
3
21
4
Caution
• Do not touch the inner pins of
the jacks on the rear panel.
Electrostatic discharge may
cause permanent damage to the
unit.
Remote Control
16
17
18
2*
3
19
21
23
24
26
25
27
28
6
4
5
8
9
12
13
10
11*
7
1
14
15
20
22
E5RJ0BD_EN.book Page 8 Tuesday, October 20, 2009 3:53 PM