CAMILEO® B10 Quick Start Guide English/Español
Introduction Introduction For more detailed information please refer to the User's Manual on the included CD. Safety instructions 1 Do not drop, puncture or disassemble the camcorder; otherwise the warranty will be voided. 2 Avoid all contact with water, and dry hands before using. 3 Do not expose the camcorder to high temperature or leave it in direct sunlight. Doing so may damage the camcorder. 4 Use the camcorder with care. Avoid pressing hard on the camcorder body.
Safety instructions 3 ❖ Never install or remove the battery without first turning off the power and disconnecting the USB cable or AC adaptor (AC adaptor sold separately). ❖ Only use the USB cable or AC adaptor (AC adaptor sold separately) to charge the battery. Never attempt to charge the battery with any other charger. Handling the cord on this product will expose you to lead, a chemical known to the State of California to cause birth defects or other reproductive harm. Wash hands after handling.
Safety instructions Additional Information © Copyright 2011 TOSHIBA CORPORATION. All rights reserved. TOSHIBA reserves the right to make technical changes. TOSHIBA assumes no liability for damages incurred directly or indirectly from errors, omissions or discrepancies between this product and the documentation. Trademarks CAMILEO is a registered trademark of Toshiba America Information Systems, Inc. and/or Toshiba Corporation.
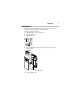
Getting Started Getting Started The battery comes pre-installed in the camcorder, however you must remove the protective film on the battery before use. To properly connect the battery: 1 Slide the battery cover up and remove. 2 Remove the battery. 3 Pull the film off. REMOVE 4 Reinsert the battery, making sure it is lined-up with the correct polarity marks. Li-ion battery 5 Close the battery cover.
Getting Started To insert the SD™ Card (optional): 1 Flip open the SD™ Card cover. 2 Insert the SD™ Card into the slot until it locks in place. 3 Once inserted, close the SD™ Card cover. To remove the SD™ Card, press inward to release it. When the card pops out, grasp it and pull it straight out. Charging the battery You must use the supplied USB cable or AC adaptor (AC adaptor sold separately) to charge your camcorder before use. Turn off the camcorder.
Quick Tour 7 Quick Tour 1 3 2 4 6 5 1 To power on Press and hold the Power (......) button for one second. To conserve battery power, the camcorder will turn off automatically after 3 minutes of non-operation. 4 To zoom in and out Press the Up/Down arrow (....) buttons. 5 To review videos/photos Press the Playback (....) button. 6 For menu options Press the MENU/OK (.......) button to access the options menu. MENU OK 2 To start or stop recording Press the Video (.......) button.
Quick Tour Front View LCD screen Video button Press to begin recording. To stop recording, press it again. Photo button Zoom in (Up)/Thumbnail button Press to take a photo. In Record mode: Zoom in. In Playback mode: Go to the video/photo thumbnail screen. When playing a video, press to increase volume. Menu/OK button Menu ON. Validate the setting. Left button Right button Move between option items. During playback: Go to previous video/photo. Move between option items.
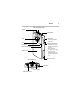
Quick Tour 9 Rear/Underside Views Speaker Power button Light Light button Press to toggle ON/OFF/ Digital light. Lens Internet upload button Microphone In Playback mode, press to select the current file to tag for upload. When the camera is connected to your computer, press to launch the CAMILEO® Uploader (for Windows® based systems only). Multi-indicator light Battery cover Mini HDMI™ port SD™ Card cover Strap hook Tripod socket Mini USB 2.
Quick Tour Menu options Video Settings The light turns ON, providing illumination when recording. Light OFF The light turns OFF. Extends the dynamic range for backlight and high Digital light contrast, so that objects are brighter and clearer. Full HD 1080/30 1920 x 1080p (30fps) HD 720/60 1280 x 720p (60fps) Resolution HD 720/30 1280 x 720p (30fps) VGA 480/30 640 x 480 (30fps) Enables digital image stabilization, providing ON smooth and stable recording.
Quick Tour 11 Photo Settings ON Light OFF Digital light Resolution Self-Timer Face Tracking Date Printing High-16MP Standard-5MP Low-3MP ON OFF ON OFF ON OFF Auto 800 ISO 1600 Slideshow 2 sec 5 sec 10 sec OFF The light turns ON, providing illumination when recording. The light turns OFF. Extends the dynamic range for backlight and high contrast, so that objects are brighter and clearer. 4608 x 3456 (16MP) 2592 x 1944 (5MP) 2048 x 1536 (3MP) Activates 10-second delayed self-timer.
Quick Tour Effects Scene Filter White Balance Auto Skin Night Backlight Auto Black & White Classic Negative Auto Daylight Fluorescent Tungsten Automatically adjusts to the current conditions. Adjusts skin tones to appear more natural. Use in low light conditions or at night. Use when the subject is brightly lit from behind. Automatically adjusts to the current conditions. The image is converted to black and white. The image is converted to sepia.
Plug and share 13 Plug and share Install the bundled software application, ArcSoft MediaImpression®, for optimal video playback on your computer. Connect the computer and camcorder with the supplied mini USB 2.0 cable as shown. Videos and photos recorded on your SD™ Card can be found on your computer at My Computer\SD\DCIM\100MEDIA (path will vary depending on name of SD™ Card). In this folder, you can view, delete, move, or copy the desired recorded movies and pictures.
Webcam mode Webcam mode Connect the camcorder to your computer with the supplied mini USB 2.0 cable. Press the Playback button to switch to Webcam mode. The Multi-indicator light glows blue. You can also implement live video conference meetings and multimedia communications. For additional information, refer to the User’s Manual. Toshiba Support If you require help or are having problems operating your product, you may need to contact Toshiba for additional technical assistance.
Toshiba Support Toshiba Phone Service Center for Latin America Specialized technical service in Spanish. Hours: Monday through Friday from 8:00 a.m. to 9:00 p.m.
CAMILEO® B10 Guía de inicio rápido
2 Introducción Introducción Para obtener información detallada consulte el Manual del usuario en el CD que se incluye. Instrucciones de seguridad 1 2 No deje caer la videocámara ni la perfore o desarme, de lo contrario se anula la garantía. Evite el contacto con el agua y séquese las manos antes de usar la videocámara. 3 No exponga la videocámara a temperaturas elevadas ni la deje en contacto directo con la luz del sol ya que la videocámara podría averiarse. 4 Use la videocámara con cuidado.
Instrucciones de seguridad ❖ ❖ ❖ 3 Cargue la batería solamente a temperatura ambiente entre 5 y 35 grados centígrados (41 y 95 grados Fahrenheit). De lo contrario, es posible que se fugue la solución electrolítica, que se deteriore el rendimiento de la batería y que se acorte su duración. Nunca instale o extraiga la batería sin antes apagar la alimentación y desconectar el cable USB o el adaptador de CA (adaptador de CA vendido por separado).
4 Instrucciones de seguridad Contacto Dirección: TOSHIBA America Information Systems, Inc. 9740 Irvine Boulevard Irvine, California 92618-1697 Teléfono: (949) 583-3000 Información adicional © Copyright 2011 TOSHIBA CORPORATION. Todos los derechos reservados. TOSHIBA se reserva el derecho de efectuar cambios técnicos. TOSHIBA no asume ninguna responsabilidad por daños directos o indirectos incurridos por errores, omisiones o discrepancias entre este producto y la documentación.
Para comenzar 5 Para comenzar La batería ya viene instalada en la videocámara, sin embargo, debe retirar la película protectora de la batería antes de usarla. Para conectar correctamente la batería: 1 Deslice la cubierta de la batería hacia arriba y retírela. 2 Saque la batería. 3 Retire la película. REMOVE 4 Inserte de nuevo la batería asegurándose de que quede alineada con las marcas de polaridad correctas. Batería de iones de litio 5 Cierre la cubierta de la batería.
6 Para comenzar Para insertar una tarjeta SD™ (opcional): 1 Abra la cubierta de la tarjeta SD™. 2 Inserte la tarjeta SD™ en la ranura hasta que encaje en su lugar. 3 Una vez insertada la tarjeta cierre la cubierta. Para extraer la tarjeta SD™, presiónela hacia adentro para liberarla. Cuando se asome la tarjeta, sujétela y extráigala. Cómo cargar la batería Para cargar la videocámara antes del uso debe utilizar el cable USB suministrado o un adaptador de CA (adaptador de CA vendido por separado).
7 Referencia rápida Referencia rápida 1 3 2 4 5 5 6 1 Para encender la videocámara 4 Para efectuar acercamientos Presione y mantenga presionado el botón y alejamientos de encendido (......) durante un segundo. Para conservar energía de la batería la videocámara se apaga automáticamente después de 3 minutos de inactividad. 2 Para iniciar o detener una grabación Presione el botón Video (.......). 3 Para tomar una fotografía Presione el botón Fotografía (......).
8 Referencia rápida Vista frontal Pantalla LCD Botón Video Presionar para iniciar la grabación. Para detener la grabación presione el botón de nuevo. Botón Fotografía Presionar para tomar una fotografía. Botón Menú/OK Menú ENCENDIDO. Validar la configuración. Botón Izquierda Moverse entre las distintas opciones. Durante la reproducción: Ir al video/fotografía anterior. Botón Reproducir Pasar al modo Reproducir.
Referencia rápida 9 Lados posterior/inferior Parlante Botón de encendido Luz Botón de la luz Presionar para alternar entre luz encendida/apagada/luz digital. Lente Botón para cargar a Internet Micrófono En el modo Reproducir, presionar para seleccionar y marcar el archivo corriente para cargarlo a Internet. Cuando la cámara está conectada a la computadora, presione este botón para ejecutar la aplicación CAMILEO® Uploader (solamente para sistemas basados en Windows®).
10 Referencia rápida Opciones del menú Configuración de video ENCENDIDA Luz APAGADA Luz digital Resolución Estabilización Detección de movimiento Full HD 1080/30 HD 720/60 HD 720/30 VGA 480/30 ACTIVADA DESACTIVADA ACTIVADA DESACTIVADA ACTIVADA Cámara lenta NOTA: DESACTIVADA Pregrabación Tiempo de espera Reproducción continua ACTIVADA DESACTIVADA DESACTIVADO 1 segundo 3 segundos 5 segundos ACTIVADA DESACTIVADA La luz se enciende, suministrando iluminación mientras se graba. La luz se apaga.
Referencia rápida 11 Configuración de las fotografías ENCENDIDA Luz APAGADA Luz digital Resolución Autotemporizador Alta-16MP Estándar-5MP Baja-3MP ACTIVADO DESACTIVADO Seguimiento de caras Impresión de fecha ACTIVADO DESACTIVADO ACTIVADA DESACTIVADA Auto 800 ISO 1600 2 segundos Presentación de 5 segundos diapositivas 10 segundos DESACTIVADA La luz se enciende suministrando iluminación mientras se graba. La luz se apaga.
12 Referencia rápida Efectos Escena Filtro Balance de blancos Auto Piel Noche Luz de fondo Auto Blanco y negro Clásica Negativo Auto Luz de día Fluorescente Tungsteno Se ajusta a las condiciones corrientes automáticamente. Hace que los tonos de la piel aparezcan más naturales. Utilizar en condiciones de baja iluminación o en la noche. Utilizar cuando hay una luz brillante detrás del sujeto. Se ajusta a las condiciones corrientes automáticamente. La imagen se convierte a blanco y negro.
Conectar y compartir 13 Conectar y compartir Para reproducir video en forma óptima en la computadora, instale el programa de software ArcSoft MediaImpression® incluido. Con el mini cable USB 2.0 que se suministra conecte la computadora y la videocámara, como se muestra a continuación. Los videos y fotografías registrados en la tarjeta SD™ se pueden encontrar en la computadora bajo “Mi PC\SD\DCIM\100MEDIA” (la ruta varía de acuerdo con el nombre de la tarjeta SD™).
14 Modo Cámara web Modo Cámara web Conecte la videocámara a la computadora utilizando el mini cable USB 2.0 que se suministra. Presione el botón Reproducir para pasar al modo de Cámara web. La luz multi indicadora se ilumina de color azul. En este modo usted puede efectuar videoconferencias en vivo y comunicaciones multimedia. Para obtener información adicional consulte el Manual del usuario.
Asistencia técnica de Toshiba 15 Contacto telefónico con Toshiba Si desea solicitar asistencia técnica, llame al Centro de asistencia al cliente de Toshiba: Al (888) 592-0944 dentro de Estados Unidos Al (949) 583-3305 desde fuera de Estados Unidos Centro de Asistencia Telefónica de Toshiba para servicio técnico en español para América Latina. Horas: De lunes a viernes de 8:00 a.m. a 9:00 p.m.
GMAA00309011 04/11