User’s Manual Camileo BW10 EN CZ DE DK ES FI FR GR HR HU IT NL NO PL PT RS RU SE SK SL TR AR
INTRODUCTION Welcome and thank you for choosing a TOSHIBA product. For your convenience, your TOSHIBA product is furnished with two guides: a) Quick Start Guide, and b) this comprehensive PDF User’s Manual. Please read these instructions carefully before using the camcorder. Keep this Manual in a safe place for later reference. Symbols used in this manual HINT CAUTION (page xx) EN Points giving some extended instructions or special points to pay attention to. Points that require special attention.
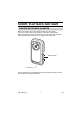
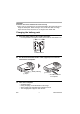
SHOOT, PLAY BACK AND SAVE BEFORE RECORDING IN WATER Make sure that the slot cover and the terminal cover are closed. If a cover is open, water will get inside the camcorder and damage it. When closing the slot cover and terminal cover, make sure that no foreign object such as sand, hair, dust, etc. is caught in the rubber seal. Terminal cover Slot cover There are places in the camcorder where water might accumulate, but this will not affect its waterproof properties.
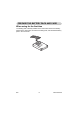
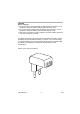
PREPARE THE BATTERY PACK AND CARD When using for the first time The battery pack is already installed in the camcorder. Remove the battery pack from the camcorder, remove the insulating seal, and reinstall the battery pack in the camcorder.
Installing the battery pack and card Install the card and the supplied battery pack. i The card is not an included accessory. Please purchase a commercially sold card. i The camcorder has an internal memory, which means that you can record and save the recorded data even if no card is installed. 1 While pressing...
CAUTION Close the slot cover and terminal cover securely i If any cover is not closed or is not closed completely, the camcorder will no longer be waterproof. When closing a cover, make sure that no foreign object such as sand, hair, dust, etc. is caught in the rubber seal. Charging the battery pack 1 Press the power button to turn off the camcorder. h It is not possible to charge the battery pack while the camcorder is on.
CAUTION During charging... i Do not turn on the camcorder while the battery pack is charging. It is not possible to charge the battery pack while the camcorder is on. i Do not turn off the computer while the battery pack is charging. It is not possible to charge the battery pack while the computer is off. i With certain computers, it may be possible to charge the battery pack even when the computer is turned off.
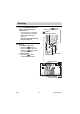
Shooting 1 2 Press the POWER button for at least 1 second to turn the camcorder on. h If the screen to set the date and time appears, press the MENU button 2 times to cancel it. For how to set the date and time, see page 16. [ ] button (Video recording button) [ ] button (Photo shooting button) Record. To record a video clip: h Press the [ ] button to begin recording a video clip. h Press the [ ] button again to end the recording. To take a photo: h Press the [ ] button. h A still image is captured.
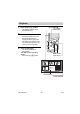
Playback 1 2 3 Press the play [=] button. h The display changes to the Playback Screen. [=] button (Play button) Select the image to play back. h Use the arrow keys to move the orange frame to the image you wish to play back. h The image information for the framed image is shown in the bottom part of the monitor. Press the OK button. h The file you selected is played back. h Press the play [=] button. OK button MENU button Arrow keys 2010.12.
Deleting files 1 On the screen in step 2, move the orange frame to the file you wish to delete, and press the MENU button. 2 Select “DELETE SINGLE”, and press the OK button. h If you press [G] or [H], the screen to delete a different file will appear. 3 When you are finished deleting files, press the MENU button. When you are finished using the camcorder... Press the POWER button for at least 1 second to turn the camcorder off.
Copy data from your camcorder to the computer Connect your camcorder to a computer, and copy the desired data to the computer. 1 Turn on the computer, and use the supplied dedicated USB interface cable to connect your camcorder to the computer. h Connect the cable between the camcorder’s USB terminal and the computer’s USB connector. Supplied dedicated USB interface cable To USB terminal To USB connector 2 Turn on the camcorder (page 13). h The USB Connection Screen appears on the camcorder’s monitor.
3 Select “COMPUTER”, and press the OK button. h The screen to select the computer connection mode appears. USB CONNECTION YouTube CARD READER MTP PC CAMERA CANCEL CANCEL OK 4 Select “CARD READER”, and press the OK button. 5 Copy data from your camcorder to a computer.
Dismounting the camcorder CAUTION i To disconnect your camcorder, be sure to follow the procedure below. Failure to follow this procedure may cause faulty operation of your computer or corrupt the files in your camcorder. 1 2 Left-click on the icon for safely removing hardware in the task tray. h A list appears showing the devices connected to the computer’s USB connector. Left-click on the camcorder drive (E:). h The camcorder can now be disconnected.
CONTENTS INTRODUCTION .................................................................................... i CHECKING THE INCLUDED ACCESSORIES ...................................... 3 SAFETY INSTRUCTIONS ..................................................................... 4 ABOUT THE CARD ............................................................................... 5 Media cards that can be used with this camcorder ......................... 5 What “card” means in this manual .............................
CONNECTING TO A TV CONNECTING TO A TV .......................................................................32 Connecting to the HDMI terminal ..................................................33 PLAYING BACK ON A TV ....................................................................34 APPENDICES FREQUENTLY ASKED QUESTIONS ..................................................35 OVERVIEW OF THE MENU SCREEN .................................................40 SPECIFICATIONS ................................
CHECKING THE INCLUDED ACCESSORIES i Software DVD + User’s Manual (DVD-ROM): 1 i Li-ion battery pack: 1 i Dedicated USB interface cable (page v, x, 9): 1 i Handstrap: 1 i Soft case: 1 i Quick Start Guide i Warranty Leaflet EN 3 User’s Manual
SAFETY INSTRUCTIONS 1. Do not drop, puncture or disassemble the camcorder; otherwise the warranty will be voided. 2. Do not expose the camcorder to high temperature or leave it in direct sunlight. Doing so may damage the camcorder. 3. Use the camcorder with care. Avoid pressing hard on the camcorder body. 4. For your own safety, avoid using the camcorder when there is a storm or lighting. 5. Do not use batteries of different specifications. Doing so may lead to the potential for serious damage. 6.
ABOUT THE CARD Media cards that can be used with this camcorder The type of card that can be inserted into and used with this camcorder is: i SD Memory Card i SDHC Memory Card i SDXC Memory Card What “card” means in this manual i In this manual, SD Memory Cards, SDHC Memory Cards and SDXC Memory Cards that can be used in this camcorder are referred to as “card”.
SETUP SETUP PARTS NAMES Front Microphone LED light SETUP Lens Speaker Terminal cover Slot cover User’s Manual 6 EN
Rear Multi-indicator Monitor OK button [ ] button (Video recording button) [ ] button (Photo shooting button) Arrow keys MENU button [ ] [=] button (Play button) POWER button EN 7 User’s Manual
Installing the battery pack and card Install the card and the supplied battery pack. i The card is not an included accessory. Please purchase a commercially sold card. i The camcorder has an internal memory, which means that you can record and save the recorded data even if no card is installed. 1 While pressing...
CAUTION Close the slot cover and terminal cover securely i If any cover is not closed or is not closed completely, the camcorder will no longer be waterproof. When closing a cover, make sure that no foreign object such as sand, hair, dust, etc. is caught in the rubber seal. Charging the battery pack 1 Press the power button to turn off the camcorder. h It is not possible to charge the battery pack while the camcorder is on.
CAUTION During charging... i Do not turn on the camcorder while the battery pack is charging. It is not possible to charge the battery pack while the camcorder is on. i Do not turn off the computer while the battery pack is charging. It is not possible to charge the battery pack while the computer is off. i With certain computers, it may be possible to charge the battery pack even when the computer is turned off.
CAUTION Do not charge the battery pack immediately after the camcorder has been in continuous use for a long time i The battery pack becomes hot when the camcorder is used continuously for a long time. If you attempt to charge the battery pack in this state, the multi-indicator may flash orange and it may not be possible to charge the battery pack. Wait until the battery pack has cooled down before attempting to charge it.
About recharging Recharging takes place only when the camcorder is turned off, or when the power save function or the sleep function has been activated. Recharging does not take place when the camcorder is in the recording mode or playback mode.
TURNING THE CAMCORDER ON AND OFF Turning on the camcorder 1 Press the POWER button for at least 1 second. h If you briefly press the POWER button, once, the camcorder will switch to the power save mode. h When the [I] arrow key is used to turn on the camera, the screen to set the operation sounds appears. POWER button Turning off the camcorder 1 Press the POWER button for at least 1 second. h The camcorder turns off.
Turning on the camcorder when the power save (sleep) mode is active In order to preserve battery pack power, the power save (sleep) function will automatically turn off the camcorder after about 1 minute of no use during shooting, or about 5 minutes of no use during playback (factory-preset setting). User’s Manual 14 EN SETUP i When the power save mode is active, you can restore the power by any of the following methods: h Press the POWER button.
HINT To immediately activate the power save mode i Press the POWER button briefly to activate the power save function. CAUTION If the K icon appears... i When a picture is taken, the date and time it was captured are recorded with it. If the date and time settings have not been completed (page 16), the date and time cannot be recorded with the captured images.
DATE AND TIME SETTING When the camcorder is first turned on after purchase, the Clock Set Screen appears. Proceed from step 4 to set the date and time. 1 2 4 5 6 Press the MENU button. h The Setting Menu appears. OK button SETUP 3 Press the power button to turn on the camcorder. Use the [I] and [J] arrow keys to select “CLOCK SET”, and press the OK button. h The Clock Set Screen appears. Set the date and time. h To select the desired setting: Press the [G] and [H] arrow keys.
HINT i Under normal conditions, while the battery pack is being replaced, an internal battery will maintain the date and time settings. However, there is a small chance the settings may be lost (the backup will last for about 7 days). It is recommended to check that the date and time settings are still correct after replacing the battery pack and before shooting or recording of any type (follow step 1). To correct the date and time settings 1 Turn on the camcorder. 2 Press the MENU button.
ACCESSING THE MENU SCREEN 1 2 Turn on the camcorder (page 13). MENU LED LIGHT FACE CHASER PHOTO VIEW CLOCK SET LANGUAGE TV OUTPUT OK User’s Manual SETUP Press the MENU button. h The Menu Screen appears. h To cancel the Menu Screen, press the MENU button.
3 Press [I] or [J] to select the item you wish to change, and press the OK button. h The Setting Screen for the selected item appears. h To return to the Menu Screen, press the MENU button.
SHOOTING SHOOTING VIDEO CLIP RECORDING 1 2 [ ] button (Video recording button) Press the [ ] button. h Recording begins. h It is not necessary to keep the [ ] button pressed while recording. h When the remaining recording time available for the currently recording clip becomes little, a countdown of the remaining recording time appears on the display. SHOOTING 3 Turn on the camcorder (page 13). End the recording. h Press the [ ] button again to stop recording.
HINT To change the video settings 1 With the Recording Screen displayed, press the [H] arrow key. h The screen to change the video settings appears. h To return to the Recording Screen without changing the settings, press the MENU button. VIDEO 1920x1080 30fps SHQ 2 Use the [G] and [H] keys to select a setting, and press the OK button. h The video settings are changed, and you are returned to the recording screen.
SHOOTING SINGLE SHOTS Capture a still image (single-shot). 1 2 Turn on the camcorder (page 13). [ ] button (Photo shooting button) SHOOTING Press the [ ] button. h The shutter releases and the image is captured. h You can view the captured image on the monitor by keeping the [ ] button depressed when you capture the image.
To change the photo settings 1 With the recording screen displayed, press the [G] arrow key. h The screen to change the photo settings appears. h To return to the recording screen without changing the settings, press the MENU button. PHOTO 2592x1944 2 Use the [G] and [H] keys to select a setting, and press the OK button. h The photo settings are changed, and you are returned to the recording screen.
User’s Manual 24 EN SHOOTING HINT If the camcorder shake icon > appears... i During still image shooting, if the shutter speed is slow and the possibility that the image may be blurred due to camcorder shake becomes high, the camcorder shake icon may appear on the monitor. In this case, use a tripod to stabilize the Camcorder shake icon camcorder when shooting. Does it seem to take a long time to save images? i When shooting in dimly lit conditions, it may take some time to save the data to the card.
SHOOT A STILL IMAGE WHILE RECORDING A VIDEO CLIP You can capture a still image (a single-shot) while recording a video clip. 1 2 3 4 Turn on the camcorder (page 13). Press the [ [ ] button ] button. When you see a scene you’d like to capture as a still image, press the [ ] button. Press the [ ] button to end the video clip recording.
About the recording size of still images i The size of a still image captured during video clip recording depends on the video clip recording size.
MACRO-PHOTOGRAPHY (ZOOM) 1 2 3 Point the camcorder lens at the subject. Press [I]/[J] Press [I] or [J]. [I]: Zoom in on the subject. [J]: Zoom out. h When the zoom switch is pushed, the zoom bar appears on the monitor. Take the picture. For video clip recording, see page 20. For shooting single shots, see page 22.
PLAYING BACK VIDEO CLIPS AND STILL IMAGES 1 2 [=] button (Play button) Select the image to play back. h Use the arrow keys to move the orange frame to the image you wish to play back. h The image information for the framed image is shown in the bottom part of the monitor. SHOOTING 3 Press the play [=] button. h The display changes to the Playback Screen. Press the OK button. h The file you selected is played back. h Press the play [=] button.
Deleting files 1 2 On the screen in step 2, move the orange frame to the file you wish to delete, and press the MENU button. Select “DELETE SINGLE”, and press the OK button. h If you press [G] or [H], the screen to delete a different file will appear. 3 EN When you are finished deleting files, press the MENU button.
Video clip playback operation To do this... Normal forward playback Stop playback Pause To play Forward back one playback image at a Reverse time (singleplayback frame step) During playback, press the OK button. After pausing playback, press [H]. After pausing playback, press [G]. Forward playback After pausing playback, press and hold [H]. Reverse playback After pausing playback, press and hold [G].
How to save one frame from a video clip as a still image 1 2 Play back the video clip. Pause the playback at the point you wish to “snap” a photo. Press the [ ] button. h The screen to select the aspect ratio of the still image appears. Select the desired aspect ratio, and press the [ ] button. Note, however, that if the video clip aspect ratio is 4:3, you cannot select 16:9.
CONNECTING TO A TV CONNECTING TO A TV CONNECTING TO A TV By connecting the camcorder to a TV, you can play back the recorded files on the TV. About image output: The image output destination differs depending on the camcorder status.
Connecting to the HDMI terminal Use a separately sold or commercially available mini-HDMI cable to connect to a TV.
PLAYING BACK ON A TV i After connecting the camcorder to the television, switch the TV input to the terminal to which the camcorder is connected. i The playback method is the same as when viewing images on the camcorder’s monitor. (Use the TV controls to adjust the volume.) i The same playback procedure as when playing back with the camcorder is used to play back audio recordings as well.
APPENDICES APPENDICES FREQUENTLY ASKED QUESTIONS If you have a question about the camcorder operation, you might find the answer in this compilation of frequently asked questions. Question Why doesn’t the power turn on? Why is the battery pack consumed so quickly even after it was fully recharged? Answer Due to cold temperatures, the battery pack temporarily lost its power. The ambient temperature is very low. The battery pack life has expired.
Question Are the settings retained even after the camcorder is turned off? Which resolution setting should I use? Answer — — Shooting User’s Manual Condition due to the monitor characteristics. 36 Select the resolution setting according to the intended use. f: Appropriate for printing letter-size or larger, and for printing a close-up of part of a photo (trimming). +: For printing standard photo (photo service) sizes. ,, [: For photos displayed on a web page, or sent as e-mail attachments.
Viewing images Question Why is the image too bright? Answer The subject was too bright. Why is there no image (z is shown)? This may happen when trying to play back images stored on a card from a different digital camcorder. If the subject moves or the camcorder is moved during recording, a distorted image may sometimes occur. Due to the characteristics of the camcorder, magnified images appear less clear.
Question Why is there a Viewing motor-like sound images during video clip playback? Why is there no Connecting sound? to a TV Printing A problem such as inability to record or play back occurs. User’s Manual Action Not a malfunction. There is no more available memory on the card or in the camcorder’s internal memory. Delete unnecessary files, or use a card that has more memory available. The lock switch on the card is in the locked (protect) position.
Question Can I use my camcorder abroad? Misc. EN Why does the “System error” message appear? Answer — A problem has occurred within the camcorder or card. 39 Action When the camcorder is connected to a TV, you can switch the camcorder’s video output to NTSC or PAL. If you have questions about accessories etc., please consult with a dealer near you for advice. Check the following items: 1 Remove the card and then install it again. 2 Remove the battery pack and then install it again.
OVERVIEW OF THE MENU SCREEN MENU LED LIGHT FACE CHASER PHOTO VIEW CLOCK SET LANGUAGE TV OUTPUT OK OK FORMAT 1 2 3 4 5 6 8 7 APPENDICES User’s Manual 40 EN
1 LED light setting /: The LED light operates regardless of the shooting conditions. .: The LED light is disabled regardless of the shooting conditions. 2 Face chaser -: Enable face chaser. .: Disable face chaser. 3 PHOTO VIEW h Switch the field of view. 4 CLOCK SET setting h Set the camcorder’s clock. 5 LANGUAGE setting h Select the language in which the monitor messages are displayed.
SPECIFICATIONS Camcorder Camileo BW10 5Mega Pixel CMOS Sensor Movie Record, Picture Record f=4.1mm;F2.8 Normal:30cm~infinite 10×Digital Electronic 2.0"LCD SD/SDHC/SDXC 2592 × 1944 5M 1920 × 1080 2M(16:9) Image Resolution 1280 × 720 0.9M(16:9) 640 × 480 0.3M 1920 × 1080p 30fps Movie Resolution 1280 × 720p 30fps 640 × 480p 30fps White Balance Auto Exposure Auto Light On/Off Picture:JPEG File-Format Movie:Mpeg-4 AVC/H.264 Image play Single Image/Slideshow PC interface USB 2.
Concerning the multi-indicator The camcorder’s multi-indicator will light, flash, or be off, depending on the different camcorder operations.
Others Mac OS is a trademark of Apple Inc., registered in the U.S. and other countries. Microsoft and Windows are registered trademarks of Microsoft Corporation in the USA and other countries. Intel and Pentium are registered trademarks of Intel Corporation (USA). In this manual, the Microsoft® Windows® 2000 operating system, Microsoft® Windows® XP operating system, Microsoft® Windows® Vista operating system, and Microsoft® Windows® 7 operating system are collectively referred to as “Windows”.
TOSHIBA SUPPORT Need help? For the latest driver updates, User’s Manuals & FAQs please have a look at the TOSHIBA options & services support page: computers.toshiba.eu/options-support Please see computers.toshiba.eu/options-warranty for the TOSHIBA hotline numbers.
REGULATORY INFORMATION CE compliance This product is CE marked in accordance with the requirements of the applicable EU Directives. Responsible for CE marking is Toshiba Europe GmbH, Hammfelddamm 8, 41460 Neuss, Germany. A copy of the official Declaration of Conformity can be obtained from following website: http://epps.toshiba-teg.com.
Additional environments not related to EMC Outdoor use: As a typical home/office equipment this product has no special resistance against ingress of moisture and is not strong shock proofed. Explosive atmosphere: The use of this product in such special working environment (Ex) is not allowed.
For more detailed information about the collection and recycling programmes available in your country, please visit our website (http:// eu.computers.toshiba-europe.com) or contact your local city office or the shop where you purchased the product. Disposal of batteries and/or accumulators The crossed out wheeled dust bin symbol indicates that batteries and/or accumulators must be collected and disposed of separately from household waste.
ADDITIONAL INFORMATION © 2010 TOSHIBA Europe GmbH. All rights reserved. TOSHIBA reserves the right to make technical changes. TOSHIBA assumes no liability for damages incurred directly or indirectly from errors, omissions or discrepancies between this product and the documentation.
BW10_UM__AB_V02_0910 For more information, please visit: www.toshiba-multimedia.