
User guide


10
EN
Section 2
Getting Started
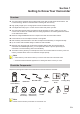
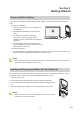
Charge the Built-in Battery
You must use the supplied mini USB cable or power adaptor to charge the battery as the following
steps:
• Use the mini USB cable:
1. Connect your camcorder to your computer with
mini USB cable.
2. Select [MASS STORAGE] on the camcorder
screen.
3. The blinking LED indicator conrms the
camcorder is currently charging, and the
indicator becomes constant after the charging is
completed.
4. The full charge time is approximately 5 hours.
(Actual charging time may vary. It depends on the
battery and PC conditions.)
• Use the power adaptor:
1. Use the supplied power adaptor (Rated at 5V, 2A) to connect to your device’s mini USB 2.0 port
and AC wall socket. Approximate charging time is up to 4 hours.
Note
• Neverchargethebatterybyamethodotherthanasinstructed.Doingsomaycauseareor
explosionpossiblyresultinginseriousinjury.
Inserting and Removing the Micro SD Card (Optional)
The camcorder comes with an internal memory which allows you to store photos and videos. You can
expand the memory capacity by using an optional Micro SD memory card.
1. Open the ports cover.
2. Insert the Micro SD card (Optional) into the slot until it locks properly.
3. To remove the Micro SD card, press inwards to release it and gently pull it
out.
4. Recommended memory capacity of SD card (Optional)--1GB or above.
Note
• Whenamemorycardistted,videos/photosaresavedonthecard
ratherthanonthebuilt-inmemory.