User’s Manual CAMILEO P10 DE IT DK NL ES NO FI PT FR SE
Introduction Welcome and thank you for choosing a TOSHIBA product. For your convenience, your TOSHIBA product is furnished with two guides: a) a Quick Start Guide, and b) this comprehensive PDF User’s Manual on the included CD.
Contents Section 1 Getting to Know Your Camcorder......................................... 4 Overview................................................................................. 4 Check the Components......................................................... 4 Safety Instructions................................................................. 5 System Requirements............................................................ 5 Front View and Side View......................................................
Contents Section 4 Playback Mode..................................................................... 19 Button Function.................................................................... 19 LCD Monitor Information..................................................... 20 Operations for Playback Mode . ......................................... 21 Movie Playback..................................................................... 21 Movie Playback Mode Menu................................................
Contents Section 12 Other Information............................................................... 41 TOSHIBA Support............................................................... 41 Operating Environment Conditions.................................. 41 Regulatory Information...................................................... 41 Additional Information.......................................................
Section 1 Getting to Know Your Camcorder Overview The camcorder with 5 Mega Pixel sensor can take H.264 movies. By way of using H.264 technology, more videos can be taken within certain amount of memory. High quality images with up to 8 mega-pixels can also be delivered smoothly. With a color LCD monitor, users can compose images and examine them easily. The camcorder also features movie recording at HD resolution of 1440x1080.
Safety Instructions 1. Do not drop, puncture or disassemble the camcorder; otherwise the warranty will be voided. 2. Avoid all contact with water, and dry hands before using. 3. Do not expose the camcorder to high temperature or leave it in direct sunlight. Doing so may damage the camcorder. 4. Use the camcorder with care. Avoid pressing hard on the camcorder body. 5. For your own safety, avoid using the camcorder when there is a storm or lightning. 6. Do not use batteries of different specifications.
Front View and Side View Macro Switch Microphone Speaker LCD Panel Lens Flash Light Self-timer LED Power Button Battery/SD card Cover Rear View LED Menu/OK Button Direction Button Movie Shutter Button Picture Shutter Button Tele Button OK Button Wide Button RECORD/PLAY Button TV Port HDMI Port Mini USB 2.
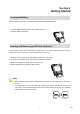
Section 2 Getting Started Loading the Battery Before using the camcorder, users must load Lithium-ion rechargeable battery. 1. Insert the battery following to the correct polarity marks ( + or -). 2. Close the battery cover firmly. Inserting and Removing an SD Card (Optional) The camcorder comes with internal memory which allows you to store pictures and movies. You can expand the memory capacity by using an optional SD memory card. 1. Insert the memory card into the right position.
Turning the Camcorder On and Getting Started • To turn on the camcorder: 1.Flip out the LCD panel; the camcorder will turn on automatically. 2.Or press Power Button for one second to turn on it. • To take a movie, press the Movie Shutter Button ( • To take a picture, press the Picture Shutter Button ( ). ). • To view stored movies and pictures, press RECORD/PLAY Button ( ) once to switch to Playback Mode. Press a second time to return to Record Mode.
Section 3 Record Mode Button Function Direction Button: Right Button: Flash Auto/Red Eye/OFF Left Button: Self timer ON/OFF Up Button: LCD Information ON/OFF Down Button: HD(1080p)/VGA mode switch Menu/OK Button: Menu ON Tele Button : Digital Zoom In Wide Button : Digital Zoom out OK Button: Menu ON/Validate the setting Power Button: Press down for one second to turn on or turn off the camcorder RECORD/PLAY Button functions: 1. Switch between Record /Playback Mode 2. Return to the previous page 3.
LCD Monitor Information The indicator shown below may display on LCD when movies and pictures are recorded: Movie Resolution HD (1080p) (30fps) HD (720p) (30fps) WVGA (60fps) VGA (30fps) (1) QVGA (30fps) Picture Resolution High Standard Low Number of images that can still be taken at current resolution (2) Recording time of movie that can still be taken at current resolution Auto Flash (3) Red Eye Reduction Flash Off 10 EN
(4) Self-timer enabled Scene Skin (5) Night Backlight (6) Macro Position Focusing +1.0EV +0.6EV +0.3EV (7) 0EV Exposure compensation value -0.3EV -0.6EV -1.
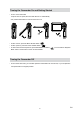
Video Quality HD (1080p) (30fps) HD (720p) (30fps) WVGA (60fps) VGA (30fps) QVGA (30fps) Picture Recording • Press the Picture Shutter Button ( ) to take a picture. • Press RECORD/PLAY Button to view the picture. • Three resolution settings are available: Image Quality High Quality:8 Mega Pixels Standard Quality:5 Mega Pixels Low Quality:3 Mega Pixels Taking Close up Pictures • Slide the macro switch to change the focus range for different distances of objects • To take close-up pictures: 1.
Options for Record Menu Movie Mode Picture Mode Effect • Resolution • Resolution • Scene • Stabilization • Flash • Exposure • Self-timer • WB(White Balance) Operations for Record Mode Operation Display Screen 1. Press Menu/OK Button when in Record Mode. 2. Use Right/Left Buttons to move between main menu options, which are Movie Mode, Picture Mode, and Effect. 3. Press Down Button to enter the folder of main option you select. 4.
Movie Mode Submenu Setting Operation Display Screen 1. In Record Mode, press Menu/OK Button to enter record menu screen. 2. Use Right/Left Buttons to select Movie Mode. 3. The Movie Mode submenu contains 2 options, Resolution and Stabilization, for you to adjust the camcorder setting. Movie Resolution Operation Display Screen 1. In Movie Mode submenu, press Down button to enter Resolution. 2. Use Right/Left Buttons to move between five settings. 3. Press OK Button to validate the setting.
Picture Mode Submenu Setting Operation Display Screen 1. In Record Mode, press Menu/OK Button to enter record menu screen. 2. Use Right/Left Buttons to select Picture Mode. 3. The Picture Mode submenu contains 3 options, Resolution, Flash, and Self timer, for you to adjust the camcorder setting. Picture Resolution Operation Display Screen 1. In Picture Mode submenu, press Down button to enter Resolution. 2. Use Right/Left Buttons to move between three settings. 3.
Flash (Picture Mode Only) This camcorder has three flash settings. To change flash setting by either hot key (Right Button) or Option Setting. • Auto ( ): The flash fires automatically according to light conditions. Use this mode for general photography. • Red Eye ( ): The pre-flash will fire to reduce the red-eye effect. • Off ( ): The flash will not fire under any circumstances.
Effect Submenu Setting Operation Display Screen 1. In Record Mode, press Menu/OK Button to enter record menu screen. 2. Use Right/Left Buttons to select Effect. 3. The Effect submenu contains 3 options, Scene, Exposure, and WB, for you to adjust the camera setting. Scene You can select the mode according to the scene condition. • Auto: Shoot without any special effect on the image.
Exposure The camcorder adjusts image exposure automatically. In certain circumstances you may wish to adjust the exposure compensation setting. Operation Display Screen 1. In Effect submenu, press UP/Down button to select Exposure. 2. Use Right/Left Buttons to choose preferred EV(Exposure Value). The change can be previewed immediately. 3. Press OK Button to validate the setting. WB (White Balance) The camcorder adjusts the color balance of images automatically.
Section 4 Playback Mode Button Function The Buttons have the following functions in Movie and Picture Playback Modes. Direction Button: Right Button: Go to the next movie/picture. Fast forward Left Button: Go to the previous movie/picture. Fast rewind Up Button: Volume increase/Information ON/OFF Down Button: Volume decrease Menu/OK Button: Enter to movie or picture option menu. Tele Button : Zoom in. Wide Button : Zoom out OK Button: Validate the setting. RECORD/PLAY Button functions: 1.
LCD Monitor Information Indicators on the LCD screen while in Playback Mode: HD (1080p) (30fps) HD (720p) (30fps) WVGA (60fps) (1) VGA (30fps) QVGA (30fps) High Standard Low (2) Movie playback time counter (3) Indicate the selected movie/picture is locked. (4) Current Number/ Total number of movie or picture. (5) Volume (6) Indicate the screen is in movie playback mode:Play/Pause (7) Magnification Indicator.
Operations for Playback Mode The Playback Mode is for viewing and managing movies and pictures on the built-in memory or on an SD card. Operation Display Screen ) to switch 1. Press RECORD/PLAY Button ( from Record Mode to Playback Mode Main Menu.There are 2 options in the Playback Mode, Movie and Picture. 2. Press Direction Button to select the specific option. 3. Press Menu/OK Button to enter Movie/ Picture thumbnail preview folder. 4.
Movie Playback Mode Menu Operation Display Screen 1. In Movie Playback Mode, press Menu/OK Button to enter Movie Playback menu screen. 2. .Use Up/Down Buttons to select four options, Delete, Lock, Repeat One, and Repeat All. Delete Movies Operation Display Screen 1. Use Up/Down Buttons to select the Delete option . 2. Press Menu/OK Button to go to the Delete menu. 3. Use Right/Left Buttons to select the movie. 4. Use Up Button to delete all movies or Down Button to delete single movie.
Lock Movies Single or all movies can be locked. This function can prevent the movies from being deleted accidentally. Operation Display Screen 1. Use Up/Down Buttons to select the Lock option. 2. Press Menu/OK Button to go to the Lock menu. 3. Use Right/Left Buttons to select the movie. 4. Use Up Button to lock/unlock all movies or Down Button to lock/unlock single movie. 5. Press RECORD/PLAY Button to exit. Repeat Movies This function automatically repeats playing single movie or all movies in order.
Picture Playback Operation Display Screen 1. In Picture thumbnail preview folder, use direction buttons to locate the picture you want to view. 2. Press OK button to view the picture. 3. Use Right/Left Buttons to go to the next or last picture. 4. While the picture is selected, use Tele Button to magnify. 5. Use Direction Buttons to navigate the magnified picture. Press OK Button to exit navigation mode.
Picture Playback Mode Menu Operation Display Screen 1. In Picture Playback Mode, press Menu/OK Button to enter Picture Playback menu screen. 2. Use Up/Down Buttons to select three options, Delete, Lock, and Slideshow. Delete Picture Operation Display Screen 1. Use Down Buttons to select the Delete option. 2. Press Menu/OK Button to go to the Delete menu. 3. Use Right/Left Buttons to select the picture. 4. Use Up Button to delete all pictures or Down Button to delete single picture.
Lock Pictures Single or all pictures can be locked. This function can prevent the pictures from being deleted accidentally. Operation Display Screen 1. Use Up/Down Buttons to select the Lock option. 2. Press Menu/OK Button to go to the Lock menu. 3. Use Right/Left Buttons to select the picture. 4. Use Up Button to lock/unlock all pictures or Down Button to lock/unlock single picture. 5. Press RECORD/PLAY Button to exit. Make Slide Show This function automatically repeats all pictures in order.
Section 5 Setting Your Camcorder Setting Menu Operation Display Screen 1. In Record Mode, press Menu/OK Button to enter record menu screen. 2. Use Right/Left Buttons to select Setting. 3. The Setting submenu contains 7 options for configuring your camcorder set up. They are Sound (operation sound),Information,Time Setting,Format,TV,Language,and Default Setting. Sound Enable or disable KeyPad tone and operation sound. Operation Display Screen 1. In setting submenu, press Down button to enter Sound. 2.
Time Setting Operation Display Screen 1. In setting submenu, press UP/Down Button to select Time Setting. 2. Press Menu/OK Button to go to the Time Setting menu. 3. Move between date and time by using Up/Down Buttons. Adjust date and time by using Left/Right Buttons. 4. Press OK Button to validate the setting. Or Press RECORD/PLAY button to leave Time Setting without any change.
TV Ensure that the appropriate TV standard of your area is selected – either NTSC or PAL. Wrong TV system setting may cause image flicker. NTSC standard: USA, Canada, Japan, South Korea and Taiwan etc. PAL standard: UK, Europe, China, Australia, Singapore and Hong Kong etc. Operation Display Screen 1. In setting submenu, press Up/Down Button to select TV. 2. Use Right/Left Buttons to choose NTSC(60Hz) or PAL(50Hz). 3. Press OK Button to validate the setting.
Default Setting To restore the default factory setting, select this option. Operation Display Screen 1. In setting submenu, press Up/Down Button to select Default Setting. 2. Press Menu/OK Button to go to the Default Setting confirmation screen. 3. Use Right/Left Buttons to choose Yes or No. 4. Choosing “Yes” will execute the operation, “No” will cancel the operation. 5. Press OK Button to validate the setting.
Section 6 Viewing Pictures and Movies on a TV Connecting to a High-Definition 16:9 (Wide) TV 1. Connect one end of the HDMI cable to your camcorder’s HDMI Out port. 2. Connect the other end of the cable to a television. 3. Set video input source of a TV to “ HDMI” option. 4. The steps for viewing stored pictures and movie on a TV are exactly the same as for viewing them on the LCD monitor. ( 16 : 9 ) Note The camcorder can not run movie recording and picture taking when it is connected to an HDTV.
Section 7 Viewing Pictures and Movies on PC Installing Bundled Software The CD-ROM supplied with this camcorder contains 2 pieces of software. • ArcSoft MediaImpression is a user-friendly application that helps you managing your media, burning your video into DVD, and uploading your videos to YouTube easily. • Adobe Reader is a popular program that you need to have installed to read the User’s Manual. Many computer users will find they already have this software installed on their computer.
Section 8 Burning the Recorded Clip into DVD Bundled software CD contains ArcSoft MediaImpression features burning the movie clip into DVD. You can share this DVD movie with family and friends by using regular DVD player. To create a DVD: 1. Install ArcSoft MediaImpression (Refer to Section 7) 2. Click Windows [ Start ] g[ (All) Programs ] g[ ArcSoft MediaImpression ] 3. ArcSoft MediaImpression main screen will appear on your desktop. 4. Click [ Make Movie ] .
5. The operation screen will appear: • Select the folder that contains the video files you want to burn. • Select the files • Click button to add the files into slide • Click [Burn to Disc] 1 2 3 4 6. Click [ Start ] to start DVD burning.
Section 9 Uploading Video Files to YouTube Bundled software CD contains ArcSoft MediaImpression features uploading the recorded videos to YouTube. It will help you to share them with your family and friends on YouTube website. To upload video files to YouTube: 1. Install ArcSoft MediaImpression (Refer to Section 7) 2. Click Windows [Start] g [ (All) Programs ] g[ ArcSoft MediaImpression ] 3. ArcSoft MediaImpression main screen will appear on your desktop. 4. Click [ Video] Option.
5. Select the video file you want to upload and click [ Upload to YouTube] option at the bottom menu. 6. If this is your first using of this function, please follow the instruction on YouTube Setting Panel.
7. Go to http://www.youtube.com/login, then log onto your YouTube account. (If you do not have YouTube account, sign up here first.) 8. After you log onto your YouTube account, Click [ Get Authorization ] button below.
Then, Click [Allow] Button shown on YouTube website. 9. Click [Save] Button to upload the video.
Section 10 Specifications Specifications Image Sensor 5 Mega Pixel CMOS Sensor Operation Modes Movie Record, Picture Record Lens F3.2 (f = 7.2mm) Focus Range 200cm~infinite (Normal Mode) 90cm~200CM (Portrait Mode) Center: 20 cm (Macro Mode) Digital Zoom 1080p:2X Other video resolution:4X Shutter Electronic LCD monitor 2.
Section 11 Troubleshooting Troubleshooting 1.If the LCD image is not clear when shooting, how can the focus be adjusted? Try to switch between Macro,Portrait Mode, and Normal Mode.(Macro Mode: For object in distance about 20cm, Portrait Mode: For object in distance of 90cm~200cm. Normal Mode: For object in distance beyond 200cm) 2.The flash is not working. The camcorder is in Macro Mode. The battery power is low. 3.The files on the memory card do not display smoothly when the LCD shows the “!” marking.
Section 12 Other Information TOSHIBA Support Need help? For the latest driver updates, user’s manuals & FAQ’s, please have a look at the TOSHIBA options & services support page: computers.toshiba.eu/options-support Please see computers.toshiba.eu/options-warranty for the TOSHIBA hotline numbers.
administration. This product is not certified as a medical product according to the Medical Product Directive 93/42 EEC. Automotive environment: Please search the owner instructions of the related vehicle for advices regarding the use of this product (category). Aviation environment: Please follow the instructions of the flight personnel regarding restrictions of use.
Additional Information © 2008 TOSHIBA Europe GmbH. All rights reserved. TOSHIBA reserves the right to make technical changes. TOSHIBA assumes no liability for damages incurred directly or indirectly from errors, omissions or discrepancies between this product and the documentation.
0970A8328L-A02F 44 73 For further options & services see: computers.toshiba-europe.